This article comes in 3 parts
- Calling a Secured SOAP Service from ASP.NET Core WebAPI (WSDL+ WCF)
- Securing a SOAP Client with OAuth2 in ASP.NET Core (WCF Behaviors) (This page)
- Integrating and Testing a Secured SOAP Client with Dependency Injection
You can find the companion code for this blog at GVerelst/ShiftLeftStore.
Introduction
In the previous article, we built a working SOAP client using WSDL‑generated code. Now it’s time to secure it.
Many enterprise SOAP services require OAuth2 (Client Credentials Flow). To support this in WCF, we’ll add a message inspector and attach it via an endpoint behavior. Before diving into the implementation details, let’s clarify who this guide is intended for and what readers can expect to gain.
Audience
This guide is for .NET developers and software architects who need to integrate SOAP services into modern ASP.NET Core WebAPI projects, especially when bridging legacy systems with REST interfaces. Readers should be comfortable with C#, dependency injection, and basic HTTP concepts — no prior WCF experience required.
Typical use cases: integrating ERP SOAP endpoints, wrapping legacy partner APIs, or exposing mainframe SOAP services through REST.
Let’s immediately dive in.
Adding an authentication header to all the SOAP requests
The demo service allows non-authorized calls, but in most cases, we have to authenticate in some way. In this case we want to add an Authorization header to each request. The header will contain a bearer token that we need to retrieve and possibly renew.
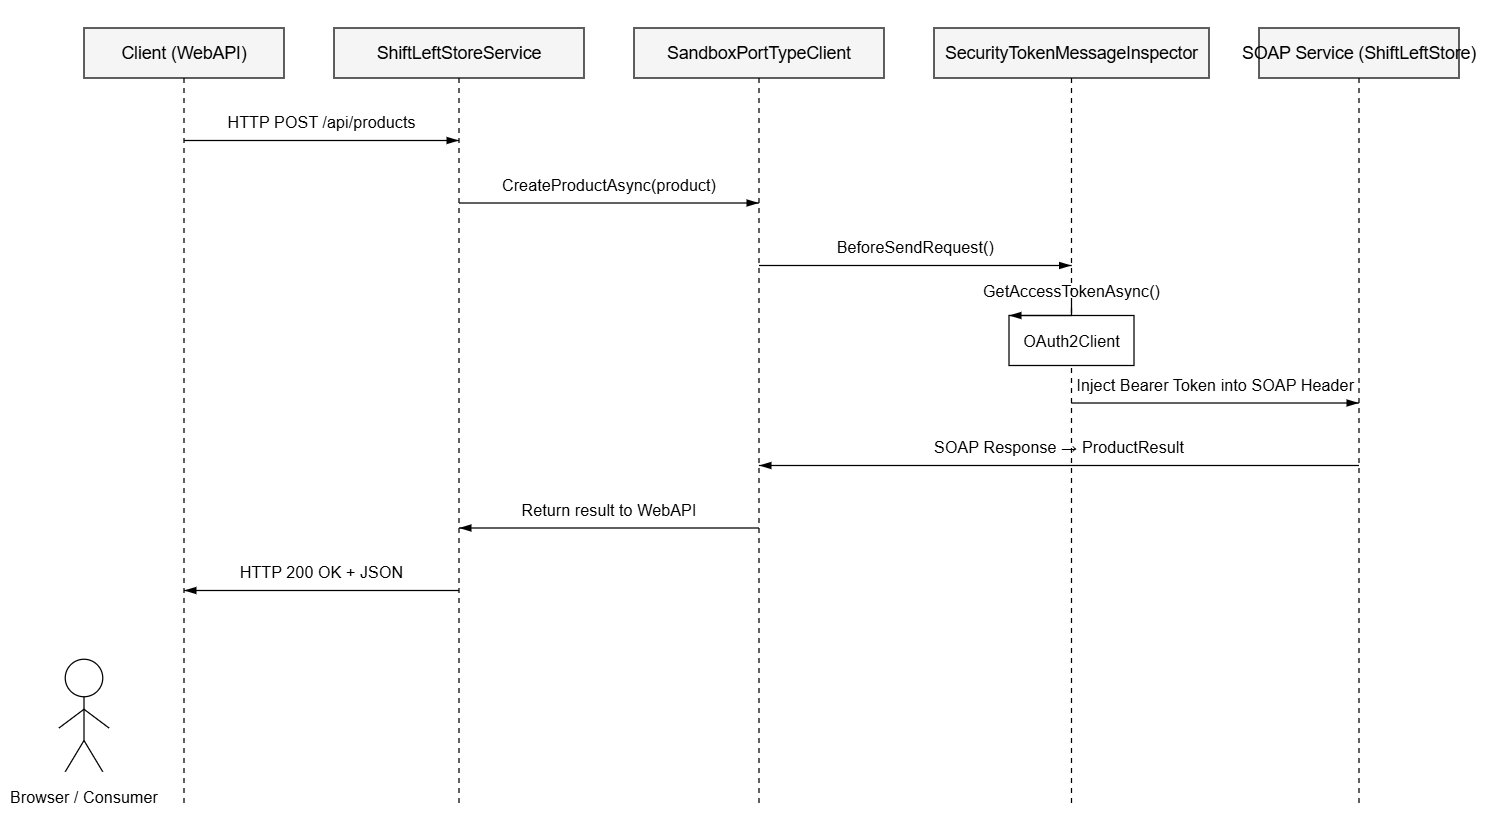
Time to introduce IClientMessageInspector. This is a small interface that allows inspecting and modifying a request before sending it, or to modify a reply after it was received. For our authentication purpose it allows to add the Authorization header to every call. For the user of the library this is completely transparent.
namespace System.ServiceModel.Dispatcher{ public interface IClientMessageInspector { void AfterReceiveReply(ref Message reply, object correlationState); object BeforeSendRequest(ref Message request, IClientChannel channel); }}
In the MessageInspector we want to retrieve a JWT token and pass it in the Authorization header. If we create another class for the authentication this can be reused. The demo service works fine with an empty Bearer. To keep the focus on SOAP /WCF we use a stub that always returns an empty string.
Please bear in mind that
- Real OAuth2 flows require token caching, expiry handling, and error handling.
- Calling the token endpoint for every SOAP request is inefficient.
public class OAuth2Client : IOAuth2Client{ private readonly ShiftLeftSettings _settings; // Stored for future real OAuth2 implementation. public OAuth2Client(ShiftLeftSettings settings) { _settings = settings; } // Todo: actual implementation to obtain the token using _settings and OAuth2 flow. public async Task<string> GetJwtTokenAsync() => await Task.FromResult(string.Empty);}
We implement the IClientMessageInspector interface in the SecurityTokenMessageInspector class. The constructor receives an IOAuthClient to obtain the bearer token and sets the Authorization header before sending the request to the SOAP service.
⚠️ Authentication is stubbed here
public class SecurityTokenMessageInspector(IOAuth2Client _oAuth2Client) : IClientMessageInspector{ private const string AuthZHeader = "Authorization"; public object? BeforeSendRequest(ref Message request, IClientChannel channel) { string token = _oAuth2Client.GetJwtTokenAsync().GetAwaiter().GetResult(); string bearer = $"Bearer {token}"; if (request.Properties.TryGetValue(HttpRequestMessageProperty.Name, out object? httpRequestMessageObject) && httpRequestMessageObject is HttpRequestMessageProperty httpRequestMessage) { // Only add if not already present if (string.IsNullOrEmpty(httpRequestMessage.Headers[AuthZHeader])) { httpRequestMessage.Headers[AuthZHeader] = bearer; } } else { httpRequestMessage = new HttpRequestMessageProperty(); httpRequestMessage.Headers.Add(AuthZHeader, bearer); request.Properties.Add(HttpRequestMessageProperty.Name, httpRequestMessage); } return null; } public void AfterReceiveReply(ref Message reply, object correlationState) { }}
The WCF message inspector is not async aware, so on line 7 we use _oAuth2Client.GetJwtTokenAsync().GetAwaiter().GetResult(). This is technically correct for WCF behaviors (they are synchronous), no need to worry about deadlocks here. Do not use this pattern outside WCF behaviors; it can cause deadlocks in ASP.NET Core request pipelines.
As expected, this class does nothing before it is wired to the endpoint. For this we will create an IEndpointBehavior implementation that will add the message inspector to endpoint. We only need the ApplyClientBehavior( ) method.
public class SecurityTokenEndpointBehavior : IEndpointBehavior{ private readonly IClientMessageInspector _clientMessageInspector; /// <summary> /// Initializes a new instance of the <see cref="SecurityTokenEndpointBehavior"/> class. /// </summary> /// <param name="clientMessageInspector">The client message inspector to be added to the endpoint.</param> public SecurityTokenEndpointBehavior(IClientMessageInspector clientMessageInspector) { _clientMessageInspector = clientMessageInspector; } /// <summary> /// Implements a modification or extension of the binding parameters for the endpoint. /// </summary> /// <param name="endpoint">The endpoint to modify.</param> /// <param name="bindingParameters">The binding parameters to be modified or extended.</param> public void AddBindingParameters(ServiceEndpoint endpoint, BindingParameterCollection bindingParameters) { } /// <summary> /// Implements the modification or extension of the client runtime across an endpoint. /// Adds the client message inspector to the endpoint's message inspectors collection. /// </summary> /// <param name="endpoint">The endpoint to be customized.</param> /// <param name="clientRuntime">The client runtime to be customized.</param> public void ApplyClientBehavior(ServiceEndpoint endpoint, ClientRuntime clientRuntime) { clientRuntime.ClientMessageInspectors.Add(_clientMessageInspector); } /// <summary> /// Implements a modification or extension of the service dispatcher across an endpoint. /// </summary> /// <param name="endpoint">The endpoint that exposes the contract.</param> /// <param name="endpointDispatcher">The endpoint dispatcher to be modified or extended.</param> public void ApplyDispatchBehavior(ServiceEndpoint endpoint, EndpointDispatcher endpointDispatcher) { } /// <summary> /// Implements validation to confirm that the endpoint meets the requirements for this behavior. /// </summary> /// <param name="endpoint">The endpoint to validate.</param> public void Validate(ServiceEndpoint endpoint) { }}
Now that the behavior is defined, we need a convenient way to attach it to the generated WCF client. Let’s add an extra constructor to the SandboxPortTypeClient. In this constructor we will add the SecurityTokenEndpointBehavior to the service’s EndpointBehaviors. That simplifies instantiating a new service.
The generated SandboxPortTypeClient is a partial class. Partial classes allow extending generated (WSDL) code without modifying auto-generated files. I created a separate source file to add this constructor. When the code is regenerated this code will not be touched.
/// <summary>/// Initializes a new instance of the <see cref="SandboxPortTypeClient"/> class./// </summary>/// <param name="endpointBehavior">The endpoint behavior to be added to the service endpoint.</param>/// <param name="options">The IMS settings containing the Agreement Service URI configuration.</param>public SandboxPortTypeClient(IEndpointBehavior endpointBehavior, IOptions<ShiftLeftSettings> options) : this(_binding, new EndpointAddress(options.Value.ServiceURI)){ Endpoint.EndpointBehaviors.Add(endpointBehavior);}
With the behavior now attached, we can start dependency injection.
    public class ShiftLeftStoreService : IShiftLeftStoreService
    {
        private readonly SandboxPortType _portType;

        public ShiftLeftStoreService(SandboxPortType sandboxPort)
        {
            _portType = sandboxPort;
        }

        public async Task<Product> CreateProductAsync(Product product)
        {
            CreateProductResponse response = await _portType.CreateProductAsync(product.ToCreateProductRequest());
            return new Product(response.product);
        }

        public async Task<bool> DeleteProductAsync(string productId)
        {
            DeleteProductRequest request = new DeleteProductRequest
            {
                id = productId
            };
            DeleteProductResponse response = await _portType.DeleteProductAsync(request);
            return response.success;
        }

        public async Task<Product> GetProductAsync(string productId)
        {
            GetProductRequest request = new GetProductRequest
            {
                id = productId
            };
            GetProductResponse response = await _portType.GetProductAsync(request);
            return new Product(response.product);
        }

        public async Task<List<Product>> GetProductsAsync(int page = 1, int limit = 10)
        {
            GetProductsRequest request = new GetProductsRequest
            {
                page = page,
                limit = limit
            };
            GetProductsResponse response = await _portType.GetProductsAsync(request);
            return response.products.Select(p => new Product(p)).ToList();
        }

        public async Task<Product> UpdateProductAsync(Product product)
        {
            UpdateProductResponse response = await _portType.UpdateProductAsync(product.ToUpdateProductRequest());
            return new Product(response.product);
        }

    }
In the next part of this series, we will see how to set up dependency injection (DI) to make the service and the WCF infrastructure easy to use.
Conclusion
Calling a secured SOAP service from ASP.NET Core doesn’t have to be painful. With a proper setup we achieved:
- No more manual SOAP envelope manipulation
- Centralized authentication
- Testable, mockable service layer
- Clean separation between REST and SOAP models
References
Options pattern – .NET | Microsoft Learn
How to: Inspect or Modify Messages on the Client – WCF | Microsoft Learn


Pingback: Integrating and Testing a Secured SOAP Client with Dependency Injection | MSDev.pro blog