Integrating and Testing a Secured SOAP Client with Dependency Injection

This article comes in 3 parts

  1. Calling a Secured SOAP Service from ASP.NET Core WebAPI (WSDL+ WCF)
  2. Securing a SOAP Client with OAuth2 in ASP.NET Core (WCF Behaviors)
  3. Integrating and Testing a Secured SOAP Client with Dependency Injection (This page)

You can find the companion code for this blog at GVerelst/ShiftLeftStore.

Introduction

In the previous articles, we built a working SOAP client using WSDL‑generated code and secure it using OAuth2.

Now that authentication works, we need to integrate the client into ASP.NET Core in a clean, testable way.

Audience

This guide is for .NET developers and software architects who need to integrate SOAP services into modern ASP.NET Core WebAPI projects, especially when bridging legacy systems with REST interfaces. Readers should be comfortable with C#, dependency injection, and basic HTTP concepts — no prior WCF experience required. Here are some possible scenarios:

  • Integrating ERP SOAP endpoints into modern REST APIs
  • Wrapping legacy partner systems behind WebAPI
  • Replacing brittle XML‑manipulation code with WCF behaviors

Refactoring the code (dependency injection)

We now have working code, but there is a lot of setup to do to make it work. Here are the steps;

  1. First obtain the ShiftLeftSettings from a configuration. The settings must come from a secure configuration store (config file, secrets.json, Azure key vault, …).
  2. Use the settings in the OAuth2Client constructor
  3. Use the OAuth2Client in the SecurityTokenMessageInspector constructor
  4. Use the SecurityTokenMessageInspector in the SecurityTokenEndpointBehavior constructor
  5. Finally create the SecurityTokenEndpointBehavior

This screams for dependency injection! The goal is that users of the service inject the service in the class constructor (or in the methods) and just use it without bothering about all the dependencies and how exactly to use it.

Here are some reasons to choose for DI when working with WCF clients:

  • WCF clients have complex dependency chains
  • OAuth2 token retrieval must be centralized
  • Inspectors and behaviors must be reused safely
  • Configuration must be testable

Setting up the IoC container

To hide the complexity for the users of the service, the setup should be easy:

builder.Services.AddSoapServices();

We will create an extension method on the IServiceCollection interface :

C#
public static class IServiceCollectionExtensions
{
public static void AddSoapServices(this IServiceCollection services, ShiftLeftSettings settings)
{
// TODO: register services
}
}


Configuring the settings using the IOptions<T> pattern

Avoid injecting ShiftLeftSettings directly — always use IOptions<T> or IOptionsMonitor<T> to ensure proper lifetime management. It will also make your code easy to test. Using the IOptions patterns allows to write tests that don’t depend on actual config files.

It requires a small change in the classes that use the ShiftLeftSettings. They can now receive a parameter of type IOptions<ShiftLeftSettings>. Using its Value property, we can get access to the actual settings.

We start with the ShiftLeftSettings class that will hold the retrieved settings from the configuration store. If you want to change the configuration store, all you need to do is to register the right configuration provider. The rest of the code will remain the same.

ShiftLeftSettings.cs
C#
namespace ShiftLeftStore.Soap.Services
{
public class ShiftLeftSettings
{
public required string TokenEndpoint { get; set; }
public required string ClientId { get; set; }
public required string ClientSecret { get; set; }
public required string Scope { get; set; }
public required string ServiceURI { get; set; }
}
}


And here is the config file. Normally this file should NOT go into your source code control system for everybody to read.

Remember that there are more secure ways of storing settings, such as Azure Key Vault.

appsettings.json
JSON
{
"Logging": {
"LogLevel": {
"Default": "Information",
"Microsoft.AspNetCore": "Warning"
}
},
"AllowedHosts": "*",
"ShiftLeft": {
"TokenEndpoint": "https://api.shiftleft.io/oauth/token",
"ClientId": "your-client-id",
"ClientSecret": "your-client-secret",
"Scope": "openid",
"ServiceURI": "https://demo.totalshiftleft.ai/soap"
}
}


Our AddSoapServices function already has one line now:

IServiceCollectionExtensions.cs
C#
public static void AddSoapServices(this IServiceCollection services, IConfiguration configuration)
{
services.Configure<ShiftLeftSettings>(configuration.GetSection("ShiftLeft"));
// ...
}


and the constructor in OAuth2Client changes slightly:

OAuth2Client.cs
C#
public class OAuth2Client : IOAuth2Client
{
private readonly ShiftLeftSettings _settings; // not used in this dummy implementation.
public OAuth2Client(IOptions<ShiftLeftSettings> options)
{
_settings = options.Value;
}
// Todo: actual implementation to obtain the token using _settings and OAuth2 flow.
public async Task<string> GetJwtTokenAsync() => await Task.FromResult(string.Empty);
}

The constructor now receives IOptions<ShiftLeftSettings> parameter. We assign its Value property to _settings for later use.

Registering the other services in the IoC container now is easy:

IServiceCollectionExtensions.cs
C#
public static void AddSoapServices(this IServiceCollection services, IConfiguration configuration)
{
services.Configure<ShiftLeftSettings>(configuration.GetSection("ShiftLeft"));
services.AddSingleton<IOAuth2Client, OAuth2Client>();
services.AddSingleton<IClientMessageInspector, SecurityTokenMessageInspector>();
services.AddSingleton<IEndpointBehavior, SecurityTokenEndpointBehavior>();
services.AddScoped<SandboxPortType, SandboxPortTypeClient>();
services.AddScoped<IShiftLeftStoreService, ShiftLeftStoreService>();
}


Line 4 tells the framework how to instantiate an IOAuth2Client object. The config has been defined on line 3, and is automatically injected when IOAuth2Client is injected.

Line 5 tells how to create a IClientMessageInspector. This class takes an IAuth2Client parameter in its constructor. All the dependencies are clear through the constructors so the IoC container knows exactly how to build the whole object tree.

Etcetera …

Notice the lifetime for the registered services:

ServiceLifetimeWhy
OAuth2ClientSingletonStateless, config‑based
MessageInspectorSingletonNo per‑request state
EndpointBehaviorSingletonPure configuration
WCF ClientScopedNot thread‑safe
StoreServiceScopedDepends on scoped WCF client

Remark: Don’t register the actual WCF client as a singleton. WCF clients maintain internal channel state; sharing them across threads leads to channel faults and disposed objects.
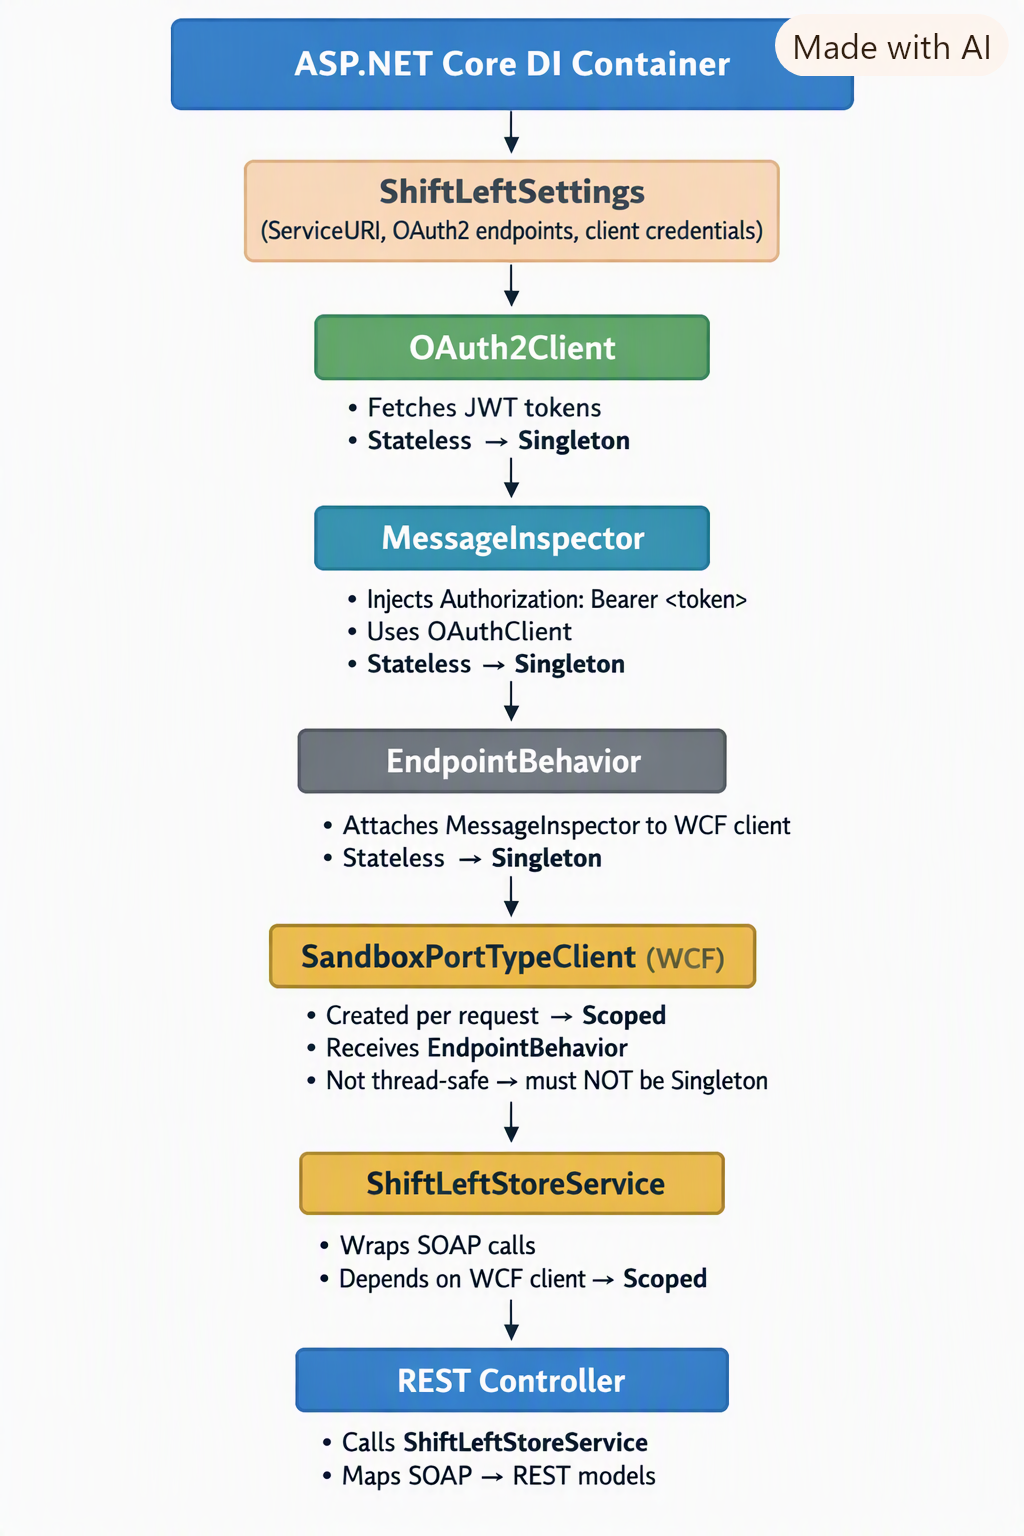
Flowchart illustrating the ASP.NET Core Dependency Injection (DI) Container, featuring components like OAuth2Client, MessageInspector, EndpointBehavior, SandboxPortTypeClient, ShiftLeftStoreService, and REST Controller, with annotations on their scopes and singleton statuses.

Testing the AddSoapServices method (unit test)

Testing the DI is not dependent on any external services and should be performed in a new unittest project. Use the same steps as before to create an XUnit project and call it ShiftLeftStore.Soap.Unittests.

I split unit tests and integration tests so that in the CI/CD pipeline I can run all the tests in the *.Unittests project and skip the tests in the *.Integrationtests project. Integration tests (by nature) depend on external resources that often are not accessible from the build server, so it is good practice to separate them and only execute the unit tests in the build pipeline.

IServiceCollectionExtensionsTests.cs
C#
public class IServiceCollectionExtensionsTests
{
[Fact]
public void AddSoapServices_RegistersExpectedServicesAndOptions()
{
// Arrange
var inMemory = new Dictionary<string, string>
{
["ShiftLeft:ClientId"] = "cid",
["ShiftLeft:ClientSecret"] = "secret",
["ShiftLeft:TokenEndpoint"] = "https://token",
["ShiftLeft:ServiceURI"] = "https://demo.totalshiftleft.ai/soap"
};
var configuration = new ConfigurationBuilder()
.AddInMemoryCollection(inMemory)
.Build();
var services = new ServiceCollection();
// Act
services.AddSoapServices(configuration);
using var provider = services.BuildServiceProvider();
// Assert: options configured
var options = provider.GetService<IOptions<ShiftLeftSettings>>();
Assert.NotNull(options);
Assert.Equal("cid", options.Value.ClientId);
// Assert: services registered
Assert.NotNull(provider.GetService<IOAuth2Client>());
Assert.NotNull(provider.GetService<IClientMessageInspector>());
Assert.NotNull(provider.GetService<IEndpointBehavior>());
Assert.NotNull(provider.GetService<SandboxPortType>());
Assert.NotNull(provider.GetService<IShiftLeftStoreService>());
}
}


Notice that we use an in-memory collection for the configuration. This doesn’t require any change in the rest of the code.

Testing the CreateProduct method again is left as an exercise for the reader. You can find the working code in my github repository.

The unit tests are not complete. We should add more cases, test for more edge cases, add negative tests. But that is not the scope of this article.

Adding the other methods for the ShiftLeftStoreService is easy now. The implementation is also in the reference project.

Now we can go back to the Web API and implement the Products controller. With all the work that we have done this will be easy.

Registering the ShiftLeftStoreService

Open Program.cs in the ShiftLeftStore project and add this:

Program.cs
C#
using ShiftLeftStore.Soap.Extensions;
var builder = WebApplication.CreateBuilder(args);
// Add services to the container.
builder.Services.AddControllers();
builder.Services.AddEndpointsApiExplorer();
builder.Services.AddSwaggerGen();
builder.Services.AddSoapServices(builder.Configuration);
var app = builder.Build();


Line 1 imports the namespace and line 8 registers the necessary services to use the ShiftLeftService. To use it we only need to use constructor or method injection and adapt the config file to include the ShiftLeft settings.

AppSettings.json
JSON
{
"Logging": {
"LogLevel": {
"Default": "Information",
"Microsoft.AspNetCore": "Warning"
}
},
"AllowedHosts": "*",
"ShiftLeft": {
"TokenEndpoint": "https://api.shiftleft.io/oauth/token",
"ClientId": "your-client-id",
"ClientSecret": "your-client-secret",
"Scope": "openid",
"ServiceURI": "https://demo.totalshiftleft.ai/soap"
}
}


Adding the Products controller to the ShiftLeftStore project

The ProductController will work with its own Product model class. We could be lazy in this case and use the Product class from the Soap project, but experience teaches me that later you’ll need a separate class to interface with your REST API anyway. Adding one more class and some conversions is not a lot of work and may save us work and frustrations in the future.

Product.cs
C#
using SLS = ShiftLeftStore.Soap.Models;
namespace ShiftLeftStore.Models
{
public record struct Product(string Name, decimal Price, string Description,
int Stock, string Category, string Id
)
{
internal Product(SLS.Product product)
: this(product.Name, product.Price, product.Description, product.Stock, product.Category, product.Id)
{ }
internal SLS.Product ToSLSProduct()
=> new SLS.Product(Name, Price, Description, Stock, Category, Id);
}
}

Add a new ProductController to the ShiftLeftStore project:
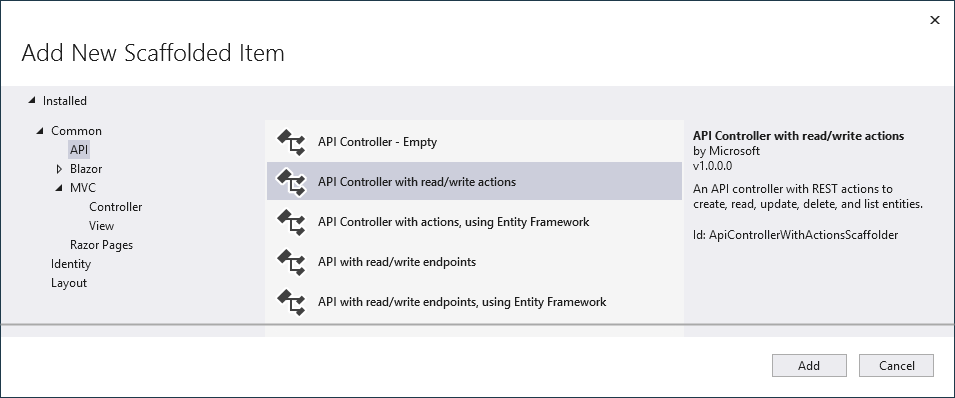
Screenshot of the 'Add New Scaffolded Item' dialog in a development environment, showcasing options for adding API controllers with various functionalities.

Add the IShiftLeftStoreService interface to the constructor and use it to handle the products, and use the injected service to implement the REST endpoints:

ProductsController.cs
C#
using Microsoft.AspNetCore.Mvc;
using ShiftLeftStore.Models;
using ShiftLeftStore.Soap.Services;
namespace ShiftLeftStore.Controllers
{
[Route("api/[controller]")]
[ApiController]
public class ProductsController(IShiftLeftStoreService _service) : ControllerBase
{
[HttpGet]
public async Task<IEnumerable<Product>> GetAsync()
=> (await _service.GetProductsAsync()).Select(p => new Product(p));
[HttpGet("{id}")]
public async Task<Product> GetAsync(string id)
=> new Product(await _service.GetProductAsync(id));
[HttpPost]
public async Task<Product> PostAsync([FromBody] Product newProduct)
{
var prod = await _service.CreateProductAsync(newProduct.ToSLSProduct());
return new Product(prod);
}
[HttpPut("{id}")]
public async Task<Product> PutAsync(string id, [FromBody] Product newProduct)
{
var prod = await _service.UpdateProductAsync(newProduct.ToSLSProduct());
return new Product(prod);
}
[HttpDelete("{id}")]
public async Task DeleteAsync(string id)
=> await _service.DeleteProductAsync(id);
}
}

In line 9 the IShiftLeftStoreService is injected, making it available in all the methods. The implementation of the methods now is trivial.

Conclusion

Calling a secured SOAP service from ASP.NET Core doesn’t have to be painful. With a proper setup we gained:

  • Centralized authentication
  • Fully testable DI setup
  • Clean separation between SOAP and REST
  • No more manual XML manipulation
  • A maintainable architecture ready for production

References

Options pattern – .NET | Microsoft Learn

Key Vault | Microsoft Azure

How to: Inspect or Modify Messages on the Client – WCF | Microsoft Learn
Posted in .Net, API Development, Architecture, ASP.NET Core, Design Patterns, Development, SOAP, WCF, Web API | Tagged , , , , , , , | Leave a comment

Securing a SOAP Client with OAuth2 in ASP.NET Core (WCF Behaviors)

This article comes in 3 parts

  1. Calling a Secured SOAP Service from ASP.NET Core WebAPI (WSDL+ WCF)
  2. Securing a SOAP Client with OAuth2 in ASP.NET Core (WCF Behaviors) (This page)
  3. Integrating and Testing a Secured SOAP Client with Dependency Injection

You can find the companion code for this blog at GVerelst/ShiftLeftStore.

Introduction

In the previous article, we built a working SOAP client using WSDL‑generated code. Now it’s time to secure it.

Many enterprise SOAP services require OAuth2 (Client Credentials Flow). To support this in WCF, we’ll add a message inspector and attach it via an endpoint behavior. Before diving into the implementation details, let’s clarify who this guide is intended for and what readers can expect to gain.

Audience

This guide is for .NET developers and software architects who need to integrate SOAP services into modern ASP.NET Core WebAPI projects, especially when bridging legacy systems with REST interfaces. Readers should be comfortable with C#, dependency injection, and basic HTTP concepts — no prior WCF experience required.

Typical use cases: integrating ERP SOAP endpoints, wrapping legacy partner APIs, or exposing mainframe SOAP services through REST.

Let’s immediately dive in.

Adding an authentication header to all the SOAP requests

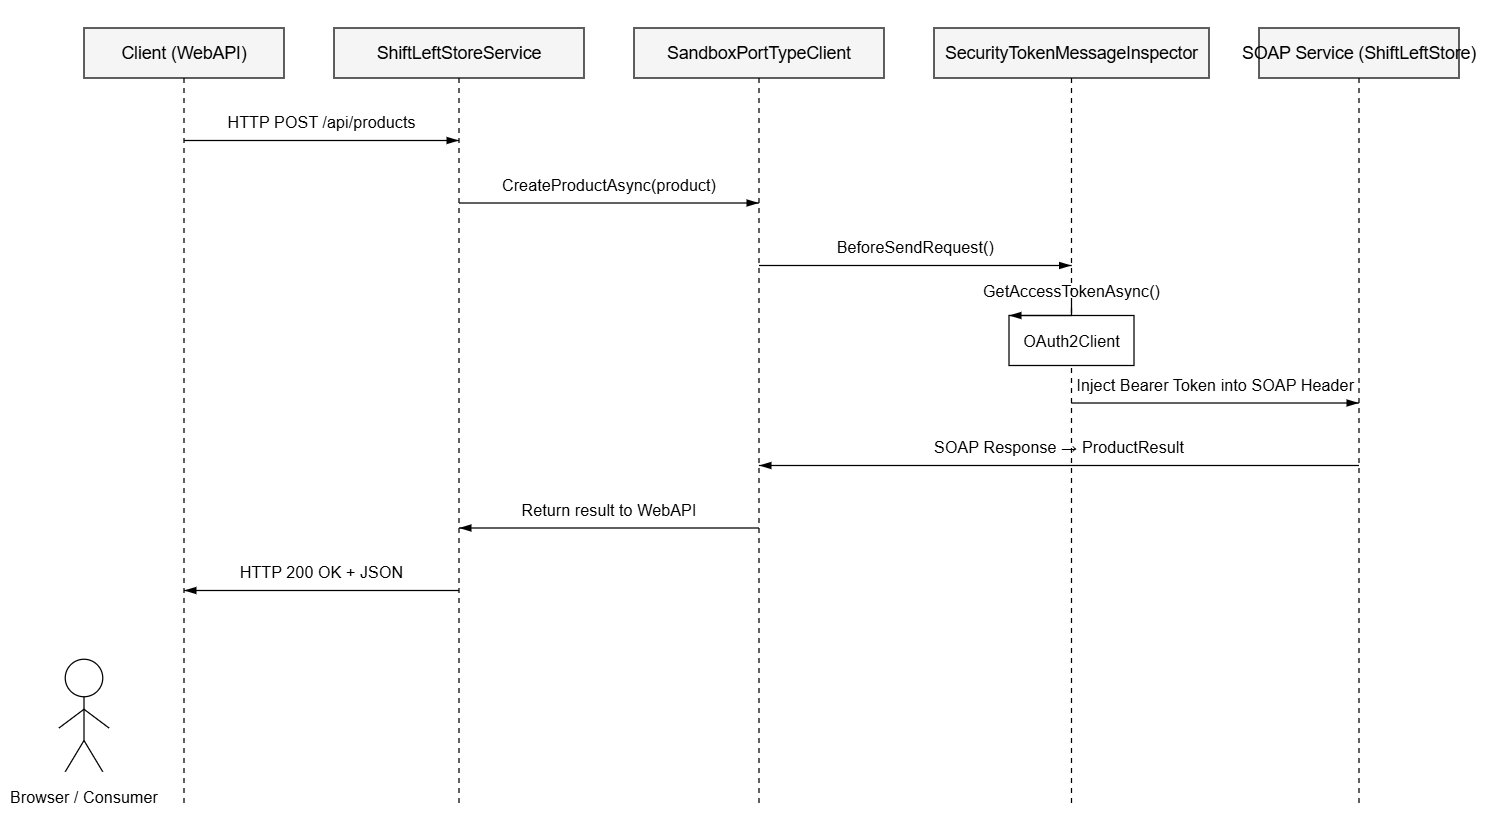
The demo service allows non-authorized calls, but in most cases, we have to authenticate in some way. In this case we want to add an Authorization header to each request. The header will contain a bearer token that we need to retrieve and possibly renew.

Sequence diagram for authentication

Time to introduce IClientMessageInspector. This is a small interface that allows inspecting and modifying a request before sending it, or to modify a reply after it was received. For our authentication purpose it allows to add the Authorization header to every call. For the user of the library this is completely transparent.

IClientMessageInspector.cs
C#
namespace System.ServiceModel.Dispatcher
{
public interface IClientMessageInspector
{
void AfterReceiveReply(ref Message reply, object correlationState);
object BeforeSendRequest(ref Message request, IClientChannel channel);
}
}


In the MessageInspector we want to retrieve a JWT token and pass it in the Authorization header. If we create another class for the authentication this can be reused. The demo service works fine with an empty Bearer. To keep the focus on SOAP /WCF we use a stub that always returns an empty string.

Please bear in mind that

  • Real OAuth2 flows require token caching, expiry handling, and error handling.
  • Calling the token endpoint for every SOAP request is inefficient.

OAuth2Client.cs
C#
public class OAuth2Client : IOAuth2Client
{
private readonly ShiftLeftSettings _settings; // Stored for future real OAuth2 implementation.
public OAuth2Client(ShiftLeftSettings settings)
{
_settings = settings;
}
// Todo: actual implementation to obtain the token using _settings and OAuth2 flow.
public async Task<string> GetJwtTokenAsync() => await Task.FromResult(string.Empty);
}


We implement the IClientMessageInspector interface in the SecurityTokenMessageInspector class. The constructor receives an IOAuthClient to obtain the bearer token and sets the Authorization header before sending the request to the SOAP service.

⚠️ Authentication is stubbed here

SecurityTokenMessageInspector.cs
C#
public class SecurityTokenMessageInspector(IOAuth2Client _oAuth2Client) : IClientMessageInspector
{
private const string AuthZHeader = "Authorization";
public object? BeforeSendRequest(ref Message request, IClientChannel channel)
{
string token = _oAuth2Client.GetJwtTokenAsync().GetAwaiter().GetResult();
string bearer = $"Bearer {token}";
if (request.Properties.TryGetValue(HttpRequestMessageProperty.Name, out object? httpRequestMessageObject)
&& httpRequestMessageObject is HttpRequestMessageProperty httpRequestMessage)
{
// Only add if not already present
if (string.IsNullOrEmpty(httpRequestMessage.Headers[AuthZHeader]))
{
httpRequestMessage.Headers[AuthZHeader] = bearer;
}
}
else
{
httpRequestMessage = new HttpRequestMessageProperty();
httpRequestMessage.Headers.Add(AuthZHeader, bearer);
request.Properties.Add(HttpRequestMessageProperty.Name, httpRequestMessage);
}
return null;
}
public void AfterReceiveReply(ref Message reply, object correlationState)
{ }
}


The WCF message inspector is not async aware, so on line 7 we use _oAuth2Client.GetJwtTokenAsync().GetAwaiter().GetResult(). This is technically correct for WCF behaviors (they are synchronous), no need to worry about deadlocks here. Do not use this pattern outside WCF behaviors; it can cause deadlocks in ASP.NET Core request pipelines.

As expected, this class does nothing before it is wired to the endpoint. For this we will create an IEndpointBehavior implementation that will add the message inspector to endpoint. We only need the ApplyClientBehavior( ) method.

SecurityTokenEndpointBehavior.cs
Plain text
public class SecurityTokenEndpointBehavior : IEndpointBehavior
{
private readonly IClientMessageInspector _clientMessageInspector;
/// <summary>
/// Initializes a new instance of the <see cref="SecurityTokenEndpointBehavior"/> class.
/// </summary>
/// <param name="clientMessageInspector">The client message inspector to be added to the endpoint.</param>
public SecurityTokenEndpointBehavior(IClientMessageInspector clientMessageInspector)
{
_clientMessageInspector = clientMessageInspector;
}
/// <summary>
/// Implements a modification or extension of the binding parameters for the endpoint.
/// </summary>
/// <param name="endpoint">The endpoint to modify.</param>
/// <param name="bindingParameters">The binding parameters to be modified or extended.</param>
public void AddBindingParameters(ServiceEndpoint endpoint, BindingParameterCollection bindingParameters)
{ }
/// <summary>
/// Implements the modification or extension of the client runtime across an endpoint.
/// Adds the client message inspector to the endpoint's message inspectors collection.
/// </summary>
/// <param name="endpoint">The endpoint to be customized.</param>
/// <param name="clientRuntime">The client runtime to be customized.</param>
public void ApplyClientBehavior(ServiceEndpoint endpoint, ClientRuntime clientRuntime)
{
clientRuntime.ClientMessageInspectors.Add(_clientMessageInspector);
}
/// <summary>
/// Implements a modification or extension of the service dispatcher across an endpoint.
/// </summary>
/// <param name="endpoint">The endpoint that exposes the contract.</param>
/// <param name="endpointDispatcher">The endpoint dispatcher to be modified or extended.</param>
public void ApplyDispatchBehavior(ServiceEndpoint endpoint, EndpointDispatcher endpointDispatcher)
{ }
/// <summary>
/// Implements validation to confirm that the endpoint meets the requirements for this behavior.
/// </summary>
/// <param name="endpoint">The endpoint to validate.</param>
public void Validate(ServiceEndpoint endpoint)
{ }
}


Now that the behavior is defined, we need a convenient way to attach it to the generated WCF client. Let’s add an extra constructor to the SandboxPortTypeClient. In this constructor we will add the SecurityTokenEndpointBehavior to the service’s EndpointBehaviors. That simplifies instantiating a new service.

The generated SandboxPortTypeClient is a partial class. Partial classes allow extending generated (WSDL) code without modifying auto-generated files. I created a separate source file to add this constructor. When the code is regenerated this code will not be touched.

SandboxPortTypeClient.cs
C#
/// <summary>
/// Initializes a new instance of the <see cref="SandboxPortTypeClient"/> class.
/// </summary>
/// <param name="endpointBehavior">The endpoint behavior to be added to the service endpoint.</param>
/// <param name="options">The IMS settings containing the Agreement Service URI configuration.</param>
public SandboxPortTypeClient(IEndpointBehavior endpointBehavior, IOptions<ShiftLeftSettings> options)
: this(_binding, new EndpointAddress(options.Value.ServiceURI))
{
Endpoint.EndpointBehaviors.Add(endpointBehavior);
}


With the behavior now attached, we can start dependency injection.

    public class ShiftLeftStoreService : IShiftLeftStoreService
    {
        private readonly SandboxPortType _portType;

        public ShiftLeftStoreService(SandboxPortType sandboxPort)
        {
            _portType = sandboxPort;
        }

        public async Task<Product> CreateProductAsync(Product product)
        {
            CreateProductResponse response = await _portType.CreateProductAsync(product.ToCreateProductRequest());
            return new Product(response.product);
        }

        public async Task<bool> DeleteProductAsync(string productId)
        {
            DeleteProductRequest request = new DeleteProductRequest
            {
                id = productId
            };
            DeleteProductResponse response = await _portType.DeleteProductAsync(request);
            return response.success;
        }

        public async Task<Product> GetProductAsync(string productId)
        {
            GetProductRequest request = new GetProductRequest
            {
                id = productId
            };
            GetProductResponse response = await _portType.GetProductAsync(request);
            return new Product(response.product);
        }

        public async Task<List<Product>> GetProductsAsync(int page = 1, int limit = 10)
        {
            GetProductsRequest request = new GetProductsRequest
            {
                page = page,
                limit = limit
            };
            GetProductsResponse response = await _portType.GetProductsAsync(request);
            return response.products.Select(p => new Product(p)).ToList();
        }

        public async Task<Product> UpdateProductAsync(Product product)
        {
            UpdateProductResponse response = await _portType.UpdateProductAsync(product.ToUpdateProductRequest());
            return new Product(response.product);
        }

    }


In the next part of this series, we will see how to set up dependency injection (DI) to make the service and the WCF infrastructure easy to use.

Conclusion

Calling a secured SOAP service from ASP.NET Core doesn’t have to be painful. With a proper setup we achieved:

  • No more manual SOAP envelope manipulation
  • Centralized authentication
  • Testable, mockable service layer
  • Clean separation between REST and SOAP models

References

Options pattern – .NET | Microsoft Learn

Key Vault | Microsoft Azure

How to: Inspect or Modify Messages on the Client – WCF | Microsoft Learn

Posted in .Net, Architecture, ASP.NET Core, Design Patterns, Development, SOAP, WCF, Web API | Tagged , , , , , , , , , | 1 Comment

Calling a Secured SOAP Service from ASP.NET Core WebAPI (WSDL+ WCF)

I had a nice challenge: calling a SOAP service from a WebAPI back-end application. To use the SOAP service, one has to authenticate with OAuth (Client Credentials Flow).

This article comes in 3 parts

  1. Calling a Secured SOAP Service from ASP.NET Core WebAPI (WSDL+ WCF) (This page)
  2. Securing a SOAP Client with OAuth2 in ASP.NET Core (WCF Behaviors)
  3. Integrating and Testing a Secured SOAP Client with Dependency Injection

You can find the companion code for this blog at GVerelst/ShiftLeftStore.

Introduction

Calling a SOAP service from an ASP.NET Core WebAPI project can feel like stepping back in time. WSDL files, XML envelopes, generated proxies — it’s a very different world compared to modern REST APIs. But with the right structure, you can integrate a SOAP backend cleanly, safely, and testably.

In this first part, we’ll explore the ShiftLeft Store SOAP API, generate a WCF client using dotnet-svcutil, build a clean product model, and write our first integration test.

In the second part, we’ll secure the client using OAuth2 and wrap everything in a robust DI setup. Before diving into the implementation details, let’s clarify who this guide is intended for and what readers can expect to gain.

You can find the companion code for this blog at GVerelst/ShiftLeftStore.

Audience

This guide is for .NET developers and software architects who need to integrate SOAP services into modern ASP.NET Core WebAPI projects, especially when bridging legacy systems with REST interfaces. Readers should be comfortable with C#, dependency injection, and basic HTTP concepts — no prior WCF experience required.

Overview of the ShiftLeft Store SOAP API

I will use the ShiftLeft Store API as a sample service. It is a publicly available SOAP service designed for testing and can be used with or without security.

Exploring the WSDL Using SoapUI (optional)

This step is not strictly necessary, but when I am going to use a service, I like to know how it behaves. Feel free to skip this section if you know all about SOAP.

In a REST service there is typically a swagger file that describes the functionality of the service. The equivalent in SOAP is a WSDL (Web Services Description Language) file. The WSDL describes the functionality in an XML format.

To explore the service, let’s use SoapUI, an open-source tool to test REST and SOAP services. After you have installed SoapUI, follow these steps to create the project:

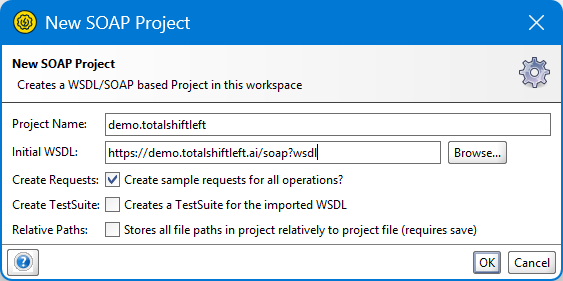
File > New SOAP Project

Set “Initial WSDL” to https://demo.totalshiftleft.ai/soap?wsdl. Notice the ?wsdl suffix which is a standard way to retrieve the WSDL from a SOAP service. The “Project Name” field will be automatically filled for you. Click OK and SoapUI will create your project.

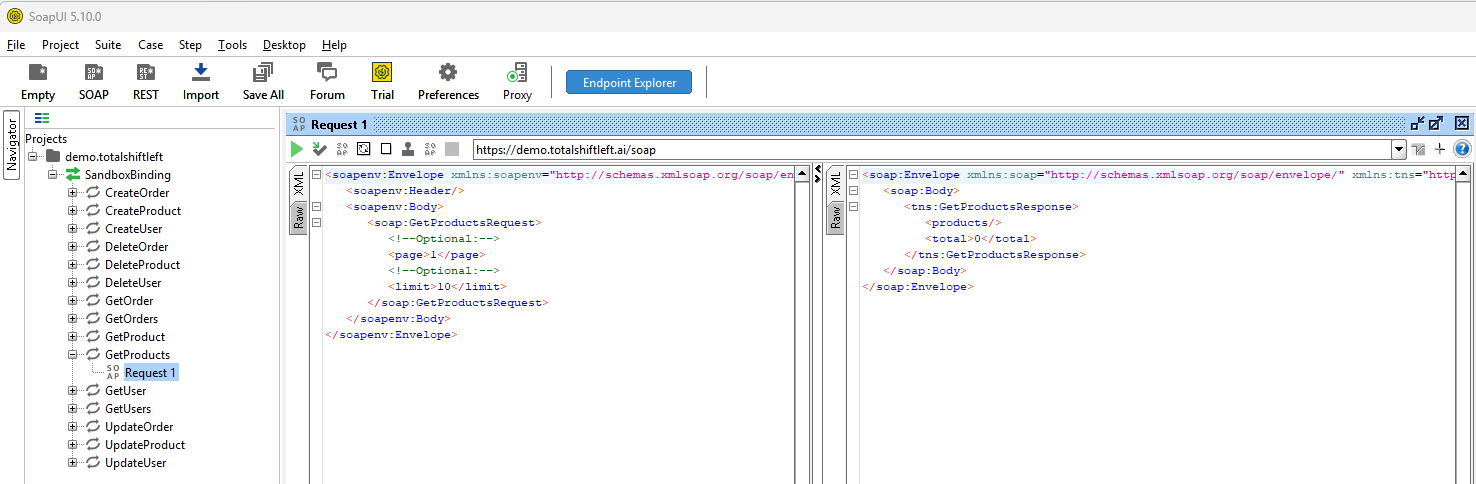
As you can see, all the messages are listed and SoapUI has created sample requests for each method. This allows you to test the service and see how it behaves.

Setting Up the ASP.NET Core WebAPI Project

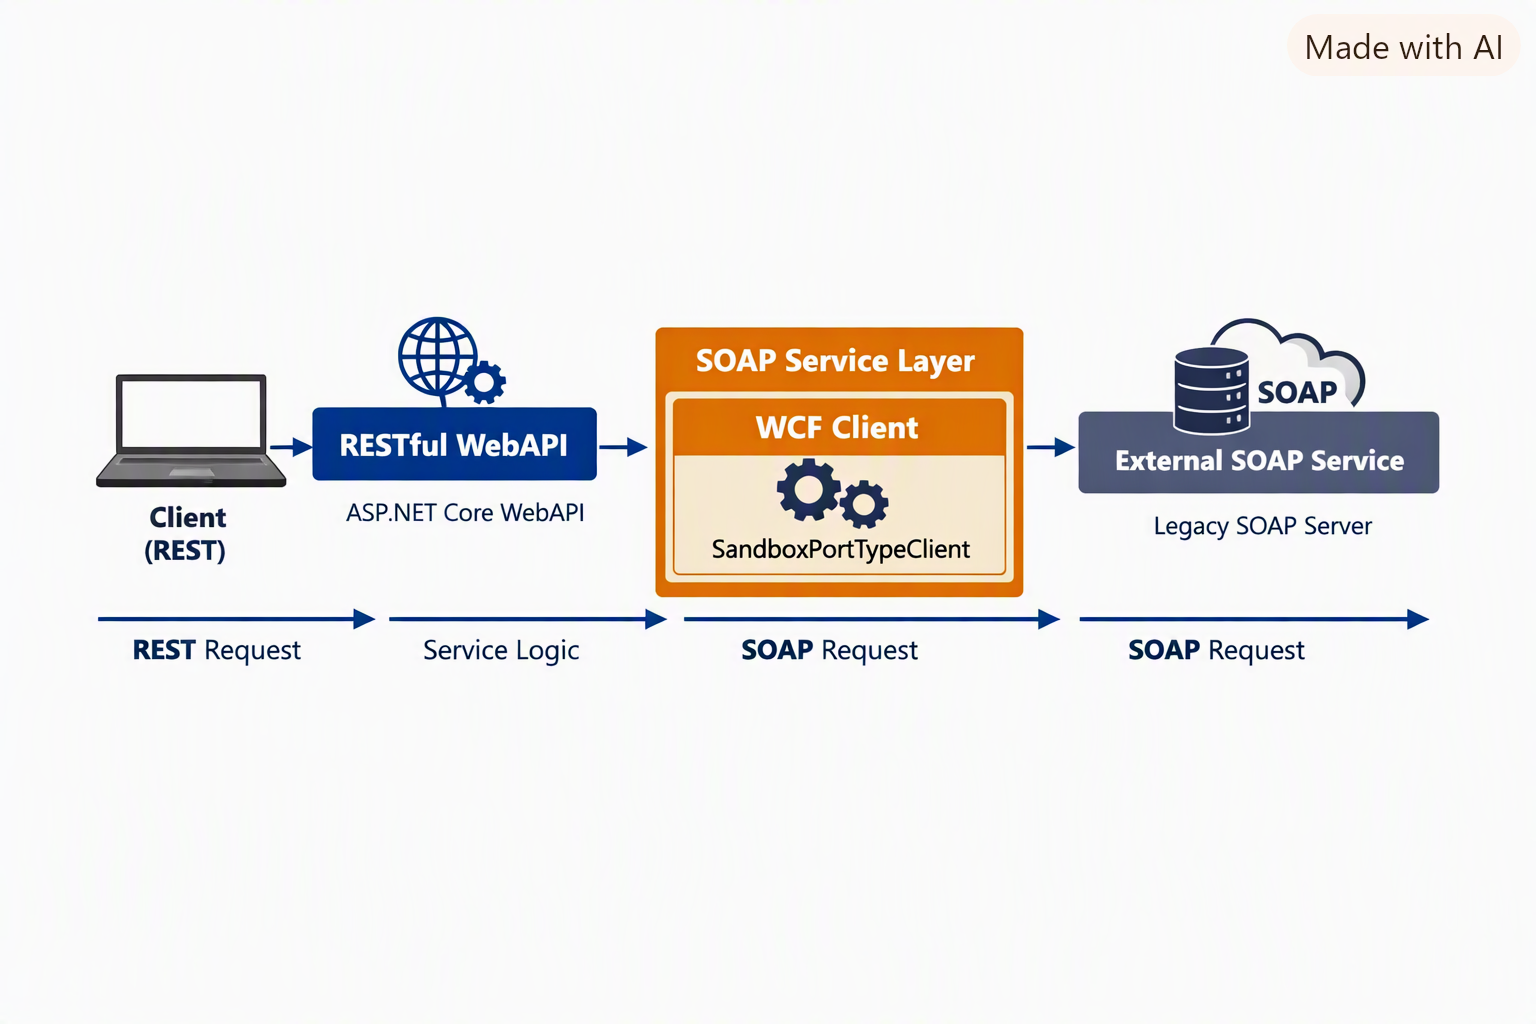
Diagram describing the solution.

To set up the Web API solution:

  • Open Visual Studio and create a new project
    File > New > Project / Solution …
  • Choose ASP.NET Core Web API > Next
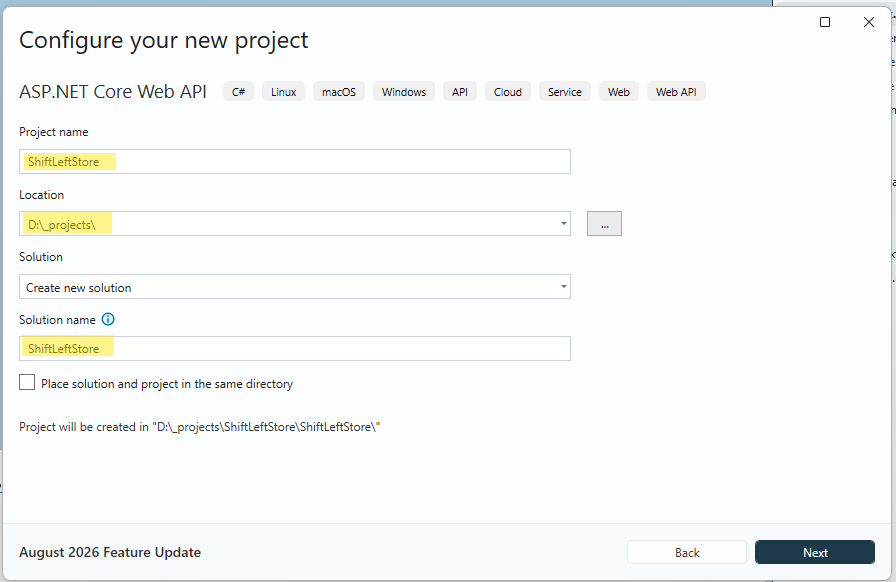
  • Configure the project > Next
  • Additional information : keep the default values > Create

You just created a new Web API. If you like to see the swagger file when you start the application here are some optional changes:

First add the Swashbuckle NuGet package to your project:

PowerShell
dotnet add package Swashbuckle.AspNetCore

Adapt Program.cs to show the swagger when running in a development environment. For security reasons you probably don’t want to show the swagger UI in production.

Program.cs
C#
var builder = WebApplication.CreateBuilder(args);
builder.Services.AddControllers();
builder.Services.AddEndpointsApiExplorer();
builder.Services.AddSwaggerGen();
var app = builder.Build();
// Configure the HTTP request pipeline.
if (app.Environment.IsDevelopment())
{
app.UseSwagger();
app.UseSwaggerUI(c =>
{
c.SwaggerEndpoint("/swagger/v1/swagger.json", "ShiftLeftStore v1");
// c.RoutePrefix = ""; // uncomment to serve UI at root "/"
});
}
app.UseHttpsRedirection();
app.UseAuthorization();
app.MapControllers();
app.Run();


Changing the launch settings to open the swagger when starting the program

Find the launchSettings.json file under your project > Properties and set the following properties:

  • “launchBrowser”: true,
  • “launchUrl”: “/swagger”,
launchSettings.json
JSON
{
"profiles": {
"http": {
"commandName": "Project",
"launchBrowser": true,
"launchUrl": "/swagger",
"environmentVariables": {
"ASPNETCORE_ENVIRONMENT": "Development"
},
"dotnetRunMessages": true,
"applicationUrl": "http://localhost:5137"
},
"https": {
"commandName": "Project",
"launchBrowser": true,
"launchUrl": "swagger",
"environmentVariables": {
"ASPNETCORE_ENVIRONMENT": "Development"
},
"dotnetRunMessages": true,
"applicationUrl": "https://localhost:7137;http://localhost:5137"
}
},
"$schema": "https://json.schemastore.org/launchsettings.json"
}


Start your application and see the nice swagger file popping up. Now we are ready to start exploring the SOAP project.

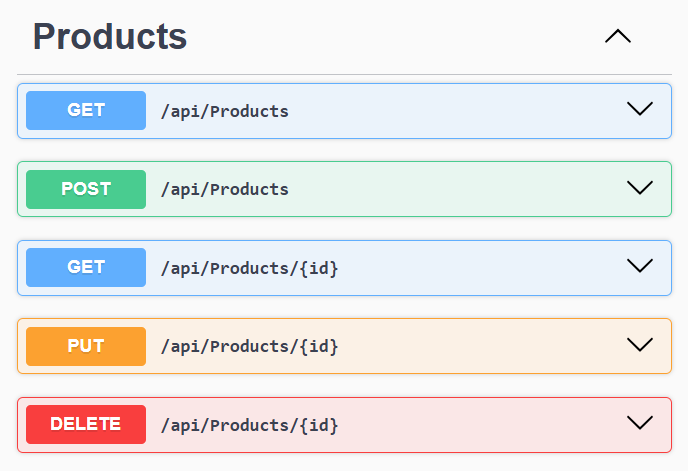
As an example, we will create a Products endpoint:

Swagger representation of the REST service that we are going to create

Calling the SOAP back end from our Web API project

To make the service reusable let’s add it as a library assembly. When this library is ready, all we need to do is to reference it from the Web API project, register the services and use it. This library will contain:

  • the WCF proxy
  • the SOAP service wrapper
  • the product model
  • future authentication logic

Here are the steps to add the class library to your solution:

  • Right-click on the solution > Add a new project
  • Choose “Class Library” > Next
  • Name it “ShiftLeftStore.Soap” > Next > Create
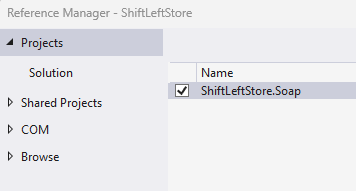
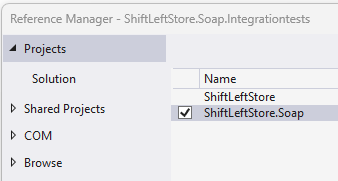
  • Add a project reference to this project in the ShiftLeftStore project. In a real life environment the library would probably be stored as a NuGet package and referenced as such.

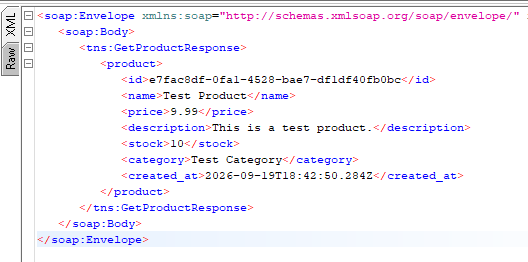
Looking at the response of the GetProduct response in SoapUI we can see the properties of a product:

Creating a Clean Product Model for Your WebAPI

SOAP DTOs are not ideal for exposing through REST. The Product record is part of the interface. This isolates SOAP‑specific types from the WebAPI surface.

  • Right-click the ShiftLeftStore.Soap project > Add > New Folder > “Models”
  • Add a new “Product” class under /Model
    • Add the 6 properties. Id is optional because it is not used when creating a new product.
    • Add a constructor to convert a ProductType to a Product.
    • Add the ToCreateProductRequest and ToUpdateProductRequest methods to convert the Product record into a suitable Soap request.
      Remark: you may want to write the constructor and the 2 methods outside of the class for maximum isolation, but I kept them here for code brevity.
Product.cs
C#
using ShiftLeftStore.MySoap;
namespace ShiftLeftStore.Soap.Models
{
public record struct Product(string Name,
decimal Price,
string Description,
int Stock,
string Category,
string? Id
)
{
internal Product(ProductType product)
: this(product.name, product.price, product.description, product.stock, product.category, product.id)
{ }
internal readonly CreateProductRequest ToCreateProductRequest()
=> new CreateProductRequest(Name, Price, Description, Stock, Category);
internal readonly UpdateProductRequest ToUpdateProductRequest()
=> new UpdateProductRequest(Id, Name, Price, Description, Stock, Category);
}
}


As you see I’m using a record struct here instead of a class. Record structs are value types; although their fields can be mutable, they behave differently from record classes because assignments copy the entire struct.

See Classes, structs, and records – C# | Microsoft Learn to learn more.

Generating the WCF Client (dotnet-svcutil)

The WSDL file is an XML file that is barely human-readable, but very computer-readable. It is structured so there are tools to create all the necessary .NET classes to make it easy to use the service.

In the ShiftLeftStore.Soap add a new folder “Services” and create a class “ShiftLeftStoreService”. In this service we will call the SOAP service. Time to add it to the project. We will use the dotnet-svcutil tool.

Line 1 installs the tool, and on lines 5-7 we generate the code to call the SOAP service in the “Services” folder. Line 6 maps all generated types to the ShiftLeftStore.MySoap namespace, keeping SOAP DTOs isolated.

PowerShell
dotnet tool install --global dotnet-svcutil
cd .\ShiftLeftStore.Soap\
dotnet-svcutil https://demo.totalshiftleft.ai/soap?wsdl \
--namespace "*,ShiftLeftStore.MySoap" \
--outputDir ./Services


When we now look under Services there is a new file called “Reference.cs”. This file contains the proxy for the SOAP service and all the necessary DTO classes. Here is a basic way to use it.

For simplicity, this example instantiates the client inline. In production, inject the client via DI and manage its lifecycle.

ShiftLeftStoreService.cs
C#
public class ShiftLeftStoreService
{
public async Task<Product> CreateProductAsync(Product product)
{
var client = new SandboxPortTypeClient();
SandboxPortType portType = client;
CreateProductResponse response = await portType.CreateProductAsync(product.ToCreateProductRequest());
return new Product(response.product);
}
}


Smoke testing the code so far

We are going to test the call to the external service, so by definition we are going to write integration tests. Once this is in place we can improve the service. As long as the integration tests still are working, we are on the right track.

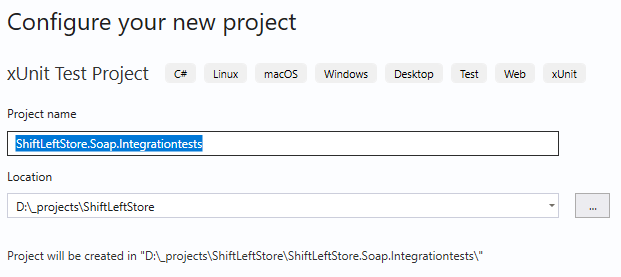
Right-click the solution > Add > New Project > xUnit Test Project

In the newly created project add a project reference to ShiftLeftStore.Soap and we are ready to create the first test.

Add a folder Services with a new class called ShiftLeftStoreServiceTests in it.

ShiftLeftStoreServiceTests.cs
C#
using ShiftLeftStore.Soap.Models;
using ShiftLeftStore.Soap.Services;
namespace ShiftLeftStore.Soap.Integrationtests.Services
{
public class ShiftLeftStoreServiceTests
{
[Fact]
public async Task CreateProduct_ShouldCreateProductSuccessfully()
{
// Arrange
var service = new ShiftLeftStoreService();
Product product = new Product
{
Name = "Test Product",
Price = 9.99m,
Description = "This is a test product.",
Stock = 10,
Category = "Test Category"
};
// Act
Product result = await service.CreateProductAsync(product);
// Assert
Assert.Equal(product.Name, result.Name);
Assert.Equal(product.Price, result.Price);
Assert.Equal(product.Description, result.Description);
Assert.Equal(product.Stock, result.Stock);
Assert.Equal(product.Category, result.Category);
}
}
}

Conclusion

At this point, you have:

  • a clean WebAPI project
  • a dedicated SOAP integration library
  • a generated WCF client
  • a clean product model
  • a working integration test

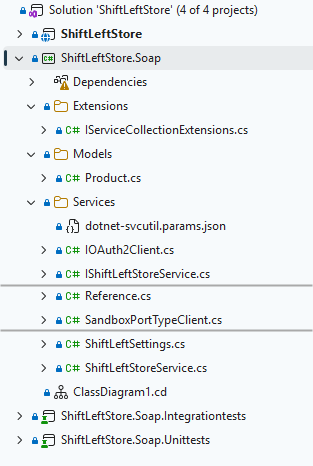
This is the current solution explore view:

In the next article, we’ll secure the SOAP client using OAuth2, add a message inspector, configure endpoint behaviors, set up dependency injection, and expose the service through a REST controller.

References

What is Swagger | Swagger Docs

Basics of SOAP – Simple Object Access Protocol – GeeksforGeeks

A Guide to Getting Started with SoapUI | SoapUI Docs

SoapUI 5.10.0 download

WCF svcutil tool overview – .NET | Microsoft Learn

Posted in .Net, API Development, Architecture, ASP.NET Core, Design Patterns, Development, SOAP, WCF, Web API | Tagged , , , , , , , | 2 Comments

Evolving ZipMatch — from a simple function to a LINQ-style implementation

In this blog we are going to find the matching items in 2 sorted collections. The algorithm is simple and effective. I will show you how to implement it in C# and make it generically (pun intended) available to all your collections. In other words: we’re going to make a generic extension method to make this a LINQ-like method.

The blog is not really about the algorithm, but more about how to write this as a LINQ extension method. Using this blogpost as an example you can write your own LINQ extension methods.

Table of contents

  1. Prerequisites
  2. Problem statement
  3. The algorithm
  4. The first small improvement
  5. Using .NET enumerators
  6. Making it generic
  7. Making it a LINQ extension method
  8. What, no F# in this blog?
  9. References

Prerequisites

The code samples are written in C#. I don’t explain the C# basics, but I will explain the steps between each code improvement. I used VS2026 and .NET 10 for the code samples, but you can use any code editor that you like.

The code for this blogpost can be found at https://github.com/GVerelst/ZipMatch.

Problem statement

Let’s say that we have 2 sorted collections list1 and list2. We want to find the matching elements in the collections. We want to make this fast as well.

The algorithm

The algorithm that we are going to use is known as the Two-way merge Algorithm. As indicated before it works on 2 sorted collections. We start simple with 2 lists of integers.

/// <summary>
/// First version to explain how the algorithm works.
/// </summary>
/// <param name="sortedlist1"></param>
/// <param name="sortedlist2"></param>
/// <returns></returns>
public static List<int> ZipMatch1(List<int> sortedlist1, List<int> sortedlist2)
{
    List<int> result = [];
    int i1 = 0;
    int i2 = 0;

    while (i1 < sortedlist1.Count && i2 < sortedlist2.Count)
    {
        if (sortedlist1[i1] == sortedlist2[i2])
        {
            result.Add(sortedlist1[i1]);
            i1++;
            i2++;
        }
        else if (sortedlist1[i1] < sortedlist2[i2]) 
        {
            i1++;
        }
        else
        {
            i2++;
        }
    }

    return result;
}

We walk through both collections using i1 as an iterator in sortedlist1 and i2 as an iterator in sortedlist2. We start at the first elements in both lists.

Now we run over the lists until one of the lists runs out of items. This means that for the remaining items in the other lists cannot be a match anymore and we stop.

At each iteration in the loop we check if one of the items is smaller than the other one. If so, we move that pointer forward. If the elements match we return the element and we advance both pointers.

This makes a very efficient algorithm:
Time complexity: O(n+m), where n and m are the sizes of the two collections.
Space complexity: O(min(m, n)) because we are filling the result list.

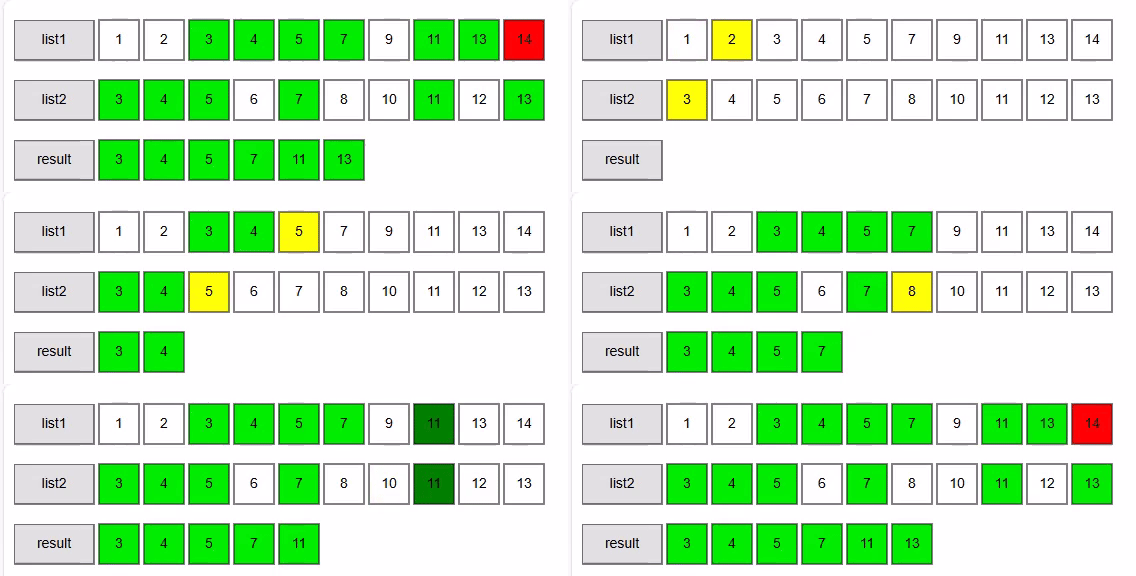
Walkthrough for the example above

sortedlist1 = [1, 2, 3, 4, 5, 7, 9, 11, 13, 14]
sortedlist2 = [3, 4, 5, 6, 7, 8, 10, 11, 12, 13]

Walkthrough (step → i1:value, i2:value → comparison → action → matches)

  1. i1=0:1, i2=0:3 → 1 < 3 → advance i1 → matches: []
  2. i1=1:2, i2=0:3 → 2 < 3 → advance i1 → matches: []
  3. i1=2:3, i2=0:3 → equal → add 3, advance both → matches: [3]
  4. i1=3:4, i2=1:4 → equal → add 4, advance both → matches: [3, 4]
  5. i1=4:5, i2=2:5 → equal → add 5, advance both → matches: [3, 4, 5]
  6. i1=5:7, i2=3:6 → 7 > 6 → advance i2 → matches: [3, 4, 5]
  7. i1=5:7, i2=4:7 → equal → add 7, advance both → matches: [3, 4, 5, 7]
  8. i1=6:9, i2=5:8 → 9 > 8 → advance i2 → matches: [3, 4, 5, 7]
  9. i1=6:9, i2=6:10 → 9 < 10 → advance i1 → matches: [3, 4, 5, 7]
  10. i1=7:11, i2=6:10 → 11 > 10 → advance i2 → matches: [3, 4, 5, 7]
  11. i1=7:11, i2=7:11 → equal → add 11, advance both → matches: [3, 4, 5, 7, 11]
  12. i1=8:13, i2=8:12 → 13 > 12 → advance i2 → matches: [3, 4, 5, 7, 11]
  13. i1=8:13, i2=9:13 → equal → add 13, advance both → matches: [3, 4, 5, 7, 11, 13]
  14. i1=9:14, i2=10: (past end) → stop

    Final result returned by ZipMatch1(List, List):
    [3, 4, 5, 7, 11, 13]

The first small improvement

        /// <summary>
        /// Second version using yield return.
        /// Slightly faster and uses less memory.
        /// </summary>
        /// <param name="sortedlist1"></param>
        /// <param name="sortedlist2"></param>
        /// <returns></returns>
        public static IEnumerable<int> ZipMatch2(List<int> sortedlist1, List<int> sortedlist2)
        {
            int i1 = 0;
            int i2 = 0;

            while (i1 < sortedlist1.Count && i2 < sortedlist2.Count)
            {
                if (sortedlist1[i1] == sortedlist2[i2])
                {
                    yield return sortedlist1[i1];
                    i1++;
                    i2++;
                }
                else if (sortedlist1[i1] < sortedlist2[i2])
                {
                    i1++;
                }
                else
                {
                    i2++;
                }
            }
        }

As you can see, there is no result list anymore. We now use the yield return statement that will return the results one by one. This makes the code a bit more readable and more efficient. Yield return returns an IEnumerable producing matches as you enumerate.

We also make the result IEnumerable<int> instead of a List. This gives the compiler the liberty to implement yield return in the most efficient way. It is also necessary to be able to use yield return.

Using .NET enumerators

ZipMatch2 works with Lists because we are using indexes. But if we want to work with other types of collections we will need to change this.

Observation: we only need to be able to move forward in both lists. So a simple IEnumerator can do the job.

        /// <summary>
        /// Working with enumerators directly.
        /// More general as it works with any IEnumerable.
        /// </summary>
        /// <param name="sortedlist1"></param>
        /// <param name="sortedlist2"></param>
        /// <returns></returns>
        public static IEnumerable<int> ZipMatch3(IEnumerable<int> sortedlist1, 
                                                 IEnumerable<int> sortedlist2)
        {
            IEnumerator<int> enumerator1 = sortedlist1.GetEnumerator();
            IEnumerator<int> enumerator2 = sortedlist2.GetEnumerator();

            bool hasValue1 = enumerator1.MoveNext();
            bool hasValue2 = enumerator2.MoveNext();

            while (hasValue1 && hasValue2)
            {
                if (enumerator1.Current == enumerator2.Current)
                {
                    yield return enumerator1.Current;
                    hasValue1 = enumerator1.MoveNext();
                    hasValue2 = enumerator2.MoveNext();
                }
                else if (enumerator1.Current < enumerator2.Current)
                {
                    hasValue1 = enumerator1.MoveNext();
                }
                else
                {
                    hasValue2 = enumerator2.MoveNext();
                }
            }
        }

As you can see, we changed the parameter types to IEnumerable instead of the very specific List class. The IEnumerable interface gives the semantics of a forward only (and read-only) cursor. The code is now a bit more complex.

  • We first obtain the 2 enumerators using the IEnumerable.GetEnumerator() function. This returns an IEnumerator<int>.
  • Using the MoveNext( ) function we move to the first element in both collections. MoveNext( ) returns false when there are no more elements in the collection.
  • The Current property returns the item at the enumerator’s position.
  • i1++ now becomes hasValue1 = enumerator1.MoveNext();
    i2++
    now becomes hasValue2 = enumerator2.MoveNext();

We can now Zipmatch3 over any collection that implements IEnumerable, giving us a much broader and useful function than Zipmatch2.

Making it generic

We want the code to work with collections containing any data type, not only integers, so let’s play with C# generics.

        public static IEnumerable<(T, U)> ZipMatch4<T, U>(IEnumerable<T> sortedlist1,
                                                          IEnumerable<U> sortedlist2,
                                                          Func<T, U, int> compare)
        {
            IEnumerator<T> enumerator1 = sortedlist1.GetEnumerator();
            IEnumerator<U> enumerator2 = sortedlist2.GetEnumerator();

            bool hasValue1 = enumerator1.MoveNext();
            bool hasValue2 = enumerator2.MoveNext();

            while (hasValue1 && hasValue2)
            {
                if (compare(enumerator1.Current, enumerator2.Current) == 0)
                {
                    yield return (enumerator1.Current, enumerator2.Current);
                    hasValue1 = enumerator1.MoveNext();
                    hasValue2 = enumerator2.MoveNext();
                }
                else if (compare(enumerator1.Current, enumerator2.Current) < 0)
                {
                    hasValue1 = enumerator1.MoveNext();
                }
                else
                {
                    hasValue2 = enumerator2.MoveNext();
                }
            }
        }

This step is a bit bigger. To make the function useful we want to match items from 2 collections of possibly different classes. Because we don’t know the classes beforehand we use C# generics. sortedlist1 if of type T, sortedlist2 is of type U.

To make sense of the returned items, we now return tuples of matching items.

In the example with integers the sort was implicit in the int datatype, but the compiler cannot infer how to compare the different types T and U. That is why we need the compare function. This is a generic delegate that compares an object of class T with an object of class U and returns < 0 when obj1 < obj2, > 0 when obj1 > obj2, 0 when they are equal. In the rest of the code we now use this function for the comparisons.

Here is an example of how to use this function:

[Fact]
public void CustomComparer_WorksWithDifferentTypes()
{
    // Arrange
    var a = new List<string> { "1", "2", "10" };
    var b = new List<int> { 1, 2, 10 };

    // Act
    var res = ListUtils.ZipMatch4(a, b, (s, i) => int.Parse(s).CompareTo(i)).ToList();

    // Assert
    var expected = new List<(string, int)> { ("1", 1), ("2", 2), ("10", 10) };
    Assert.Equal(expected, res);
}

Making it a LINQ extension method

In the following versios of the function I changed the function signature such that the first parameter is this IEnumerable sortedlist1. I also added some error checking to make the function more robust. So here is the final version of our ZipMatch function:

        public static IEnumerable<(T, U)> ZipMatch5<T, U>(this IEnumerable<T> sortedlist1, 
                                                          IEnumerable<U> sortedlist2, 
                                                          Func<T, U, int> compare)
        {
            ArgumentNullException.ThrowIfNull(sortedlist1);
            ArgumentNullException.ThrowIfNull(sortedlist2);
            ArgumentNullException.ThrowIfNull(compare);

            var enumerator1 = sortedlist1.GetEnumerator();
            var enumerator2 = sortedlist2.GetEnumerator();

            var hasValue1 = enumerator1.MoveNext();
            var hasValue2 = enumerator2.MoveNext();

            while (hasValue1 && hasValue2)
            {
                if (compare(enumerator1.Current, enumerator2.Current) == 0)
                {
                    yield return (enumerator1.Current, enumerator2.Current);
                    hasValue1 = enumerator1.MoveNext();
                    hasValue2 = enumerator2.MoveNext();
                }
                else if (compare(enumerator1.Current, enumerator2.Current) < 0)
                {
                    hasValue1 = enumerator1.MoveNext();
                }
                else
                {
                    hasValue2 = enumerator2.MoveNext();
                }
            }
        }

And here is how you call it using the “LINQ way”:

        [Fact]
        public void CustomComparer_WorksWithDifferentTypes()
        {
            // Arrange
            var a = new List<string> { "1", "2", "10" };
            var b = new List<int> { 1, 2, 10 };

            // Act
            var res = a.ZipMatch5(b, (x, y) => int.Parse(x).CompareTo(y)).ToList();

            // Assert
            var expected = new List<(string, int)> { ("1", 1), ("2", 2), ("10", 10) };
            Assert.Equal(expected, res);
        }

What, no F# in this blog?

You made it to the end. But you know that I like F# so here is some bonus code for you:

let rec zipMatch sortedlist1 sortedlist2 =
    if sortedlist1 = [] || sortedlist2 = [] then
        []
    else
        let h1::t1 = sortedlist1
        let h2::t2 = sortedlist2
        if h1 = h2 then
            h1 :: zipMatch t1 t2
        elif h1 < h2 then
            zipMatch t1 sortedlist2
        else
            zipMatch sortedlist1 t2


printfn "%A" (zipMatch [1;3;4;6;7;9] [0;2;4;5;6;8;9])

References

Merge joins in SQL Server

https://www.baeldung.com/cs/2-way-vs-k-way-merge

https://learn.microsoft.com/en-us/dotnet/csharp/language-reference/statements/yield

https://learn.microsoft.com/en-us/dotnet/api/system.collections.ienumerator?view=net-10.0

https://learn.microsoft.com/en-us/dotnet/csharp/fundamentals/types/generics

https://learn.microsoft.com/en-us/dotnet/csharp/language-reference/builtin-types/value-tuples

https://learn.microsoft.com/en-us/dotnet/api/system.func-2?view=net-9.0

https://learn.microsoft.com/en-us/dotnet/csharp/linq/how-to-extend-linq

Posted in .Net, Codeproject, Design Patterns, Development, F#, Functional Programming | Tagged , , | Leave a comment

Using an F# DSL to generate C# code

My current project is for a company called HDMP (The website is in Dutch / French). We make software for medical practitioners.  I am working on a service that communicates with web services created by the Belgian government. The services are quite old, proven by the fact that they expect as input a flat file with specific record formats, the so called efact format. I am parsing this file using the excellent FileHelpers package, which allows describing fixed length file formats. This article is only about the code generation, not about the use of the Filehelpers library.

In the efact file there over 10 different record formats, all with a fixed length of 370 bytes. Fields in a record are positional. To describe this I created a more readable Domain Specific Language in F#. In this article I will demonstrate how this works. The code for this article can be found on GVerelst/CodeGen: F# DSL for C#Code generation. (github.com).

Prerequisites

  • You’ll need a little bit of C# knowledge to follow this post. In particular, I will show how to create a couple of C# classes, with some (custom) attributes. But in the end the F# program will just generate some text that happens to be C# code.
  • F# knowledge will help, but I will explain most of what I’m doing in this post.

The Problem

The code that is needed for FileHelpers to work with fixed records looks like this:

    // //////////////////////////////////////
    // FileInfoBase
    // //////////////////////////////////////

    [FixedLengthRecord()]
    public partial class FileInfoBase
    {
        // Segment segment200
        [EFactMetadata("200", "6N", "1-6", "Naam van het bericht", "Nom du message"), FieldFixedLength(6), FieldAlign(AlignMode.Right, '0')] public int MessageName { get; set; } = 920000; // 920000|920900|...
        [EFactMetadata("2001", "2N", "7-8", "Code fout", "Code érreur"), FieldFixedLength(2), FieldAlign(AlignMode.Right, '0')] public byte Error2001 { get; set; } = 0;
        [EFactMetadata("201", "2N", "9-10", "Versienummer formaat van het bericht", "N° version du format du message"), FieldFixedLength(2), FieldAlign(AlignMode.Right, '0')] public byte MessageVersionNumber { get; set; } // 2
        // ...
        [EFactMetadata("204", "14N", "21-34", "Referentie bericht ziekenhuis", "Reference du message"), FieldFixedLength(14), FieldTrim(TrimMode.Both)] public string InputReference { get; set; } = new string('0', 14);
        // ...
        [EFactMetadata("3091", "2N", "206-207", "Code fout", "Code érreur"), FieldFixedLength(2), FieldAlign(AlignMode.Right, '0')] public byte Error3091 { get; set; } = 0;
    }


We describe the record fields mainly using attributes:

  • The FileHelper attributes that describe the format of the field
  • The EFactMetadata custom attribute that gives some additional information about the field. It contains the name of the zone (ex: “200”. Remember, this is an archaic record format), the type of the zone (ex: “6N” or “45A”), the position in the record (calculated), and then the translation in Dutch and French.
  • And in addition we also give the field a data type, a name, an optional default value and an optional comment.

The documentation describes the file format using these terms. I also created a file viewer to show the contents in a user-friendly way, hence the translated fields. This will not be on GitHub. The attributes allow the use of reflection in the user interface to show the file format. The documentation also uses a notion of segments to describe a block in the record formats that can be reused in similar record formats. We want to mimic this behavior as well.

Clearly this is a lot of error prone code to type, and also not very readable because of all the clutter. If only we could represent this in a more concise and readable way, and generate the necessary code from this …

Defining the internal Domain Specific Language in F#

Looking at this, we can see some needed entities. The first thing we need to describe is a zone (which will translate into a property in the generated class. For the first zone (“200”) this can look like

    Z "200" (N 6) "Dutch name" "French name" Int "PropertyName" "920000" "920000|920900|..."

This contains all the data we need to describe a field with all its attributes. Let’s create the Zone type:

type Zone = { zone: string; length: Length; nl: string; fr: string; datatype: Datatypes; name: string; defaultvalue: string; comments: string}

and a constructor for this type:

let Z zone length nl fr dt name dft comments =
    { zone=zone; length = length; nl= nl; fr = fr; datatype=dt; name=name; defaultvalue=dft; comments=comments }

  • zone: the zone name (being “200”, “2001”, …)
  • length: definition of the length (ex N 6 indicates 6 digits, A 5 indicates 5 characters)
  • nl: description in Dutch
  • fr: description in French
  • The rest of the fields are clear.

This is valid F# code, embedded in our project. The nice thing is that the compiler will prevent a lot of errors for us. This is what is called an “internal DSL”. An external DSL describes a separate language, with its own syntax rules. This means that the interpretation of the external DSL needs to be written as well.

There are some unknown parts in there:

Z "200" (N 6) "Naam van het bericht" "Nom du message" Int "PropertyName" "920000" "920000|920900|..."

The datatype is Int, we must describe this as well. This could have been just a string, but that doesn’t allow for validation. Ideally we want the F# compiler to catch as many errors as possible before we start to generate the code. So here is the Datatypes enumeration:

type Datatypes = Bool | CRC | Byte | Short | Int | DateTime | Time | String | Money | AmbHos | Gender | Error 

Now the F# compiler will only allow these datatypes. Depending on the datatype we can generate slightly different C# code. Example:

Int generates this:

[EFactMetadata("200", "6N", "1-6", "Naam van het bericht", "Nom du message"), FieldFixedLength(6), FieldAlign(AlignMode.Right, '0')] public int MessageName { get; set; } = 920000; // 920000|920900|...

And String will generate this:

[EFactMetadata("204", "14N", "21-34", "Referentie bericht ziekenhuis", "Reference du message"), FieldFixedLength(14), FieldTrim(TrimMode.Both)] public string InputReference { get; set; } = new string('0', 14);

Of course the other datatypes generate their own versions.

Having this in place already reduces the number of hard to find errors in the C# code.

Z "200" (N 6) "Naam van het bericht" "Nom du message" Int "PropertyName" "920000" "920000|920900|..."

We also see a Length. The constructor (N 6) is actually composed of the length type (“A” is alphabetic, “N” is numeric, “S” is numeric, but prefixed with ‘+’ or ‘-‘. This will later be used in the code generation. Let’s describe this:

type LengthType = A | N | S
type Length = { ltype: LengthType; length: int }

and we create 3 constructor functions:

let N x = { ltype= N; length= x }
let A x = { ltype= A; length= x }
let S x = { ltype= S; length= x }

N 6 will now return a new Length record with ltype = N, length = 6. Having these 3 little functions allows the F# again to validate the code at compile time.

Recap of the definition of the zone so far:

type Datatypes = Bool | CRC | Byte | Short | Int | DateTime | Time | String | Money | AmbHos | Gender | Error 
type LengthType = A | N | S
type Length = { ltype: LengthType; length: int }
type Zone = { zone: string; length: Length; nl: string; fr: string; datatype: Datatypes; name: string; defaultvalue: string; comments: string}

let N x = { ltype= N; length= x }
let A x = { ltype= A; length= x }
let S x = { ltype= S; length= x }

let Z zone length nl fr dt name dft comments =
    { zone=zone; length = length; nl= nl; fr = fr; datatype=dt; name=name; defaultvalue=dft; comments=comments }

These 9 lines of code allow us to create zones in a concise and clear way. Let’s add semantics to this. Some zones are of the same type, and have a specific meaning. For example I defined the Recordtype function as

let Recordtype rectype zone = 
    let rt = rectype.ToString()
    Z zone (N 2) ("recordtype " + rt) ("enregistrement de type " + rt) Byte "Recordtype" rt ("Always " + rt);

Every efact record will have a specific record type, the 2 first bytes of the record. They always have the same NL and FR description, so I made a new function for this. The function on itself is not to save typing, but to give semantics to this field.

Recordtype 95 "400"

Indicates a record that is a record type. We can also write this out in the code as

Z "40" (N 2) "recordtype 95" " enregistrement de type 95" Byte "Recordtype" "95" "Always 95"

It is not much longer (copy / paste is your friend here), but a lot clearer on what it means. So in the same style I defined Mutuality:

let Mutuality zone =
    Z zone (N 3) "Nummer mutualiteit" "Numéro de Mutualité" Int "MutualityNumber" "" ""

And again

Mutuality "401"

indicates very clearly what we mean here. I made some more:

let Errorcode zone =
    let nzone = normalizeName zone
    Z zone (N 2) "Code fout" "Code érreur" Error ("Error" + nzone) "0" ""

let Reserved l zone =
    let nzone = normalizeName zone
    let dft = match l.ltype with
                | A -> sprintf "new string(' ', %d)" l.length 
                | N -> sprintf "new string('0', %d)" l.length 
                | S -> sprintf "'+' + new string('0', %d)" (l.length - 1)
    Z zone l "Reserve" "Reserve" String ("Reserved" + nzone) dft ""

As you can see, a reserved zone can only be of datatypes A | N | S. For each of the cases I defined the outcome. No more need to think about what kind of attributes need to be generated, and it is clear that this is a zone that is there as a filler, in case more zones would be needed in the future (remember, this is an archaic format).

This now gives us a (domain specific) language to describe the records, for example:

    Recordtype 95 "400"
    Errorcode "4001"
    Mutuality "401"
    Errorcode "4011" 
    Z "402" (N 12) "Nummer van verzamelfactuur" "Numéro de facture récapitulative" String "RecapInvoiceNumber" "" ""
    Errorcode "4021" 
    // ...
    Reserved (N 257) "413"

Now we have a way to describe the zones in the flat file that will be converted into properties in a C# class. Let’s extend the DSL to include classes. In the eFact documentation there are some predefined structures called segments. A segment has a name and is composed of 1 or more zones. These segments will be put together in a class. So a class is a named collection of segments, and a segment is a named collection of zones. A class can also inherit from another class, which saves some more typing. A namespace is a named collection of classes, and finally a program (I didn’t find a better name for this) is composed of namespaces, and has a filename.

Here are the definitions:

type Segment = { name: string; zones: Zone list }
type Interface = { name: string; lines: string list }
type Record = { name: string; inherits: Record option; implements: Interface list; segments: Segment list }
type Namespace = { name: string; records: Record list }
type Program = { filename: string; baseNamespace: string; namespaces: Namespace list }

Let’s define a small program

let segment200 = 
    { 
        name= "segment200"; 
        zones= 
        [
            Z "200" (N 6) "Naam van het bericht" "Nom du message" Int " MessageName" "920000" "920000|920900|..."
            Errorcode "2001" 
            Z "201" (N 2) "Versienummer formaat van het bericht" "N° version du format du message" Byte " MessageVersionNumber" "" "2"
            Errorcode "2011" 
	     // ...
            Z "205" (N 14) "Referentie bericht VI" "Reference du message OA" String " ReferenceOA" "" ""
            Errorcode "2051" 
            Reserved (N 15) "206"
        ] 
    }

let segment300 = 
    { 
        name= "segment300"; 
        zones= 
        [
            Z "300a" (N 4) "Factureringsjaar"  "Année de facturation"  Int "YearBilled" "" ""
            Z "300b" (N 2) "Factureringsmaand" "Mois de facturation"  Byte "MonthBilled" "" ""
            Errorcode "3001" 
            Z "301" (N 3) "Nummer van de verzendingen" "Numero d''envoi" Int " RequestNr" "" ""
            Errorcode "3011" 
            Z "302" (N 8) "Datum opmaak factuur" "Date de création de facture" DateTime " Creationdate" "" ""
            Errorcode "3021" 
	     // ...
            Z "309" (N 2) "Type facturering" "Type facturation" Byte "Invoicingtype" "" ""
            Errorcode "3091" 
        ] 
    }

let fileInfoBase =
   {
        name= "FileInfoBase"; 
        inherits = None;
        implements = [];
        segments= 
        [
           segment200 
           segment300
        ]
   }

let fileInfo =
    {
        name= "FileInfo"; 
        inherits = Some fileInfoBase;
        implements = [];
        segments= 
        [
            segment300a
        ]
    }

// ...
let namespaceRequests =
    {
        name="Requests";
        records=
        [
            fileInfoBase
            fileInfo
	     // ...
        ]
    }

let namespaceSettlement =
    {
        name="Settlement";
        records=
        [
	     // ...
        ]
    }

let prog = 
    { 
        filename="eFact.cs";
        baseNamespace="HdmpCloud.eHealth.eFact.Serializer.Recordformats.";
        namespaces = 
        [
            namespaceRequests
            namespaceSettlement
        ]
    }

As you can see, the definition of all the needed datatypes is about 10 lines, and very readable:

type Datatypes = Bool | CRC | Byte | Short | Int | DateTime | Time | String | Money | AmbHos | Gender | Error 
type LengthType = A | N | S
type Length = { ltype: LengthType; length: int }
type Zone = { zone: string; length: Length; nl: string; fr: string; datatype: Datatypes; name: string; defaultvalue: string; comments: string}
type Segment = { name: string; zones: Zone list }
type Interface = { name: string; lines: string list }
type Record = { name: string; inherits: Record option; implements: Interface list; segments: Segment list }
type Namespace = { name: string; records: Record list }
type Program = { filename: string; baseNamespace: string; namespaces: Namespace list }

Then we defined some helper functions to make the definition of the zones a bit easier, and to give it semantic meaning. And now we have described the zones, segments, records, namespaces and the program. This is done in about 1000 lines of code.

Let’s generate some C#

Nice. We have described our language (DSL), and we have described what our C# classes should look like. We can compile this program, and if it succeeds we know that the program in our DSL is syntactically correct. Time to generate the code, so this becomes useful.

To start, let’s output a Zone. This will be output as a property in a C# class. Don’t mind the pos parameter yet.

let outputZone pos zone  =
    let (declaration, att3) = outputDeclaration zone
    let att1 = outputEFactMetadata zone pos
    let att2 = sprintf "FieldFixedLength(%d)" zone.length.length

    let attslist = [ att1; att2; att3 ]

    let atts = attslist |> List.reduce (fun a b -> a + ", " + b)
    let comment = if zone.comments.Length = 0 then "" else (C2 zone.comments)

    "[" + atts + "] " + declaration + (outputDefaultValue zone) + " " + comment 

As you can see, there are some helper functions here. I’ll discuss them below.

The outputZone function takes 2 parameters: pos and zone. The output is a string describing a C# property with the necessary attributes. This is the central function in the code generation. The output type of this function is a string. In the end the generated program will just be a list of strings to be written into a file.

In F# a function can only be used if it was defined before the calling function. At first this is a pain, but it forces you to have a correct dependency structure. Typically this results in a list of small functions that are composed into more useful functions. Let’s look at some of the functions in “generator.fs”, which contains the code to generate the C# classes.

Very simple function to generate the string “5N” from the type (N 5):

let outputLength (l: Length) =
    sprintf "%d%A" l.length l.ltype

Make the first character of a string uppercase:

    let captitalize (s:string) =
        if s.Length = 0 then ""
        else s.Substring(0,1).ToUpper() + s.Substring(1) 

Create the EFactMetadata attribute:

// EFactMetadata("312", "449", "352-800", "Reserve", "Reserve") 
let outputEFactMetadata zone pos =
    let nl = captitalize zone.nl
    let fr = captitalize zone.fr
    let rng = sprintf "%d-%d" pos (pos + zone.length.length - 1)
    sprintf "EFactMetadata(\"%s\", \"%s\", \"%s\", \"%s\", \"%s\")" zone.zone (outputLength zone.length) rng nl fr 

The function is straightforward thanks to the use of the small helpers.

// public string Reserve9 { get; set; } = new string(' ', 449);
let outputDeclaration zone =
    let (dt, att) = match zone.datatype with
                     | CRC -> ("byte", "FieldTrim(TrimMode.Both)")
                     | Int -> ("int", if (zone.length.ltype = LengthType.S )
                                         then sprintf "FieldConverter(typeof(SignedIntConverter), %d)" zone.length.length
                                         else "FieldAlign(AlignMode.Right, '0')")
                    // ...
                     | Gender -> ("Gender", "FieldConverter(typeof(EnumIntConverter),1)")

    (sprintf "public %s %s { get; set; }" dt zone.name, att)

// [EFactMetadata("312", "449", "352-800", "Reserve", "Reserve"), FieldFixedLength(450), FieldValueDiscarded] public string Reserve9 { get; set; } = new string(' ', 449);
let outputZone pos zone  =
    let (declaration, att3) = outputDeclaration zone
    let att1 = outputEFactMetadata zone pos
    let att2 = sprintf "FieldFixedLength(%d)" zone.length.length

    let attslist = [ att1; att2; att3 ]

    let atts = attslist |> List.reduce (fun a b -> a + ", " + b)
    let comment = if zone.comments.Length = 0 then "" else (C2 zone.comments)

    "[" + atts + "] " + declaration + (outputDefaultValue zone) + " " + comment

The first function with some logic in it: outputSegment

We want to output a segment, which is a number of zones. There will be a loop to cover all the zones, but in functional programming we avoid loops as much as possible. F# provides us with a lot of functions to handle collections.

The output we want is not just a line for each zone, but given that eFact files are records with fixed-length fields, we also want to indicate the position of the field in the record. We saw before that each record has a length, this allows us to calculate the positions. Here is some partial output of a zone:

        // Segment segment200
        [EFactMetadata("200", "6N", "1-6", "Naam van het bericht", "Nom du message"), FieldFixedLength(6), FieldAlign(AlignMode.Right, '0')] public int MessageName { get; set; } = 920000; // 920000|920900|...
        [EFactMetadata("2001", "2N", "7-8", "Code fout", "Code érreur"), FieldFixedLength(2), FieldAlign(AlignMode.Right, '0')] public byte Error2001 { get; set; } = 0;
        [EFactMetadata("201", "2N", "9-10", "Versienummer formaat van het bericht", "N° version du format du message"), FieldFixedLength(2), FieldAlign(AlignMode.Right, '0')] public byte MessageVersionNumber { get; set; } // 2
        [EFactMetadata("2011", "2N", "11-12", "Code fout", "Code érreur"), FieldFixedLength(2), FieldAlign(AlignMode.Right, '0')] public byte Error2011 { get; set; } = 0;

Notice the 3rd parameter of the eFactMetadata attribute (“1-6”, “7-8”, “9-10”, “11-12”, …). This is a running total that is calculated using a start position and the lengths of the zones. Remember that the outputZone function takes a “pos” parameter, this explains why. Here is the function:

let outputSegment start (seg: Segment)  =
    let (endpos, lines) = 
        seg.zones |> List.fold (fun (pos, lines) z -> 
            let z2 = outputZone pos z
            (pos + z.length.length, z2::lines)
                                    ) (start, [])

    let zs2 = (C2 ("Segment " + seg.name)) :: (lines |> List.rev)

    (endpos, zs2)

A record is composed of one or multiple segments, so we need a start position and we return the end position for this segment. Later the outputRecord function will use the same trick as we use here for the position in the EfactMetadata attribute.

The main loop is implemented in the List.fold function:

seg.zones |> List.fold (fun (pos, lines) z -> 
            let z2 = outputZone pos z
            (pos + z.length.length, z2::lines)
                       ) (start, [])

Taking the collection of zones as its input, List.fold will iterate over each zone and apply an accumulator function to it. The accumulator is the tuple (pos, lines), which indicates that we are accumulating 2 things at the same time: the position and the generated lines.

let z2 = outputZone pos z			// generates the line for the current position
(pos + z.length.length, z2::lines)		// returns pos plus the length of the zone and the generated line in front of all the lines that were already generated

The result is that we now have our lines with the position correctly filled, but in reverse order. This explains the following line:

let zs2 = (C2 ("Segment " + seg.name)) :: (lines |> List.rev)

If you like you can read the rest of the code on GitHub. Most of the code is straightforward from this point on.

More enhancements

One simple enhancement is this:

let C2 s = "// " + s

Now we can generate comments like   C2 “Segment 200”.

Errorcodes

In the efact format there are many Errorcode fields. They always look the same:

Z  “2001” (N 2) "Code fout" "Code érreur" Error ("Error" + nzone) "0" ""

This is always a 2-digit field (N 2), so we can define a new function for this:

let Errorcode zone =
    let nzone = normalizeName zone
    Z zone (N 2) "Code fout" "Code érreur" Error ("Error" + nzone) "0" ""

Errorcode “2001” will now create a 2-digit zone in a descriptive way.

Reserved zones

There are also 2 types of reserved zones: numeric and alphabetic. Depending on their type they will be filled up with different values. They are the FILLERS in good old COBOL (and yes, this says something about my age).

To describe them we make another function:

let Reserved l zone =
    let nzone = normalizeName zone
    let dft = match l.ltype with
                | A -> sprintf "new string(' ', %d)" l.length 
                | N -> sprintf "new string('0', %d)" l.length 
                | S -> sprintf "'+' + new string('0', %d)" (l.length - 1)
    Z zone l "Reserve" "Reserve" String ("Reserved" + nzone) dft ""

Conclusion

Describing the data model for the classes to be generated takes about15 lines of code. Then we defined a couple of small helper functions and some bigger functions to generate the code. The generator.fs file contains 163 lines of code. With this we can describe our program in a readable way. We also added some semantics to the code with constructor functions to describe fillers, errors, a mutuality, … I think this is a nice demonstration of F# as a functional language.

References

F# for fun and profit (fsharpforfunandprofit.com)

FileHelpers Library

Lists – F# | Microsoft Docs

Posted in .Net, Codeproject, F#, Functional Programming | Tagged , , | Leave a comment

Sending notifications with Corona updates to thousands of doctors

During the Corona crisis, our (Belgian) government sends out regular updates for medical professionals. I created a small UWP app that will notify all the subscribed doctors when new information is available. The doctors can download and install this application from the Microsoft Store to see the updates pop up in a toast message.

Introduction

I am working for a company specialized in software for general practitioners . The practitioners use our software to keep data about patients, and use a whole lot of (almost) mandatory services provided by the government. This is all initiated from the client.

Now we need to work in the other direction. When we receive an update (in this case typically about Corona), we must push it to all the connected doctors. This can be done using polling (every x minutes we check if there is something new), or using push notifications.

Architectural choice

For communication from the server to clients there are 2 main possibilities in Microsoft Azure: either use SignalR, or use Azure Notification hubs. My first choice was to use SignalR, but it this is mainly supported for web applications (web sockets). 

I decided to use Azure Notification Hubs.

  • In the free tier we can push 1 million messages per day to max 500 active devices. Currently this is sufficient, but when more users install this app we’ll upgrade to the basic tier. This allows for 200 000 devices and 10 million messages per day, for a wobbling 8,43€ / month. That will do!
  • But to start pushing messages to devices we first need to create and register a UWP application. For this we have to create an account, and then register our application in this account. Once this is done, we can send messages from the notification hub to this application, hence to devices where the application is installed.

Steps to register the UWP application

These are the steps to take to set up a UWP application showing popups when a notification is sent. Below are more details for each step.

  1. If  this is your first UWP application, register your company (or you personally) in Windows Store.
  2. Register the app in Windows store, to obtain the necessary IDs.
  3. Create a notification hub in MS Azure, link it with the app IDs that we just registered.
  4. Create a UWP app to receive the notifications and show Toast messages to the users.
  5. Deploy this app in the Windows Store.

Registering the company in the Windows Store

  • Go to the Windows Dev Center and sign in with your Microsoft account.
  • Now click on “Windows / XBOX” and follow the steps to register yourself or your company.
  • The registration is finalized by entering your creditcard data. At the moment of writing (March 2020) it costs 14€ for an individual developer, and 75€ for a company. There is a warning that registering a company can take some time (possibly weeks) to verify the account. Creating a personal account seems to be immediate.

Create an app in the Windows Store

Now that we have a developer account we can create a new app in that same portal. Click on “Create a new app” to start the registration.

New app button

Enter a name for your app and click on “Check Availability”. If this is OK, you can proceed by clicking on “Reserve product name”. To be able to send notifications to this application, we need to retrieve some IDs.


  • In the menu on the left click on “Product Management” > “WNS/MPNS”. This opens the Push notifications page.
  • In the page is a link “Live Services site”. The link opens your Notifications Registration page in a new tab.
  • On this page you find the Application Secrets and the Package SID. Either keep this page open, or take a note of the values. We will need them when setting up the Notification hub.

On this page you can also add a logo if you want.

Create a Notification Hub

To create the notification hub, you will of course need an Azure account. If you don’t have an Azure account yet, follow the steps outlined here.

Log in to the portal to create the notification hub. The easiest way to do this is by clicking on the “hamburger menu” in the top left corner and then select “Create a resource”.


Type “Notification Hub” in the search box and press enter. You can review the overview and the plans. Click on “Create” to start the creation of the resource.

This takes us to the Basics tab:

The main things to fill out here are

  • Resource group. You can select an existing resource group or create a new one. I usually create a resource group per application, and per environment (ACC / PROD). I also apply naming conventions to nicely separate all. The name of this resource group can be something like “myapp-rg-dev”.
  • Notification Hub Namespace. Enter a unique name here. Also apply naming conventions.
  • The same for Notification Hub.
  • Don’t change the pricing tier. You can do that later, when the application outgrows the capacity.

You can now go to the “Tags” tab to enter some tags if you want, or click “Create” directly. This will create the Notification hub namespace and the Notification hub itself.

Link the UWP app to the Notification hub

Once the notification hub is created, you can go to the “Windows (WNS)” tab to enter the package SID and the Security key from the UWP app that we just registered. Don’t forget to click “Save”!

Create a UWP app to show notifications

We will keep the app very simple, the only thing it needs to do is wait for a notification to arrive, and then display that notification as a Windows toast. The nice thing is that once the app installed via the Microsoft store, it doesn’t have to be running to receive the toasts. When the app is installed, it will be opened so all we want is some static welcome screen.

  • In Visual Studio 2019 you need to have the UWP app-development tools installed. This can be done by running the VS2019 setup. When you create a new project, you can now pick the “Blank App (Universal Windows)” project template.
  • Give the application a name, and use the defaults for the other settings. 
  • Hit F5 and admire the empty application.

MainPage.xaml

Nothing fancy here, especially given that I am “graphically handicapped.”

<Page
x:Class="****Notifications.MainPage"
xmlns="http://schemas.microsoft.com/winfx/2006/xaml/presentation"
xmlns:x="http://schemas.microsoft.com/winfx/2006/xaml"
xmlns:d="http://schemas.microsoft.com/expression/blend/2008"
xmlns:mc="http://schemas.openxmlformats.org/markup-compatibility/2006"
mc:Ignorable="d"
Width="Auto" Height="Auto"
>
<Page.Background>
<AcrylicBrush TintColor="#FF35B2A6"/>
</Page.Background>

<StackPanel>
<TextBlock Text="**** Notifier" Foreground="#FCFFFFFF" FontSize="72" HorizontalAlignment="Center"/>
<TextBlock Text="This application will show a message in the system tray when new COVID updates are avaialable." Foreground="#FCFFFFFF" FontSize="18" HorizontalAlignment="Left" TextWrapping="WrapWholeWords" />
<TextBlock Text="You can safely close this window, you will still receive the notifications." Foreground="#FCFFFFFF" FontSize="18" HorizontalAlignment="Left" TextWrapping="WrapWholeWords"/>
</StackPanel>
</Page>

Mainpage.cs is not changed at all.

App.xaml.cs

This is where the magic happens. But it is also disappointingly simple because UWP does the hard work.

I have created a new function that will hook the app to the events sent by the notification hub:

private async void InitNotificationsAsync()
{
var channel = await PushNotificationChannelManager.CreatePushNotificationChannelForApplicationAsync();
var hub = new NotificationHub("****-notifications-hub", "Endpoint=sb://****-notifications-ns.servicebus.windows.net/;SharedAccessKeyName=DefaultListenSharedAccessSignature;SharedAccessKey=3aqps-secret stuff=");
var result = await hub.RegisterNativeAsync(channel.Uri);
}

Of course it would be wise to obtain the connection string from a config file, I didn’t do this for the sake of simplicity.

This function is called from the OnLauched function, and that’s it.

/// <summary>
/// Invoked when the application is launched normally by the end user. Other entry points
/// will be used such as when the application is launched to open a specific file.
/// </summary>
/// <param name="e">Details about the launch request and process.</param>
protected override void OnLaunched(LaunchActivatedEventArgs e)
{
InitNotificationsAsync();
Frame rootFrame = Window.Current.Content as Frame;
// ...
}

Testing the application

Run your application (F5 or ctrl+F5). The main window will appear.

No go to the notification hub and in the overview click on “Test Send”. Set the parameters as in the screenshot and click on Send. If all goes well, you will see a toast appearing on your desktop. 

This notification is only sent to 10 users (as it is only used to verify that your app is working properly).


Deploying the app to the Microsoft Store

There are some settings to be verified before deploying your app.

  • Right-click your project > Properties to open the properties window.
  • Click the “Package Manifest” button. This is where you can set all the information about your app to make it valid for the store. There is some work to be done here, but it is all straightforward.
  • Once this is all done, you can deploy your project by Build > Deploy.  
  • Go back to the application overview in the Windows Dev Center, open Products on the left and click on your application. In the “Application overview tab” you will see the new submission under (you guessed it right) “Submissions.”
    • Click on the “Update” button next to it and follow the instructions. You can enter the price, age ratings, … here and start making money!

Sending a notification from an application

We can send notifications from any type of application, it doesn’t need to be a UWP app. Here is the Toaster class that will do the work. 

internal class Toaster
{
private const string _secret = "hub secret";
private const string _sid = "ms-app://app id";
private const string _uri = "https:// hub uri";
private const string _notificationType = "wns/toast"; // wns/toast | wns/tile | wns/badge / wns/raw
private const string _contentType = "application/xml";

public async Task PostToWns(string xml)
{
var client = NotificationHubClient.CreateClientFromConnectionString("Endpoint=sb://hdmp-notifications-ns.servicebus.windows.net/;SharedAccessKeyName=DefaultFullSharedAccessSignature;SharedAccessKey=ijztkVtbIDtELzAJQKIkcwLy8Ru6d+tM3k7K/33yrA4=",
"hdmp-notifications-hub");

await client.SendWindowsNativeNotificationAsync(xml);
}
}

This will generate a toast message from the xml that is passed. The format of the xml must be correct of course. This format is documented here: https://docs.microsoft.com/en-us/windows/uwp/design/shell/tiles-and-notifications/toast-xml-schema. 

In the store you can also find a great app, called “Notifications Visualizer”. This app allows you to edit notifications and test them locally. This allows to rapidly compose and test your messages. 

References

https://docs.microsoft.com/en-us/azure/notification-hubs/

https://docs.microsoft.com/en-us/azure/notification-hubs/notification-hubs-windows-store-dotnet-get-started-wns-push-notification 

https://docs.microsoft.com/en-us/windows/uwp/design/shell/tiles-and-notifications/toast-xml-schema

Publishing your app to the store


Posted in .Net, Architecture, Azure, Cloud, Codeproject, Development | Tagged , , , | 1 Comment

Obtaining a free MS Azure account

In many of my posts I talk about how to perform specific actions and tasks using MS Azure. If you don’t have an account yet, here is how you can create a test account easily:

On the Azure home page you can find the steps to create a free subscription, that will be valid for 3 months. On the page you get a list of all the free services that you will receive when signing up. 

The “start free” button will take you to a login page. If you have already a Microsoft account, you can use it here, or you can create a new account. Go through the login procedure to get to the sign-up page. Your credit card number will be asked in the subscription process, but it will never be charged. So you are safe 🙂

Enjoy your new MS Azure subscription!


Posted on by Gaston | Leave a comment

How to use Microsoft Azure Key Vault

Introduction

In this post I will describe how to set up and use an Azure key vault to store your secret values.

Sometimes we see secrets like storage keys and connection strings written as literals in the code of a project, such as

public static class Secrets
{
  public const string ApiKey = "MyAppKey";
  // ...
}

This doesn’t seem too bad because

  • It is the fastest way to obtain a key
  • Probably the key won’t change too often in time

But there are some serious drawbacks to this way of working as well:

  • If the key does change, code needs to be adapted and redeployed.
  • The key is plain visible in the code.
  • The key is “for ever” in the source code system, maybe even on a public repository.
  • When you change the environment (from DEV to ACC to PROD), the key will probably change as well. This becomes a problem with a hard-coded key.

It would be nice to store the key elsewhere, but what are the options?

  • The key can be stored in a configuration file. This is better already, but this file will still be readable by developers (and on the public repo).
  • The key can be stored in Azure. This is what we’re going to talk about in this article.

Prerequisites for this article

If you want to follow along with the examples, you’ll need an Azure subscription. On the Azure home page you can find the steps to create a free subscription, that will be valid for 3 months.

Introducing Azure Key Vault

We can store the following items in a Key Vault, for later use:

  • Secrets. A lot of types of data can be stored here, such as tokens, passwords, keys, …
  • Keys. Encryption keys can go here, and can be references later to encrypt / decrypt your data.
  • Certificates.

These items are stored securely in the vault, only users (or processes) with the right access rights will be able to retrieve them. This access is monitored, so you can know who accessed what, and how the performance of the Key Vault is.

KeyVault

Creating an Azure Key Vault

In the Microsoft Azure portal

image

  • Click on the “Create a resource” button at the top left.
  • In the blade that appears enter “Key Vault” in the search box and select “Key Vault” from the list below.

image

Click “Create” and fill in the necessary parameters:

  • Name: a unique name for the key vault
  • Subscription: the subscription that will contain your key vault
  • Resource group: here you can either select an existing resource group or create a new one. For this example, you may want to create a new resource group so you can clean up everything easily when you are done “playing”.
  • Location
  • Pricing tier: standard, unless you want HSM backed keys.
  • Access policies: by default the current user will be the owner of the key vault. You can add or remove permissions here.
  • Click on “Create” and the key vault will be created for you. This can take some time.

Inserting values in the Key Vault

  • Find your new key vault in Azure, and click on it. If your subscription contains a lot of objects, you may first select the resource group that the key vault is in.
  • You now see the overview page, with some useful information.
    image

    • The main important piece of information here is the DNS Name (top right).  You will need this to connect to the key vault from your code.
    • You can also see the number of requests, the average latency, and the success ratio.
    • Pro tip: make a note of the average latency as a baseline value for future requests.
  • On the left side click on “Secrets”. You will see all the currently stored secrets. If you just created the key vault, this will be empty.
  • Click on “Generate/Import” to create a new secret:
    • Upload options: manual
    • Name: Password   (for our example)
    • Value: My Secret
    • Content type: leave this empty
    • If you wish you can also set an activation date and an expiration date for this secret. We will leave this empty for our example.
    • Make sure that “enabled” is set to yes and click “Create”.

When you click on the “Secrets” button on the left again, you will now see an entry for this key.

If you prefer to do this by scripting, the next section is for you.

Setting up the key vault using Azure Cloud Shell

Using a script to create an Azure object makes it repeatable. If you have multiple tenants, you can compose a script that will create the necessary objects for each tenant. This will save you time because

  • obviously, executing a script is faster than creating each object by hand
  • consistency. If everything is scripted, you can be sure that all the objects are created the same for each tenant. This can save you hours of finding configuration bugs.
  • you can keep the scripts in source control, which allows you to version them as well.

Open Cloud Shell

image

At the top, click the “Cloud Shell” icon. If this is the first time that you open the cloud shell, a wizard will be shown to set up the shell. You can choose the scripting language to use (PowerShell or Linux Bash), and then Azure will create some storage for you. There is also a fair warning that the storage will cost you some money.

For this example I will use Linux Bash.

RESOURCE_GROUP='CodeProject'
LOCATION='WestEurope'
KEY_VAULT='CPKeyVault666'

az group create --name $RESOURCE_GROUP --location $LOCATION
az keyvault create --resource-group $RESOURCE_GROUP --name $KEY_VAULT
az keyvault list
az keyvault secret set --vault-name $KEY_VAULT --name Password --value 'My Secret'
az keyvault secret list --vault-name $KEY_VAULT
az keyvault secret show --vault-name $KEY_VAULT --name Password --query value --output tsv

Using Azure Key Vault in your .NET project

Project setup

clip_image001

Using Visual Studio 2019, create a new .NET Core Console App, name it ‘KeyVault’.

NuGet packages

To use Azure Key Vault, you’ll first need to add 2 NuGet packages to your project:

  • Microsoft.Azure.KeyVault
  • Microsoft.Azure.Services.AppAuthentication

Open the “Package Manager Console” (Tools > NuGet Package Manager > Package Manager Console…) and type the following statements:

install-package Microsoft.Azure.KeyVault
install-package Microsoft.Azure.Services.AppAuthentication

In your source file you will need the following using statements:

using Microsoft.Azure.KeyVault;
using Microsoft.Azure.Services.AppAuthentication;

Reading a string from the Key Vault

To separate the concerns in the application it is best to create a separate class for this, such as:

using System.Collections.Generic;
using System.Threading.Tasks;
using Microsoft.Azure.KeyVault;
using Microsoft.Azure.KeyVault.Models;
using Microsoft.Azure.Services.AppAuthentication;

namespace KeyVault
{
  public class KeyvaultUtilities : IKeyvaultUtilities     
  {
     private readonly IKeyVaultClient _keyVaultClient;         
     private readonly string _vaultBaseUrl;

     public KeyvaultUtilities(string keyvaultName)         
     {             
        _vaultBaseUrl = $"https://{keyvaultName}.vault.azure.net";             
        AzureServiceTokenProvider azureServiceTokenProvider = 
		new AzureServiceTokenProvider();             
        _keyVaultClient = new KeyVaultClient(
		new KeyVaultClient.AuthenticationCallback(azureServiceTokenProvider.KeyVaultTokenCallback));         
     }
     /// <summary>         
     /// Get the value for a secret from the key vault.         
     /// </summary>         
     /// <param name="keyname"></param>         
     /// <returns></returns>         
     /// <exception cref="KeyVaultErrorException">When the key is not found, this exception is thrown.</exception>         
     public async Task<string> GetSecretAsync(string keyname)         
     {       
        try             
        {
           var secret = await _keyVaultClient.GetSecretAsync(_vaultBaseUrl, keyname)
                         .ConfigureAwait(false);
           return secret.Value;             
        }
        catch (KeyVaultErrorException kvex)
        {
           throw new KeyNotFoundException($"Keyname '{keyname}' does not seem to exist in this key vault", kvex);
        }
      }
   }
}

The purpose is to read a secret from the key vault, so that is the only method that I have implemented. You can add other key vault related methods in the class when needed.

Using this class is easy. Instead of passing the key vault name as a string, you may get it from a settings file. That will also allow you to travel easily through your development environments.

Notice that we never created a secret with a name “xyz”. Trying to retrieve this value will throw a KeyNotFoundException.

using System;
using System.Threading.Tasks;

namespace KeyVault
{
  class Program
  {
     static async Task Main(string[] args)
     {
        Console.WriteLine("Hello World!");
        IKeyvaultUtilities util = new KeyvaultUtilities("cpkeyvault666");

        string pwd = await util.GetSecretAsync("Password");
        Console.WriteLine("Password: " + pwd);
        string xyz = await util.GetSecretAsync("xyz");
        Console.WriteLine("xyz: " + pwd);
     }
  }
}

Cleanup in Azure

On the Azure Portal go back to the Cloud Shell. Delete the ‘CodeProject’ resource group:

RESOURCE_GROUP='CodeProject'
az group delete --name $RESOURCE_GROUP --yes

This will delete the ‘Codeproject’ resource group, with all of its contents. Don’t worry if you don’t perform this step, the key vault only costs you a wobbling 3 cents per 10000 operations.  You can calculate your costs here: https://azure.microsoft.com/en-us/pricing/calculator/.

You can also delete the resource group through the Azure portal.

First retrieval of the secret can be (very) slow

Retrieving the first key can take several seconds. If you are not sure that you will always need a secret from the key vault you may consider using the class Lazy<T>.

The next retrievals are fast.

For this reason you may consider to register the KeyVaultUtilities as a singleton and inject it instead of recreating it each time. How you do this will depend on the type of application that you are creating.

References

https://docs.microsoft.com/en-us/azure/key-vault/key-vault-overview

https://docs.microsoft.com/nl-be/azure/key-vault/quick-create-net

https://docs.microsoft.com/en-us/azure/key-vault/tutorial-net-create-vault-azure-web-app

Posted in .Net, Architecture, Azure, Codeproject, Development | Tagged | 3 Comments

Creating multiple identical VMs in Microsoft Azure

Introduction

I am preparing a course for 5 persons. They will all need a virtual machine (VM) with Visual Studio 2017 and some files on to perform exercises. I could create each machine, one by one and perform the same installation everywhere but this would not be very productive, and error-prone. Instead I want to create the virtual machines by creating a “master” image, from which I can easily create the other VMs.

Prerequisites

If you don’t have an Azure account yet, there are some ways to get a free test account. You can surf to https://portal.azure.com, where your credentials will be asked. If you don’t have an account yet, you click on “Create One!” and Microsoft Azure will gladly guide you to create a new account. This account will be free for the first 3 months and will provide you with a free (limited) budget to allow you to test Microsoft Azure.

Creation of the first VM

I want to create a Windows VM image that will contain Visual Studio 2017, and all the necessary course files. I already took these steps to organize my Azure resources:

  • Created a new resource group called “courses”.
  • In that resource group created a new VM called “vs2017-2”.
  • Once the VM was running, installed all the needed software and downloaded the needed files.

This is not the scope of this article, so I won’t describe this here. It would make a boring blog post…

Preparing the VM to be used as a template image

Now that the VM is installed the way we like it, let’s destroy it …

We are going to prepare the image in a way that it can be deployed on multiple computers (or VMs in our case). These don’t necessarily have the same configuration, so we need a tool to prepare for this cloning process. Enter sysprep.exe.

Sysprep can strip the image to the minimum, allowing it to be used to create other VMs. Each VM that we will create using this image will have the same software installed, with the same data files, settings, …

You can find sysprep in this folder: %windir% \System32\Sysprep. On https://blogs.technet.microsoft.com/danstolts/2014/05/how-to-sysprep-sysprep-is-a-great-and-powerful-tool-and-easy-too-if-you-know-how-step-by-step/ you can find the use of Sysprep described in a very good way.

Sysprep can be used with parameters (when you know what you are doing), or just without parameters, which will pop up a little form. In the screenshot, you can see the form with the right values filled in:

Out of Box Experience.

Generalize. This checkbox will change your image so that it can be run on a different computer. All the hardware-specific settings will be removed.

Shutdown. With the previous 2 settings you’re going to make a clean image of your computer which will only be useful to create other images from. So you don’t want to try to reboot this image.

Click OK, when you’re certain that all the security data can be wiped from this VM. Sysprep will clean up your VM, and then execute the generalize step. This can take several minutes to run. When it is ready, we can go back to the Azure portal to capture the image.

Capturing the VM in Azure

As said before, the next step is now to capture the VM, so that we can clone it later. This is done on the blade for the VM itself. To go there: open the “courses” resource group, then open the VM that you just created and generalized. On the top menu you’ll find the “Capture” button.

Clicking this button takes us into the “Create image” page, with will show some warnings to start with. Here you’ll give your new image a name, assign it to a resource group and you get the possibility to delete the VM that you are capturing. This makes sense because that VM will not be useful anymore. Below, I have created an image called “vs2017-image”, in the resource group “courses” and decided to clean up (Automatically delete):

Clicking on the “Create button” …

  • Stops the VM. When you have shut down the VM, it still is available in Azure (and still costs money). If you’re not going to use a VM for a while, don’t forget to also Stop it in the Azure portal. Warning: when you restart the VM in the portal, it will have another IP address. If you downloaded the RDP file to access this machine, you’ll need to adapt the IP address in the RDP file, or download it again. For the course I will only use the 5 VMS for 4 days, and only between 8:00 and 17:00. Therefor I also create a policy on each VM that will make the VM stop at 18:00.
  • Generalizes the VM further.
  • Creates the image.
  • Deletes the VM, as requested.

Even though the VM is deleted, other elements are not automatically deleted, so this needs to be done manually. These items don’t cost a lot in MS Azure, but it is a good practice to remove what you don’t need anymore.

  • Public IP address. Click on the Public IP address to open its blade. Click on the “Dissociate” button to remove it from its network interface (and confirm). Now you can click the “Delete” button to make the final kill!
  • Network interface. Open the blade by clicking on the name, then click “Delete” (and confirm).
  • Network security group. Open the blade by clicking on the name, then click “Delete” (and confirm).
  • The Disk. Open the blade by clicking on the name, then click “Delete” (and confirm).

The order of deletion is important, because some resources depend on others.

Creating a new virtual machine from the image

Now comes the time to profit from the work before. In the Azure portal, click on the image that you created (in this example “vs2017-image”). In the blade that appears, click on “Create VM”. This will take you through a wizard-like series of pages to enter all the necessary parameters. The important parameters are:

  • Resource group. You can select an existing resource group; or create a new one for the VM.
  • VM name. This must be a unique name for your VM.
  • Image. This will be pre-filled with the image name that you just created.
  • Size. The size for your new VM. This can be modified afterwards if needed.
  • Username / password.
  • Inbound port rules. If you want to access the VM over RDP, you need to add this here:

    You can specify these rules on the first page of the wizard, or on the network tab.
  • Most of the other fields will depend on your specific needs.

When you’re done, click on the “Create” button. The VM is now created from the image. You can test the VM by starting it; and connecting to verify if everything works correctly. When the VM is created, it is already started so you can connect immediately to it.

To create additional VMs, you don’t have to wait for the first VM to finish creation.

Conclusion

When you need one or two VMs it may not be worth setting up an image to clone the VMs from. But when you need more than that, you’ll save a lot of time using the sysprep / capture combo. In the end the steps to create an image are quite simple:

  • Create a VM that will serve as the master template. Install all the necessary software on it, together with all the data files that you may need. When everything works remove temporary files that you left during the testing of the VM. If needed, also remove MRU lists (ex in Visual studio: recently used files and projects) and other user state.
  • Run the sysprep tool on this VM.
  • Once sysprep is done, and the VM is shut down, capture the VM in the Azure portal. It is not necessary to remove all the left-overs from the master VM, but it is good practice.
  • When the capture is done, you can create new VMs from the created image.

References

Posted in Azure, Cloud, Codeproject | Tagged , , , | Leave a comment

Why would you use Common Table Expressions?

Introduction

In this article I suppose that you have a good understanding of SQL already. I will introduce some concepts very briefly before moving on to Common Table Expressions.

Below you can find the relevant database diagram of the database that I will use in this article:

image

How is SQL processed by SQL Server?

When we look at a basic SQL statement; the general structure looks like

SELECT <field list>
FROM <table list>
WHERE <row predicates>
GROUP BY <group by list>
HAVING <aggregate predicates>
ORDER BY <field list>

As a mental picture we see the order of execution as:

First determine where the data will come from. This is indicated in the <table list>. This list can contain zero or more tables. When there are many tables, they can be joined using inner or outer join operators, and possibly also cross join operators. At this stage we consider the Cartesian product of all the rows in all the tables.

select count(*) from [HR].[Employees]                    -- 9
select count(*) from [Sales].[Orders]                    -- 831
select count(*) from [HR].[Employees], [Sales].[Orders]  -- 7479
select 9 * 831                                           -- 7479

In the third query we combine the tables, without a join operator. The result will be all the combinations of employees with orders, which explains the 7479 rows. This can escalate quickly.

As a side remark: this is valid SQL, but when I encounter this in a code review it will make me suspicious. One way to make clean that you want all these combinations is the CROSS JOIN operator:

select count(*) from [HR].[Employees] cross join [Sales].[Orders]    -- 7479

This will be handled exactly the same as query 3, but now I know that this is on purpose.

Image result for sql joke

Once we know which data we are talking about, we can then filter using the <row predicates> in the where clause. This will make sure that soon in the process the number of rows is limited. In most join operators there is a condition (inner join T1 on <join condition>) which would be applied here, again limiting the number of rows.

select count(*) 
from [HR].[Employees] E 
inner join [Sales].[Orders]    O on E.empid = O.empid    -- 831

The predicate E.empid = O.empid will make sure that only the relevant combinations are returned.

If there is a group by clause, that happens next, followed by the filtering on aggregated values.

Then finally SQL looks at the <field list> to determine which fields / expressions / aggregates to make available, and then the order by clause is applied.

Of course this is all just a mental picture

Imagine a join between 3 tables, each containing 1000 rows. The resulting virtual table would contain 1.000.000.000 rows, on which SQL would have then to select the right ones. Through the use of indexes SQL Server will only obtain the relevant row combinations.  Each DBMS (Database Management System) contains a query optimizer that will intelligently use indexes to obtain the rows in the <table list>, combined with the <row predicate> from the where condition, and so on. So, if the right indexes are created in the database, only the necessary data pages will be retrieved.

Inner queries

The table list can also contain the result of another SQL statement. The following is a useless example of this:

select count(*) 
from (select * from [HR].[Employees]) E

This example will first create a virtual table named E as the result of the inner query, and use this table to select from. We can now use E as a normal table, that can be joined with other tables (or inner queries).

Tip: It is mandatory to give the inner select statement an alias, otherwise it will be impossible to work with it. Even if this is the only data source that you use, an alias is still needed.

As an example I want to know the details of the 3 orders that gave me the highest revenue. To start with, I first find those 3 orders:

select top 3 [orderid], [unitprice] * [qty] as LineTotal
from [Sales].[OrderDetails]
order by LineTotal desc

This gives us the 3 biggest orders:

orderid LineTotal
10865 15810,00
10981 15810,00
10353 10540,00

Now I can use these results in a query like

select *
from [Sales].[OrderDetails]
where orderid in (10865, 10981, 10353)

which will give the order details for these 3 orders, at this point in time. I can use the result of the previous query in the where condition to make the query work at any point in time:

select *
from [Sales].[OrderDetails]
where orderid in 
(
    select top 3 [orderid]
    from [Sales].[OrderDetails]
    order by [unitprice] * [qty] desc 
)

This query will give me the correct results. I just had to adapt some things from the initial query because the IN clause requires a list of values, so we can only return 1 value (the [orderId]. The order by clause then needs to use the full expression. Don’t worry, no more calculations than needed will be done. Trust the optimizer!

To further evolve this query we can now use an inner join instead of WHERE … IN. The resulting execution plan will be the same again, and the results too.

select *
from [Sales].[OrderDetails] SOD
inner join (select top 3 [orderid]
    from [Sales].[OrderDetails]
    order by [unitprice] * [qty] desc) SO 
on SO.orderid = SOD.orderid

Common Table Expressions

With all this we have gently worked toward CTEs. A first use would be to separate the inner query from the outer query, making the SQL statement more readable. Let’s first start with another senseless example to make the idea of CTEs more clear:

;with cte as
(
    select top 3 [orderid]
    from [Sales].[OrderDetails]
    order by [unitprice] * [qty] desc
)
select * from cte

What this does is to create a (virtual) table called cte, that can then be used in the following query as a normal data source.

Tip: the semicolon at the front of the statement is not needed if you just execute this statement. If the “with” statement follows another SQL statement then both must be separated by a semicolon. Putting the semicolon in front of the CTE makes sure you never have to search for this problem.

The CTE is NOT a temporary table that you can use. It is part of the statement that it belongs to, and it is local to that statement. So later in the script you can’t refer to the CTE table again. Given that the CTE is part of this statement, the optimizer will use the whole statement to make an efficient execution plan. SQL is a declarative language: you define WHAT you want, and the optimizer decides HOW to do this. The CTE will not necessarily be executed as first, it will depend on the query plan.

Let’s make this example more useful:

;with cte as
(
    select top 3 [orderid]
    from [Sales].[OrderDetails]
    order by [unitprice] * [qty] desc
)
select *
from [Sales].[OrderDetails] SOD 
inner join cte on SOD.orderid = cte.orderid

Now, for us humans we have split the query in 2 parts: we first calculate the 3 best orders, then we use the results of that to select their order details. Like this we can show the intent of our query.

In this case we use the CTE only once, but if you would use it multiple times in this query it would become more useful.

Hierarchical queries

image

In this table we see a field empid, and a field mgrid. (Almost) every employee has a manager, who can have a manager, … So clearly we have a recursive structure.

This kind of structures often occurs with

  • compositions
  • Categories with an unlimited level of subcategories
  • Folder structures
  • etc

So let’s see how things are organized:

select [empid], [firstname], [title], [mgrid]
from [HR].[Employees]

Gives us the following 9 rows:

image

We can see here that Don Funk has Sara Davis as a manager.

If we want to make this more apparent, we can join the Employees table with itself to obtain the manager info (self-join):

select E.[empid], E.[lastname], E.[firstname], 
       E.[title], E.[mgrid],
       M.[empid], M.[lastname], M.[firstname]
from [HR].[Employees] E
left join [HR].[Employees] M on E.mgrid = M.empid

Notice that a LEFT join operator is needed because otherwise the CEO (who doesn’t have a manager) would be excluded.

image

We could continue this with another level until the end of the hierarchy. But if a new level is added, or a level is removed, this query wouldn’t be correct anymore. So let’s use a hierarchical CTE:

;with cte_Emp as
(
select [empid], [lastname] as lname, [firstname], [title], 
       [mgrid], 0 as [level]
from [HR].[Employees]
where [mgrid] is null

union all

select E.[empid], E.[lastname], E.[firstname], E.[title], 
       E.[mgrid], [level] + 1 
from [HR].[Employees] E 
inner join cte_Emp M on E.mgrid = M.empid
)
select *
from cte_Emp

I’ll first give the result before explaining what is going on:

image

As explained before we start with a semicolon, to avoid frustrations later.

We then obtain the highest level of the hierarchy

select [empid], [lastname], [firstname], [title], 
       [mgrid], 0 as [level]
from [HR].[Employees]
where [mgrid] is null

This is our starting point for the recursion. Using UNION ALL we now obtain all the employees that have Sara as a manager. This is added to our result set, and then for each row that is added, we do the same, effectively implementing the recursion.

To make this more visual I added the [level] field, so you can see how things are executed. Row 1 has level 0, because this is the part of the query (0 as [level]). The for each pas in the recursive part, the level is incremented. This explains perfectly how this query is executed.

Conclusion

Common Table Expressions are one of the more advanced query mechanisms in T-SQL. They can make your queries more readable, or perform queries that would otherwise be impossible, such as outputting a hierarchical list. In this case the real power is that a CTE can reference itself, making it possible to handle recursive structures.

Reference

https://docs.microsoft.com/en-us/sql/t-sql/queries/with-common-table-expression-transact-sql

Posted in Codeproject, Databases, Development, SQL | Tagged , | Leave a comment