Implementing the Excel Simulator in F#

Introduction

In my previous post we talked about how to structure an Excel workbook to make it easy to perform changes. As a side effect we have now a good idea of what is the data, and what is the functionality that the workbook implements. This allows us to replace the workbook by an equivalent F# program, which was our “hidden agenda” all along 😉

What we want to achieve:

  • high-level: use a set of input parameters to generate a data set of output records
  • mid-level: some calculations can already be done on the input parameters without the corresponding records in the database. We want to separate these out.
  • low-level: we want to read data from the database to lookup some values, to filter the rows that we need and to transform them into the output records.
  • We will need to implement some Excel functionality, for example the VLOOKUP function.

I am not an expert in F# (yet), so feel free to drop comments on how this can be done better or different.

Attack Plan

There are 2 main ways to start this journey: top-down or bottom-up. Actually there is also a third way in which we work top-down and bottom-up at the same time, to meet in the middle. This may be what we need here.

First helper functions (aka bottom-up)

let round100 (x:decimal) = // ROUND(i_ConsJr*r.NormalPricePerkWh/100;2)
    let y = System.Math.Round x 
    y / 100M
This is an easy function to start with: round a decimal on 2 digits after the decimal point. This function is used quite some times, and it is very easy to write, so why not use it 😉
let n2z (x:Nullable<decimal>) =
    if x.HasValue then x.Value else 0M

let n2zi (x:Nullable<int>) =
    if x.HasValue then x.Value else 0

let n2b (x:Nullable<bool>) =
    if x.HasValue then x.Value else false
Another set of easy functions to cope with database NULL values. Very simple, but useful!
let rec LookupNotExact ls f v =
    match ls with
    | [x] -> x
    | h::t::s -> 
        if f t > v then h
        else LookupNotExact (t::s) f v
    | [] -> raise (OuterError("LookupNotExact over empty list"))

(* Tests for LookupNotExact
let testls1 = [1;2;3;4;5]
let res1_3 = LookupNotExact testls1 (fun x -> x) 3
let res1_5= LookupNotExact testls1 (fun x -> x) 7

let testls2 = [1;2;3;6;7]
let res2_3 = LookupNotExact testls2 (fun x -> x) 3
let res2b_3 = LookupNotExact testls2 (fun x -> x) 5
let res2_7 = LookupNotExact testls2 (fun x -> x) 7
let res2b_7 = LookupNotExact testls2 (fun x -> x) 9
*)

The LookupNotExact function mimics the behavior of the Excel VLookup function. It finds in a sorted list the first value that is greater or equal than v. The nice thing is that this function can easily be tested using F# interactive. Just remove the comment from the tests , select the function with its tests and hit alt+enter. This will execute the selected code and display the results in the F# interactive window.

Some data structures

The next data structures serve only to make the code more readable. We could do without them just as easy. Some examples:

type Currency = decimal

type GasVolume =
    | KWH of decimal
    | M3 of decimal

type Languages = NL |FR
Using Currency instead of decimal makes it easy to see what is the purpose of a variable. It takes away the guessing about what a variable holds. Technically it is not different from decimal.
The gas volume can be expressed in either KWH or cubic meters. That is what we see in this data type. Again using 2 different constructors make clear what we are dealing with.
Languages is just an enumerator of 2 languages, as we would do in C#.
With these functions in place (and then some more boring ones) we can start to emulate the Excel formulas that we need. I’m not going into detail on this because I don’t want law suits 😉

Converting to CSV

In the end the results are exported. We export the values as a CSV file, which can be easily read back into Excel (for validation purposes). This will involve some reflection, here is the code:

module Csv

let ref = box "#REF!"

// prepare a string for writing to CSV            
let prepareStr obj =
    if obj = null then "null"
    else
        obj.ToString()
            .Replace("\"","\"\"") // replace single with double quotes
            |> sprintf "\"%s\""   // surround with quotes

let combine s1 s2 = s1 + ";" + s2   // used for reducing

let mapReadableProperties f (t: System.Type) =
    t.GetProperties() 
        |> Array.filter (fun p -> p.CanRead)
        |> Array.map f
        |> Array.toList

let getPropertyvalues x =
    let t = x.GetType()
    t   |> mapReadableProperties (fun p -> 
            let v = p.GetValue(x)
            if v = null then ref else v
            )

let getPropertyheaders (t: System.Type) =
    t   |> mapReadableProperties (fun p -> p.Name)
        |> Seq.map prepareStr
        |> Seq.reduce combine

let getNoneValues (t: System.Type) =
    t   |> mapReadableProperties (fun p -> ref)

let toCsvString x =
    x |> getPropertyvalues
      |> Seq.map prepareStr
      |> Seq.reduce combine
Let’s start with the ToCsvString function. It almost says what it does:
  • Get the property values from x (which is the part using reflection).
  • Each property value is mapped to a good CSV value (if it contains a double quote, then the double quote will be doubled, surround the value by double quotes)
  • Everything is combined in a comma-separates string using the Seq.reduce method.

The other functions are quite easy to understand as well.

The actual program

let main  = 
    let newOutput = Calculate myInput

    // output
    let newOutputHeaders = newOutput |> List.head |> newOutputPropertyHeaders
    let newOutputCsv = newOutput |> List.map newOutputPropertyValues

    System.IO.File.WriteAllLines(@"C:\temp\NewOutput.csv", 
	newOutputHeaders :: newOutputCsv);

    printfn "Find the output in %s" @"C:\temp\NewOutput.csv"

    printfn "Press enter to terminate..."
    Console.ReadLine() |> ignore

The program is composed of some simple statements that use the functions that we previously described. This makes the program very easy to read. Not much explanation is needed, but here goes:

  • newOutput will contain the result of the calculations using the input. This is the main purpose of the program. If this were implemented as a service, newOutput would be returned and that’s it.
  • For debugging purposes we output this as a CSV file, using the functions in the Csv module.

Conclusion

Writing this simulation as an F# program was not too hard. Immutability is baked into the FP paradigm, which was perfect for this case. So you could say that this is a nice match.

The Excel workbook itself is quite complex (and big). It is hard to maintain and to extend. The F# code on the other hand is quite readable. A nice (and unexpected) side-effect is that now we understand much better what goes on in the Excel, which helps us to maintain the Excel for as long as it is still used. Another nice thing is that the (non-technical) end-used is able to understand the F# code (with some explanation).


Posted in .Net, Codeproject, Development | 2 Comments

Structuring your Excel – “the hidden agenda”

Introduction

Most developers don’t like Excel as a “development platform”. Many projects are migration projects from an Excel solution to a “real application”. And often this is worth the trouble. But in some cases Excel has a lot of advantages.

An Excel workbook can be set up in many ways, and it usually starts off very small, to end in a big spaghetti where nobody knows what is going on. And nobody dares to change a thing. Sounds like a typical spaghetti .NET (or enter your favorite language) project. So let’s try to make our Excel project manageable.

Structuring your Excel

Every workbook starts with the first sheet. And initially there are some cells that we use as input, and then some cells are used as output. If you want to keep a nice overview of what is happening is is worth creating separate sheets for separate concerns.

image

Input sheet(s)

Use this sheet to gather all the input parameters from your users. This can be a simple sheet. In the end this us the user interface to your workbook, so make it easy for users to enter data. Use data validation and lookups to limit errors. The input sheets should be the only thing that can be modified by the end-users.

Enriching the input sheet

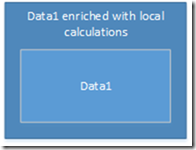
imageYou can also do some simple calculations that are local to the input sheet. For example adding 2 input fields together to see their total may be handy here. This also gives immediate feedback to the user. Looking up the city that goes with a ZIP code is another good example. I know that most of us have a problem remembering the syntax of “lookup” in Excel, hence the link Winking smile.

Depending on the nature of your applications there can be 1 or more input sheets. For example a simulation using some parameters will typically contain 1 input sheet, where an accounting application (with cash books, bank books, …) may contain multiple input sheets.

Principle: all the calculations that only concern the input data can be done already here. Using some data from the datasheets (as static data) can also be done here. This will give us the first intermediate results.

Output sheet(s)

imageThese sheets will contain the output for your users. The sheets should not contain calculations, only formatting. They will present the results from the calculation sheet(s). Of course formatting means changing fonts, colors, … and also cell formats.

Principle: This sheet contains no calculations, only formatting. Everything should be calculated in the calculations sheets already.

Data sheet(s)

imageYour workbook will probably need some data, and if you’re lucky this data is in a structured format. This data serves as static input for your calculations.

Often you will want to calculate some results per data row. This can be done in a separate sheet per data sheet that will contain all the necessary calculations that are only using data from that data sheet. Eventually you will want this data to be stored in a database to be able to access it from many applications (think reporting, for example).

To accommodate for this you can create the data sheets to contain only raw data, and then

  • Add columns to the raw data that contain calculations on the data per row. Maybe you have some fields to be added already in the data that you’ll need later, some Lookups to do. All that does not involve the input data can be done here. Make sure you put the calculations away from the data (separate them by some empty columns for later expansion of the raw data). It may also be a good idea to use colors to indicate which are the calculated fields.
  • Add a new sheet that will contain all the calculations for this data sheet that depend on the input parameters. This sheet will calculate intermediate results that are needed later.

Principle: Separate data from calculations, either by adding calculated columns at the end of the raw data, or by adding dedicated sheets to calculate these intermediate results.

Calculation sheet(s)

This is where you perform more complex calculations. Some simple calculations can be done on the input sheets and the data sheets already, but all the complex work should happen here. The calculation sheets will use the (calculated) data from many sheets and combine this data to become the final (unformatted) results. Because all the simple calculations have been done in the input- and datasheets, the calculation sheet is just consolidating this data.

Principle: This is where the sheets in the workbook are combined to produce the end result. The local calculations per sheet are done already, so that only the consolidation logic remains.

Keep your calculations as local as possible

In the proposed structure it is easy to see that calculations are done in the input sheet over only the input data (and maybe some lookups using the data sheets). Calculations over the data is done in a separate sheet per data sheet.

It is only in the calculation sheets that data will be combined from different sheets. In this way the workbook remains manageable, even when it grows bigger.

Structuring your workbook like this will also make intermediate results visible. These intermediate results will be calculated only once, and can be used everywhere. This has a couple of advantages:

  • The workbook is simpler because the intermediate results are calculated as close as possible to their data.
  • It is easier to create more complex formulas when the intermediate results are calculated already. Instead of trying to squeeze everything in 1 formula there are now building blocks available to be used.
  • The results become more consistent. The formulas for calculating the intermediate results are not repeated all over the workbook. So there is less of a risk that in some instances a formula is (slightly) different. This will prevent hard to solve errors.
  • The results are easy to test. The intermediate results are simple, so verifying if they are correct is easy. The more complex formulas are using the intermediate results as building blocks, so they become much easier to test too. If something goes wrong it is easier to track back where it went wrong. This can be seen as a kind of unit testing.

Did you notice how I don’t care about performance in this case? That is because the other advantages outweigh this by far. But of course there could be a performance gain as well.

Named cells and regions

This is an easy one. Excel allows to name cells or ranges of cells. Try to use a naming convention, for example:

  • Cells containing input fields will have a name starting with I_  (for example I_Zip code)
  • Ranges containing data for lookups can start with l_  (for example l_locations)
  • Cells containing intermediate results can start with c_  (for example c_TotalConsumption)

In this way the purpose of each cell or range is clear.

An additional advantage is that you can now move the named cells and ranges elsewhere in the workbook if you need to. As long as the new zone gets the same name, all the formulas referring to it will still work.

Excel as a functional language

If you look closely at an Excel workbook, then you’ll notice that the cells either contain input values which can be modified by the users, or output values. The output values are obtained by calculating formulas in various sheets, and with many dependencies. But each formula contains functions that have no side effects (unless you start to use non-deterministic functions of course).

So calling a function will never do something bad to your input data. It will of course update the cell which contains the formula, in a deterministic way.

Conclusion – Our hidden agenda

Once the workbook is properly structured it becomes easy to separate the data from the functions. The functions are now very clear and easy to implement in some programming language. The names ranges can be the names of variables in your program, making the match easy.

We use the Excel workbook here as input – processing – output, which can be perfectly done in a Functional language, such as F#. You will end up with data coming from the database, input parameters and functions to be applied. This will then give the end results. More on this in a later post.

Posted in Architecture, Codeproject | Tagged | 7 Comments

Improving throughput by using queue-based patterns

Introduction

In my current project we let the users run simulations. Because of flexibility, the calculations are performed by Excel spreadsheets. There are many different spreadsheets available, for different kinds of simulations. When the calculations rules for one of the simulations change it is just a matter of modifying the corresponding Excel spreadsheet. So in the current workflow this is how things happen (simplified):

image

Some of the spreadsheets contain a lot of data. The advantage of this is that the spreadsheet is completely self-contained, and there is no dependency on a database. This also means that the spreadsheets can easily be tested by the domain specialists.

But as you can see in the picture, some of the spreadsheets turn very big. So loading the spreadsheet in memory can sometimes take up to 10 seconds. We are lucky enough (?) to not have too many users using the simulations simultaneously. It is not always possible to keep the all the different spreadsheets in memory as memory is still not unlimited.

In some situations it is necessary to recalculate simulations. This is done by a daily batch job. As you can imagine this job runs pretty long. And the users must wait until the next day to see the new results because the job only runs once per day.

As a practical remark: Most of the pictures below contain a link to a page with more explanations.

Problems

As we can see, the design is really flexible but it has its drawbacks:

In the user interface it can take some time for a simulation to finish. When not too many users are performing simulations at the same time, this is more or less acceptable. Once the load on the server becomes heavier the throughput is not sufficient.

This solution is not easily scalable. We can put several servers behind a load balancer, but the servers will require a lot of memory and CPU(s) to perform the calculations timely.

The spreadsheets have a limit on their size. I don’t know by heart the maximum size of an Excel spreadsheet, but I am sure that it will be far less than any database. Also a lookup in a database happens very fast (if you put the indexes right etc), whereas a VLookup (or an alike function) in Excel will plough through the data sequentially. So the solution is not very extensible.

When many users are performing calculations the server will be very charged, and at quite moments the server does nothing. But when the batch job starts, the server will be charged again. Luckily we have a timeframe during the night where the server is less used, so we can then run the batch jobs without disturbing our users.

Introducing a queue

image

To spread the load of the simulations better in time we can start by putting requests on a queue. Several clients can put their requests on the queue at a variable rate. The messages are processed by a worker at a consistent rate. As long as there are messages on the queue, the working will handle them one by one. So no processing time goes lost.

So now when a simulation needs to be recalculated, it can be put on the queue and handled in time. The lengthy batch job is not needed anymore.

Of course with this initial design we introduce new problems. It is clear that requests coming from the UI should be processed before the background messages (fka “the batch job”).

A second problem (that is out of scope for this post) is that we put a message on the queue in a “fire and forget” mode. We just count on the fact that the queue with its worker will handle the message eventually. For the background messages this is ok, but the requests coming from the UI must return a result. This can be done in several ways, one of the most obvious ways being a response queue. When the worker has finished a calculation the result is put on the response queue, which is handled by a working on the UI side. This design will require the use of correlation IDs to work properly.

Improving the throughput

The previous solution will improve the average throughput because the batch requests are handled together with the UI requests. But it may take a while to empty the queue.

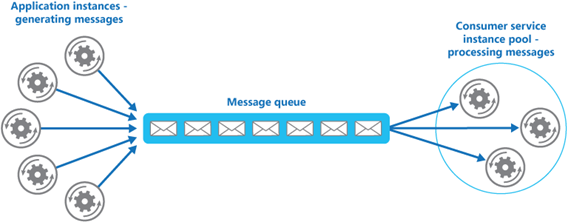
So the “Competing Consumers Pattern” was invented.

image

The left side of the queue can still receive requests from multiple (types of) clients. On the right side there can be more than 1 worker processing the messages. More handlers mean that more work is done in a shorter period.

Depending on the queue depth (the number of messages that are waiting on the queue) more workers can be added or removed. This is what we call elasticity.

So now the average time that a message is on the queue will be shorter, and we don’t use more CPU than necessary. This can be important in cloud scenarios where you have to pay per cycle.

The problem that background requests are still mixed with UI requests remains, but they will be handled faster, and in a scalable way.

Giving some priorities

We want UI requests to be executed first. So ideally they are put first on the queue. This takes us right into the “Priority Queue Pattern.

image

Each request will receive a priority. When a high priority request is placed on the queue, it will be executed before the lower level requests. So we put the UI requests on the queue with a high priority to make our users happy again.

This pattern can either be implemented with 1 queue handling the priorities, or by creating a high-priority queue and a low-priority queue. The high-priority queue can have more workers than the low-priority queue, saving CPU cycles on the low-priority queue again.

What about security?

We can create a small component (with its own endpoint) before the queue. This component can verify for each request if the user has the necessary rights to execute the request. We call this the “Gatekeeper Pattern”.

image

We can also validate the requests before they go on the queue (fire and forget), so we can give immediately a fault back to the client. We want to prevent exceptions in the workers, because this poses a problem: we can’t always report the error back to the client. Some solutions are to log the errors, or to create an error queue that can be handled elsewhere. This is also out of scope for this post.

Intermediate result 1

image

The solution that we have so far:

  • On the left side we can have many (different) clients sending requests to the queue.
  • Before the requests are handled, the gatekeeper verifies the permissions, and also the content of the message. This provides a fail fast mechanism and an initial feedback to the client.
  • Then the request is put on the queue with a specific priority.
  • The worker roles handle the messages in order of priority. When needed; more workers can be spawned to improve the throughput.
  • Finally the results are stored. Possibly the results of the calculations are put on a response queue to be consumed by the client.

Further improving the throughput

Currently the simulation spreadsheet is self-containing. It contains all the necessary data to execute a simulation. Let’s say that one of the input parameters is a zip code, and that we want to look up a record for this zip code. This means that the spreadsheet now contains thousands of rows with zip codes and their associated, of which only 1 row is needed.

So we could pass the request to a dedicated queue that will enrich the request with the zip data and then pass it to a next queue to perform the rest of the calculations.

Maybe after the calculation is done we want to enrich the results (as an example, we may perform translations). Of course there is a pattern for this: the “Pipes and Filters Pattern“.

image

Example pipeline:

  • Task A: enrich input parameters with data from the database (ex: lookups)
  • Task B: perform the Excel simulations
  • Task C: enrich the results (ex: translations)

There are some obvious advantages to this approach:

  • The spreadsheet doesn’t need to contain the data for the lookups, so it becomes smaller. This means that it will load faster, its memory footprint will be less, and it will be more performant because the (sequential) lookups aren’t necessary anymore.
  • The simulation becomes less complex. The domain experts can now concentrate on the problem at hand instead of performing all the lookups.
  • Tasks A and C will probably be much faster than task B (the simulation itself). So we can assign more workers to task B to balance the workload.

Adding more queues to simplify the work

In the current design every request must be analyzed to see which type of simulation must be executed. It would be simpler to have a queue or a pipeline per type of simulation. This can be accomplished by the “Message Router Pattern“.

image

The first queue implements the Message Router. Based on the content of the request, he message is routed to one of the queues.

Each type of simulation gets its own queue, making the processing per simulation simpler. Of course more queues will be involved, and it may be a good idea to start drawing the solution now.

Intermediate Result 2

image

The flow now becomes:

  • A client send a request to the Gatekeeper endpoint. If the request is allowed and valid, it is passed to the Message Router.
  • The Message Router analyzes the content of the request, and sends it to the corresponding queue (Simulation 1, 2 or 3).
  • The simulation queues are implemented as a pipeline where the input is enriched, the simulation is performed and the output is enriched. Finally the result is stored.
  • Depending on the tasks to be performed in each queue one or more workers can be assigned. This makes the solution highly scalable.

There are some more advantages:

  • Separation of Concerns. The implementation of each worker is simple because the whole workload is separated over multiple simple jobs.
  • Monitoring. It is easy to see where messages are in the process. This is impossible in a monolithic implementation.
  • Find the bottleneck. We only need to check the queue depths to find out where a possible bottleneck is. We can then assign more workers to this queue (or let Azure do this automatically).

Caching

Performing the simulation in one service made it very hard to cache the spreadsheets. The spreadsheets were big, and there are many types of simulations that would reside in one address space. Now we can load the spreadsheet in the worker role(s) where it is needed, resulting in the “Cache-Aside Pattern“.

image

The data for the lookups (enriching of the input parameters) can easily be kept in memory and the data for the translations as well.

Final Result

image

By separating all the workers it is easy to cache only the data that is needed. Client processes can be on different servers, and the worker processes as well. So we have effectively decoupled the clients from the workers. The throughput can be easily managed by playing with the number of workers, and the efficiency can be greatly enhanced by using caching.

In the end the implementation looks more complicated, but it is implemented in small, simple pieces that work together.

Conclusion

In this post I tried to take you through a couple of cloud design patterns. It is clear that this solution is very well suited to run in the cloud, because a lot of the functionality is already available. For example in Azure it is quite easy to set up the necessary queues, define the workers, and make it work.

There are many variations on this solution, each with its own advantages and drawbacks. So this is not THE solution to all problem. But it does show that we can create scalable, performant solutions by decoupling functionality using queue patterns.

If you have any ideas to add more patterns, or use different ones in this solution, feel free to use the comments section!

References

Cloud Design Patterns

Enterprise Integration Patterns

Posted in Architecture, Azure, Codeproject, Design Patterns, Development | Tagged , , , | Leave a comment

Knockout, self, this, TypeScript. Are you still following?

Introduction

I’m working on an MVC application with simple CRUD operations. I want the following functionality (don’t mind the Flemish (Dutch) titles):

image

Remember, I’m “graphically handicapped”, so I’m afraid that my users will have to do with the standard Bootstrap lay-out for now.

The buttons are self-explanatory and always show the same dialog box. The blue button (Bewaren = Save) changes to Insert or Delete, depending on which action the user chooses.

I will need this simple functionality on some more pages, so I want to make it a bit more generic. I don’t want to use an existing grid because the functionality I need for now is so simple that any grid would be overkill. And of course I’m suffering the NIH syndrome. I will describe the generic solution in another post later.

Knockout and the “self” thingy

If you have worked with Knockout before then you know that it is advisable to do something like this (from http://learn.knockoutjs.com/#/?tutorial=loadingsaving) :

function TaskListViewModel() {
    // Data
    var self = this;
    self.tasks = ko.observableArray([]);
    self.newTaskText = ko.observable();
    self.incompleteTasks = ko.computed(function () {
        return ko.utils.arrayFilter(self.tasks(), function (task) { return !task.isDone() 
               && !task._destroy });
        });

    // Operations
    self.addTask = function () {
        self.tasks.push(new Task({ title: this.newTaskText() }));
        self.newTaskText("");
    };

    // ...
}


TaskListViewModel is actually a function behaving like a class. As JavaScript doesn’t have classes (yet, wait for ES6), this is the only way to emulate classes. In every OO language, there is an implicit binding on “this”, referring to the object on which a method is called. As you may expect by now, this is different in JavaScript. “this” is referring to where the function is called from, and this is not necessarily the [emulated] class. This is one of the reasons that we all love JavaScript so much.  </sarcasm>

There are some ways to tackle this problem, and in the Knockout library they choose to use the pattern that you see in the code above. When the TaskListViewModel  is created, this refers to itself. So we then assign this to a variable in the Model:

var self = this;

The nice thing is now that we can call the functions in TaskListViewModel  from anywhere (that is, with possibly a different “this”) and that they will operate on the correct “self”.

Let’s try this in TypeScript

In TypeScript the problem remains the same but is even more tricky to detect. The code looks and feels like C# (thank you, Microsoft Glimlach) but eventually it is just JavaScript in disguise. So the “this” problem remains. And actually it get worse, check out the following (incomplete) code:

class Color {
    ColorId: KnockoutObservable<number>;
    ShortDescription: KnockoutObservable<string>;
    Description: KnockoutObservable<string>;

    constructor(id: number, shortDescription: string, description: string) {
        this.ColorId = ko.observable(id);
        this.ShortDescription = ko.observable(shortDescription);
        this.Description = ko.observable(description);
    }
}

In TypeScript every member of a class must be prefixed by this. So that should take care of the scoping problem, not?

Let’s add the ColorsModel class to this and then investigate some behavior:

class ColorsModel { 
    Action: KnockoutObservable<Actions> = ko.observable<Actions>();
    CurrentItem: KnockoutObservable<Color> = ko.observable<Color>();
    Items: KnockoutObservableArray<T> = ko.observableArray<T>();

    Empty(): Color {
        return new Color(0, "", "");
    }

    Create(c: any): Color {
        return new Color(c.colorId, c.shortDescription, c.description);
    }

    InsertColor(): void {
        var newColor: Color = this.Empty();
        this.Action(Actions.Insert);
        this.CurrentItem(this.Empty());
        $("#updateColor").modal("show");
    }

    RemoveColor(Color: Color): void {
        this.Action(Actions.Delete);
        this.CurrentItem(Color);
        $("#updateColor").modal("show");
    }

    UpdateColor(Color: Color): void {
        this.Action(Actions.Update);
        this.CurrentItem(Color);
        $("#updateColor").modal("show");
    }

}

var model = new ColorsModel();
ko.applyBindings(model);

In short, we create the ColorsModel class, which contains an array of colors (Items). This model is then bound to the page containing this script. For more information on this check out http://knockoutjs.com/.

In the page we have the following (partial!) html:

<form>
    <button class="btn btn-info" data-bind='click: $root.InsertColor'><span class="glyphicon glyphicon-plus" aria-hidden="true"></span>  Kleur toevoegen</button>

    <table class="table table-striped">
        <thead>
            <tr>
                <th>Korte beschrijving</th>
                <th>Beschrijving</th>
            </tr>
        </thead>
        <tbody data-bind="foreach: Items">
            <tr>
                <td data-bind='text: ShortDescription'></td>
                <td data-bind='text: Description'></td>
                <td>
                    <div class="btn-group" role="toolbar">
                        <button title="Update" type="button" class="btn btn-default" data-bind='click: $root.UpdateColor'><span class="glyphicon glyphicon-pencil" aria-hidden="true"></span></button>
                        <button title="Delete" type="button" class="btn btn-default" data-bind='click: $root.RemoveColor'><span class="glyphicon glyphicon-trash" aria-hidden="true"></span></button>
                    </div>
                </td>
            </tr>
        </tbody>
    </table>
</form>

As you can see on the <tbody> element, we bind the Items collection from the ColorModel to the rows. Each item in the collection will create a new <tr> with its values. We also create an update and a delete button, both bound to the $root methods UpdateColor (…) and RemoveColor(…).

The problem

Running the application in the browser and clicking on the “update” button doesn’t seem to work. So using the debugger in the browser we discover the following:

image

“this” is not the $root (thus the ColorModel). In a real OO language this would have been the case. Here “this” points to the current color, where we clicked on the “update” button. The debugging Console then rubs it in further:

SCRIPT438: Object doesn't support property or method 'Action'

As you can see in the RemoveColor(…) method, I found a quick work around involving the use of the global variable model. Maybe that isn’t the right solution after all…

Next attempt to solve the problem

First of all, this attempt didn’t last long, you’ll quickly notice why.

class ColorsModel {
    Self: ColorsModel = this;

    UpdateColor(Color: Color): void {
        this.Self.Action(Actions.Update);
        this.Self.CurrentItem(Color);
        $("#updateColor").modal("show");
    }
}

Remember that in TypeScript when you want to use a property you need to prefix it with “this”? As we now know “this” points to the wrong object, so it won’t have a property “this”. I feel a Catch 22 coming up.

A clean solution: arrow notation

    UpdateColor = (item: Color): void => {
        this.Action(Actions.Update);
        this.CurrentItem(item);
        $("#updateColor").modal("show");
    }

When using the => to assign the function to the member UpdateColor, TypeScript will do the necessary to make this work. Looking in the debugger we see this:

image

And yet, everything is working fine.

If you can’t beat them, confuse them

So how is this possible? The bottom line: this is not this. Let’s see at the JavaScript that TypeScript generates for our arrow function:

var _this = this;
UpdateColor = function (item) {
    _this.Action(Actions.Update);
    _this.CurrentItem(item);
    $("#updateColor").modal("show");
};

So the TypeScript “this” is translated into “_this“, and is implemented in just the same way as “self” was before. That solved the scoping problem. The debugger doesn’t catch this subtlety and show us the content of “this”, hence the confusion. But clearly everything works as it should and our problem is solved in an elegant way.

Conclusion

I’m sorry about this confusion post in which I tried to explain that this is not _this, but in plain JavaScript this is self, but in TypeScript this is _this. If you understand this conclusion then you have read the article quite well. Congratulations.

Do you know another solution to this problem? Feel free to share it in the comments!


References

http://alistapart.com/article/getoutbindingsituations

http://knockoutjs.com/

https://www.typescriptlang.org/play/index.html

Posted in Codeproject, Debugging, Development, JavaScript, TypeScript | Tagged , | Leave a comment

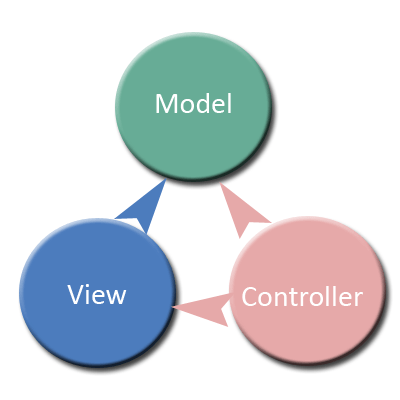
Structuring an MVC app for easy testing

Introduction

In this article I want to give you some handles to structure your MVC applications in such a way that they become easier to test. The article isn’t really about MVC, but if you want more information on MVC, I put some references at the end of this article.

MVC is a pattern typically used for creating web applications. Of course it can be (and is) applied for other types of applications as well. In this article I only talk about APS.NET MVC.

One of the reasons to separate the application in (at least) model – view – controller is to promote testability. We want to be able to test the application with as little as possible dependencies.

In this post I only concentrate on testing the server side, which will be more than enough for 1 post.

MVC Responsibilities

Image result for yodaI only give a short introduction, to make sure that we’re all on the same page.

<Yoda voice> More to say there is! </Yoda voice>


The View

To start with the easiest one: the view will be sent to the user, typically as HTML. The view can contain all the logic if you wish, because in the Razor syntax you can use everything in C# that you can use elsewhere. BUT that is not the idea. The view should bind variables, walk over collections, and generate the HTML from ready made data. In the view there should be as little processing as possible (server side).

Your view can also contain logic in JavaScript for code that is to be executed in the client browser, ultimately resulting in a Single Page Application.

The Controller

The client request is routed from the browser to the controller. Of course this is a simplification, but it will do for now. The controller contains methods with zero or more arguments that the routing system will call. This is done automatically in the framework.

The responsibility of the controller is to use the arguments to generate the output needed in the view. For example, arguments can be used to obtain customers for a certain ZIP code. In this case the controller will obtain only the required customers and send them into the view. As we saw before the view will receive this data from the controller and represent it.

Slightly more advanced: the controller can also choose to display a different view. The principle remains the same though: the view receives the data and renders is.

We want to keep the controller as simple as possible, so we let us help by the Model classes. You may notice that I’m already trying to split up complex parts into simple parts to make them easy to test – as is the purpose of this article.

The Model

The Model contains most of the classes that will be used in the Controllers and in the Views. Try to keep these classes as simple as possible as well and separate responsibilities. The Model is often split into 2 specific parts:

Data Model

Typically these are classes generated by Entity Framework (if you use database first), or your code first classes. I also like to include the repositories in the data model.

Other classes that can go in here are classes that are generated from SOAP or REST web services (by adding a web service proxy to your project).

These classes are mainly used in the Controllers to either modify data, or to obtain data (or both).

Viewmodel

As the name implies the ViewModel is used by the views. In a small application it may be overkill to create a separate ViewModel , and you can use the classes from the data model. But very soon the ViewModel will contain more (or other) information than the Data model:

  • the ViewModel may contain only those fields that are necessary in the view(s)
  • It may contain other field names, in case this is clearer for the View. Sometimes field names in a database have to follow some (company) rules, or names from a web service may be very generic names. In those cases translating them into something more “speaking” may help your designers. The developer who creates the Controllers and other back-end code and the front-end developer are often not the same guy (or girl).
  • It may contain calculated fields, aggregated fields, transformed fields, …
  • It may contain extra annotations to indicate to the user interface that fields are mandatory, have specific validations, have default values, different (localized) captions. These can then be picked up in the View to automatically generate some validation rules.
  • etc.

This means that the responsibility of the Controller now becomes:

  • Use the arguments to obtain data. The data will be in the Data Model format
  • Convert the obtained data into ViewModel classes
  • Pass this ViewModel to the View, which can then represent the data

Converting from the Data Model to the View Model

If the conversion is straightforward then it may be handy to use a library like AutoMapper, which will take care of the mapping of the fields for you. If the mappings become more complex I would advice to write specific conversion classes and methods. AutoMapper is capable of a lot of customization in its mapping, but you risk to complicate your code more than by writing a simple conversion function. Think also about the poor guy who needs to debug this code. Usually that’s you!

It will be clear now that the conversions must be tested as well. The tests can be simple / obvious, but when you extend or modify your classes the tests will fail if you don’t adapt your conversions as well. This will create a nice TODO list for you…

Setting up the tests

Now  that we have briefly determined the responsibilities of the MVC parts, we can set up and implement tests.

Setting up the test project

If you haven’t already created a test project, do so now (refer to my previous posts about this if you are not sure how to do this). A shortcut can be to right-click the Index method and then select “Create Unit test”. This will present you a nice dialog and do all the hard work for you.

Because we are going to test an MVC application, based on the ASP.NET MVC classes we’ll also need to install the Microsoft.AspNet.Mvc Nuget package. You can do this in the Package Manager Console (Tools > Package Manager > Package Manager Console) and type

install-package Microsoft.AspNet.Mvc

Also add a reference to the “Microsoft.CSharp” assembly. This will make sure that you can use the “dynamic” type in your tests.

Testing the Model

This should be easy because these are just normal classes. Feel free to read my other articles on this in the Testing category of this site.

Typically the Model classes will access a database, or call web services. For the unit tests this must be mocked of course, for example using a library such as MOQ. The other MVC classes will depend on the Model. So make sure you put enough effort in testing the Model classes.

Testing the Controller

As we saw before, the controller must orchestrate some calls into the Model, and bring together the results. These results are then passed into the view to be represented. So in most cases you don’t want to generate representation data in the controller, as that is the view’s responsibility.

Let’s take the example of a simple (stubbed) AgendaController:

    public class AgendaController : Controller
    {
        // GET: Admin/Agenda
        public ActionResult Index()
        {
            List<Agenda> agendas = new List<Agenda>();
            agendas.Add(new Agenda { Description = "Dr.X", Id = 1 });
            agendas.Add(new Agenda { Description = "Dr.No", Id = 2 });
            agendas.Add(new Agenda { Description = "Dr.Who", Id = 3 });

            List<String> resources = new List<String>();
            resources.Add("Agendas");
            ViewBag.Resources = resources;
            return View(agendas);
        }
    }


In the Index( ) function a list of Agendas is created, and in this case filled in with some random data. The same is done with a list of resources and then 2 methods of data passing are used:

  • ViewBag: this will create a new property on the dynamic object ViewBag, to be able to pass the resources collection in the View.
  • return View(Agendas): This will use the Model property in the view, which will contain this collection. The data type of Model is determined in this line:
@model IEnumerable<Planning365.Data.Agenda>

This prevents us from having to cast Model everywhere in the View.

Writing the test for AgendaController.Index( )

I choose an easy example to test, with no parameters; but the principles remain the same.

    [TestClass()]
    public class AgendaControllerTests
    {
        [TestMethod()]
        public void IndexTest()
        {
            // arrange
            AgendaController sut = new AgendaController();

            // act
            ViewResult res = (ViewResult)sut.Index();
            List<String> resources = res.ViewBag.Resources;
            List<Agenda> agendas = (List<Agenda>) res.Model;

            // assert
            Assert.IsTrue(agendas.Any(a => a.Id == 1));
            Assert.IsTrue(agendas.Any(a => a.Id == 2));
            Assert.IsTrue(agendas.Any(a => a.Id == 3));
            Assert.IsTrue(resources.Contains("Agendas"));
            Assert.AreEqual("", res.ViewName);
        }
    }

Using the AAA pattern, we first arrange the test. In this case it is only 1 line, instantiating the controller. The controller is just a normal CLR class, which happens to derive from the MVC Controller base class, so its instantiation is simple. If you use dependency injection then the steps in the “arrange” phase may be:

  • Create a mocked instance of the classes to be injected
  • Use the right constructor to pass this into the class.

In the “act” phase we call the Index method. I also create some local variables to store the results that are to be tested. As we said when describing the controller, we use 2 ways to pass data into the view, and that is the reason that we have these 2 lines here. The “resources” variable retrieves the controller data via the ViewBag, the “agendas” variable retrieves its data via the Model. Notice that the Model needs to be casted to use it.

The assertions use the obtained controller data to make sure that it is correct. These are normal Assert statements, nothing fancy going on.

In the last assertion I test that the ViewName == “”. This is the case when you don’t specify a ViewName in the Controller. If you return different Views from the Controller depending on some arguments, then this is the way to test if the correct View is returned.

Testing the View (?)

There is no straightforward way to test your Views in the MVC Framework, which is a good indication that this is not a good idea. There are some libraries and Open Source projects to test Views but is it worth it?

If all is well your View doesn’t contain any business logic. This should be in the Model classes, and possibly also in the Controllers of your project. So the view only contains representation logic. It will bind values to HTML controls, possibly loop over a collection and that’s it.

Also Views may change a lot. This is what a user sees from the application, so users will probably want to change lay-out, order of fields, colors, … You don’t want to adapt your tests each time a lay-out change has occurred.

So in my opinion it usually is a smell if you need to test your Views. And it is better to deal with the smell than to invest time in testing your Views.

Conclusion

The MVC framework has been created to be testable from the beginning. This is clearly demonstrated by the nice Separation of Concerns (MVC) in the framework. But as always it is still possible to mess things up 😉

The advice I try to give in this article is to make small testable Model classes that are easy to test. Then put them together in the Controller, with the necessary conversions. The conversions are preferably in separate (testable) methods.

The Controller methods can then be tested in the usual way. There are some small caveats in the setup of the test project.

Did I forget something? Would you do things differently? Say it in the Comments section!

References

ASP.NET home

Introduction to ASP.NET MVC

Creating Unit Tests for ASP.NET MVC Applications


Posted in .Net, Codeproject, Development, MVC, Testing | Leave a comment

What is the role of the database?

Introduction

Most non-trivial applications will use a database to store data. This database can be relational or not, but some data store will be needed.

Most modern database management systems (DBMS) can do much more than just storing data, and as we know: with great power comes great responsibility.

What should a DBMS do?

A DBMS has 3 main responsibilities:

  • Store correct data, preferably in a durable way (but not always, check out in-memory OLTP). So simple data validation is part of this responsibility.
  • Retrieve data correctly and fast.
  • Security. Make sure that data can only be modified or retrieved by the right people. This is not the scope of this post.

A DBMS has many possibilities to fulfill these 2 conditions. In this post I will discuss mostly a general DBMS, using SQL Server as an example. So Oracle fans, please don’t shoot me.

Storing data

Data is stored in tables. That could conclude this chapter, but let’s see what happens when we insert / update / delete a record in SQL Server. I simplified things, and I probably forgot some actions left and right. Feel free to let me know in the comments section!

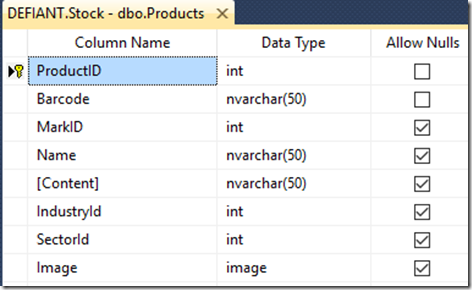
Let’s use this table as an initial example:

image

Inserting a record

When a record is inserted in the database, multiple validations are performed:

  • Check if all the mandatory fields are filled. In the example these are all the fields where “Allow Nulls” is not checked.
  • Check if all the fields are in a correct format. It will not be possible to store ‘ABC’ in the MarkID field, because its data type is int.
  • Check the conditions between fields. Maybe you’re storing a period with a from- and a to-date. Probably you’ll want the from-date to be before the to-date. This can be enforced using check constraints.
  • Check unique constraints. A primary key has to be unique, and this must be validated. In the example the ProductID is the primary key (as you can see by the key symbol next to it). Other unique constraints need to be validated. You can for example make sure that the first name, last name are unique by creating a unique index over these 2 fields.
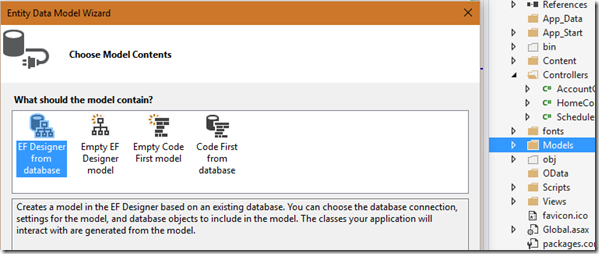
  • Check referential integrity. We saw in last week’s post how to normalize a database, which will create related tables in the database. The relationships (foreign keys) must be checked as well. Creating these relationships will enforce this, and tools (like Entity Framework designer) can use this information to automatically create relations in the model.
  • Set fields with default values. Typically these are fields like:
    • ID, which can be an identity field in SQL Server, or come from a sequence in Oracle (and SQL Server too in the latest versions).
    • A GUID (unique identifier) that can be generated as a default value.
    • A data field (example: CreationDate) which can be set to the current date (or timestamp)
    • Specific defaults that have been created for this table.

When all this is done the row will be inserted. This means that the log file is updated, and that the row is added in the right memory page. When a checkpoint occurs the page will be written to disk.

After the row is written the insert triggers are fired (if any). Insert triggers can also perform validations, and rollback the transaction. This is AFTER the row has been written, so it is not the most efficient way of validating data. The trigger execution is part of the same transaction, so if the record is invalid we can rollback in the trigger. This means that the record has been written in de log file already, and this action is now undone.

Usually the need for triggers indicates some data denormalization. This can be done for performance reasons, or to perform more exotic validations.

Updating a record

Most of the actions for an insert will be performed for an update as well. Default values will not be set, this only occurs when a record is inserted. Update triggers can be used to set fields like [LastUpdated] for auditing purposes. Referential integrity is verified, and can be handled in several ways.

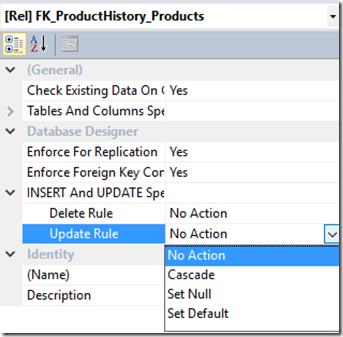
image

In the update rule we see 4 possible actions:

  • No Action – When the field is updated and referential integrity is broken an exception will be thrown and the update will not be performed.
  • Cascade – The value of this field will set the value of the foreign key in all the detail records as well.
  • Set Null – All the detail records’ foreign key will be set to null.
  • Set Default – You can guess once Knipogende emoticon


After the update the update triggers are executed, with the same undo logic.

Deleting a record

The data page for the row is retrieved and the row is marked as deleted. Referential integrity is checked, and can be handled in the same ways as when updating a record. When the row is deleted the delete triggers are executed.

Retrieving data

It is important to retrieve data as fast as possible. Users don’t want to wait for minutes for a web request to return. And often,when a request is slow it is due to the database. Of course there can be many other causes, but the database is usually the first thing to look at. Retrieving the data is the simplest operation, but it is very critical because when inserting / updating / deleting records, the DBMS must also retrieve the correct record(s) to work with.

Indexes are very important at this stage, because without indexes the only mechanism to retrieve data is a full table scan. This will soon become a problem for performance. Indexes are not the scope of this article.

In a well-normalized database queries can quickly become complex. Most development tools (like Visual Studio, SQL Server Management Studio, …) have query builders that take away the heavy typing. These tools work best when you have also created all the relationships between your tables.

Relationships

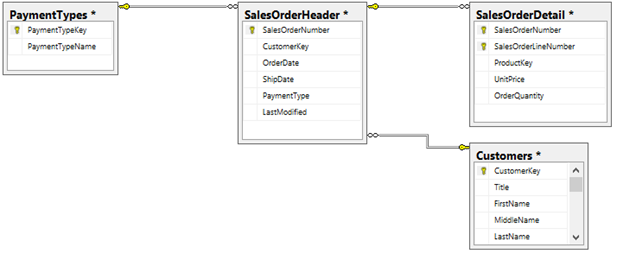
SQL Server has a nice designer to maintain your relationships, the Database Diagram Designer. It allows you to create relationships in a graphical way.

image

When you create relationships you do yourself some favors:

  • The database is automatically documented. When you see the database diagram, you understand immediately how tables are related. In our little example we see that a SalesOrderHeader can have many SalesOrderDetails, and must be linked to one customer.
  • The DBMS can now enforce relational integrity. A SalesOrderDetail must be linked to a SalesOrderHeader.

What Should the application do?

Data validation (again)

Now that the database is set up the application can focus on using the data. We are sure that most data can only be entered in a correct way in the database. This doesn’t mean that no verification must be done at the application level, but if we fail to verify the DBMS will make sure that no invalid data can be entered. This also applies when data is modified using other tools than the application (for example by using SQL Server Management Studio or linking tables in Access or Excel and directly modify the data).

Some good reasons to still perform data validation at the application level are:

  • Users want to have immediate feedback about the data they enter. If is a pity if a user enters all their data, only to find out that at the last step (saving into the database) there are some things incorrect and hey have to start again.
  • Referential integrity means that we store the (often meaningless) key to the related table. If you would for example use GUIDs for your primary keys then users would be required to know – remember – type these GUIDs in the user interface. No user will do this. Combo boxes and other mechanisms are more user friendly. Many tools will generate this automatically if the relations are properly put in the database.
  • We preferably enter the data correctly in the database. the DBMS will verify your data, but rejecting the data means that a lot of time is wasted. If you’re alone on the database this isn’t a problem, but on a loaded system with thousands of users this will impact the performance for everybody. It is better then to verify the data on the user side as much as possible.
  • Not all verifications can be done on the user side. Unique constraints are typically only checked at database level (and therefor require indexes to be created).

CrUD

Entities must be stored in the database. Depending on how your application is set up entities can correspond to single tables, or be stored in multiple tables. This can be done by simple insert statements (or by your O/RM, which will do the same in the end).

How about stored procedures for CRUD?

This used to be a no-brainer. 10 years ago we would create a procedure for each insert / update / delete, and one or more procedures to read data. Advantages of this approach are:

  • Consistency. Every modification in the database is done via a procedure.
  • Data validation. More advanced evaluations can be done in the procedure, before issuing the actual DML statement.
  • Automatic auditing / logging. In the same stored procedure we can insert / update / delete records, and then write some entries in a log table. This is typically done in a the same transaction.
  • Security. For the 2 previous reasons we may want to block direct DML access to the tables and only allow modifications (and possibly reads) through stored procedures.

As always there are also disadvantages:

  • Many procedures. If we need at least 4 procedures per table, the number of procedures will grow fast. In a moderately big database this means hundreds of stored procedures to be written and maintained. For this reasons there are tools available that will generate the CRUD procedures for a table. This doesn’t solve the problem of the many procedures, but it will at least reduce typing!
  • Code organization. Some code will be repeated in many procedures. So either we copy / paste or we create a new stored procedure for this common code. In SQL Server is it not possible to create “internal / private” procedures that can only be called from other procedures and “public” procedures that can be called from the outside. So everything will rely on good naming conventions and discipline.
  • Tools. Most tools and frameworks (ADO.NET, EF) are capable of calling stored procedures for update statements. But in the procedures a lot can be going on, and the tool doesn’t know about all the possible side effects. Cached data can be invalid after calling a stored procedure.

For all these reasons nowadays we usually choose to have the OR/M generate its own DML (data manipulation language) statements and don’t generate all the stored procedures, unless there is a good reason for it. Usually we create repositories that will be called whenever an application needs data or wants to modify data. In these repositories we can add some more validation if needed. Of course this doesn’t prevent the use of applications to directly enter data in the database!

Business logic

In many applications business logic is implemented in stored procedures. This is sometimes referred to being a 2 1/2 tier application. This approach makes it possible to change application logic without recompiling / redeploying the application. Sometimes it can be faster because stored procedures are executed “close to the data”. But (in no specific order)

  • Code organization is a problem again, for exactly the same reasons I have already given before.
  • SQL is not the best language for programming business logic. Even though the most basic language constructs (loops, selection, …) are available, it usually is easier (and more maintainable) to write the code in an OO language (or for fans of functional languages in F# or Haskell Knipogende emoticon ). Compiler support will be much better.
  • Your application code depends closely to the DBMS. If your software becomes popular and must run on different DMBSs you’re out of luck!
  • It is hard to debug SQL stored procedures. Since the latest versions of Visual Studio it is possible to debug stored procedures, but it still complicates things and it is not as powerful as the C# debugger.
  • You need a good SQL developer who knows what he is doing on the database. Don’t forget that the database layer is used by many users. So if a procedure is badly written it may impact the performance of the DBMS, and hence the performance of every application that depends on it.
  • By default database objects (such as procedures) are not versioned. So if someone modifies a stored procedure and now your application doesn’t work anymore you’ll have a good time finding what has been changed. Some would describe this as “job security”.
  • It doesn’t scale! I kept the best for last. When you discover that stored procedures are the bottleneck of your application, you can’t just put another server on the side to add some more power.

So even though it is possible to use stored procedures to implement business logic, there are some good reasons not to go that way!

So when are stored procedures OK then?

Simple: when you implement functionality that has to do with your database, and which doesn’t implement business logic. For example just copying client data may qualify.

Having said that this is simple I can tell you that if you put a couple DBAs together and you throw this “in the group”, you can expect long and hefty discussions.

Conclusion

The database is a very important part of your application. So it is a good idea to not make it your bottleneck. Try to use the DBMS for guaranteeing that data is stored as correct as possible and retrieved efficiently. Stored procedures (and user functions for that matter) are very useful, but must not be used to implement business logic. With modern OR/M frameworks the use of stored procedures for CrUD operations is not encouraged anymore.

Posted in Architecture, Codeproject, Databases, Development, Entity Framework | Tagged | 2 Comments

Database Normalization

Introduction

After I published last week’s article somebody asked me why I stated that (in this case) the problem didn’t originate in having a function with logic, but merely having to work with a database that is not normalized. So let’s talk about database normalization.

Smells

We wrote a T-SQL user function as a C# function. Let’s show this user function here again:

ALTER FUNCTION [dbo].[GetNextSalesOrderCode]

(

       @Season nvarchar(3),

       @Prefix nvarchar(3),

       @RepresentativePrefix nvarchar(2)

)

RETURNS nvarchar(50)

AS

BEGIN

       DECLARE @Code as nvarchar(50)

       DECLARE @PrevCode as nvarchar(50)

       declare @MinSoCode as int


       SELECT top 1 @MinSoCode = C.MinSoCode

       FROM   dbo.RepresentativeComputers C

       INNER JOIN dbo.Representatives R ON C.RepresentativeComputer_Representative = R.Id

       WHERE  (R.Prefix = @RepresentativePrefix) AND (C.ComputerName = N’ERP’)


       SELECT top 1 @PrevCode = Right(SO.Code,5)

       FROM   dbo.SalesOrders SO

       INNER JOIN dbo.Representatives R ON SO.SalesOrder_Representative = R.Id

       where SUBSTRING(SO.Code,4,3)= @Season

         and R.Prefix=@RepresentativePrefix

         and cast(Right(SO.Code,5) as int)>=@MinSoCode 

       order by Right(SO.Code,5) DESC


       if @PrevCode is null

       BEGIN

             set @Code=  @Prefix+‘.’+ @Season + ‘-‘ + @RepresentativePrefix +  FORMAT(@MinSoCode,‘00000’)

       END

       ELSE

       BEGIN

             set @Code= @Prefix+‘.’+ @Season + ‘-‘ + @RepresentativePrefix + FORMAT(CONVERT(int, @PrevCode)+1,‘00000’)

       END


       RETURN @Code

END


Looking at this function we see a couple of things:

  • The function does more than 1 thing. It will first find a record in the table RepresentativeComputers, hereby relying on a magic string ‘ERP’. This is for a small company, with a limited number of sales representatives so they enter some data in the tables manually. This is not necessarily bad but it has to be documented somewhere. Also, having a T-SQL function that needs multiple queries to do its work is not always bad, but it is a (light) red flag already. Just to nitpick a bit: using “top 1” here is a bit dangerous without an “order by” clause. You’ll never know which “first” row it will take as this may change when the query is adapted, or indexed are modifed, or other changes happen in the database. In this case it seems that there will only be 1 row returned anyway, so the “top 1” can be safely removed.
  • The select statement over the SalesOrders table is worse. We see that the where clause is pretty complex, using SUBSTRING, RIGHT and CAST functions. We’ll see in a moment why this is a big red flag.
  • In the last part a new code is composed coming from the result of the query over the sales orders.
  • No error checking. This is not the topic of this post, so I won’t elaborate on this. If you want to know more check out try / catch in T-SQL.

More in detail

SELECT top 1 @PrevCode = Right(SO.Code,5)

FROM   dbo.SalesOrders SO

INNER JOIN dbo.Representatives R ON SO.SalesOrder_Representative = R.Id

where SUBSTRING(SO.Code,4,3)= @Season

  and R.Prefix=@RepresentativePrefix

  and cast(Right(SO.Code,5) as int)>=@MinSoCode 

order by Right(SO.Code,5) DESC

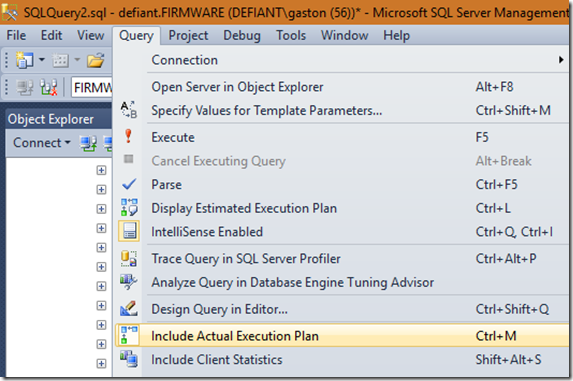
Using SQL Server Management Studio we create a new query and display the actual execution plan:

image

Filling in some actual values for the @variables in the query we obtain this plan:

image

The main important thing to notice here is that on the right there is a Clustered Index Scan over [SalesOrders]. This means that we are actually doing a full table scan using the clustered index. In this case there are only about 45K records in the table, but this will grow in the future and start to create problems.

Let’s review and apply Codd’s database normalization rules.

Who is this Codd?

Edgar F Codd.jpgWikipedia has a nice page about Edgar F.Codd, explaining a bit more about his achievements. I think he is mostly known for his database normalization rules.

From Wikipedia:

Database normalization, or simply normalisation, is the process of organizing the columns (attributes) and tables (relations) of a relational database to minimize data redundancy.

Normalization involves decomposing a table into less redundant (and smaller) tables without losing information, and then linking the data back together by defining foreign keys in the old table referencing the primary keys of the new ones. The objective is to isolate data so that additions, deletions, and modifications of an attribute can be made in just one table and then propagated through the rest of the database using the defined foreign keys.

There are (initially) 3 normal forms that can be applied over a first model of the database. They are called conveniently 1NF, 2NF and 3NF. After 3NF more normal forms can be applied but this usually only has an academic use. When the database is in 3NF it will be optimized for OLTP use.

First Normal Form

From Wikipedia:

First normal form (1NF) is a property of a relation in a relational database. A relation is in first normal form if and only if the domain of each attribute contains only atomic (indivisible) values, and the value of each attribute contains only a single value from that domain. The first definition of the term, in a 1971 conference paper by Edgar Codd, defined a relation to be in first normal form when none of its domains have any sets as elements.

Looking back at our example we see that the Code field is actually composed of 2 fields and a prefix:

  • The prefix is always ‘SO’. So there is no need to store this in the database (unless it would change later, and then it will become a separate field anyway).
  • SUBSTRING(SO.Code,4,3) contains the code for the season, always 3 characters.
  • Right(SO.Code,5) contains the actual code, and this is the field that needs to be calculated in our T-SQL function.

Splitting the Code field into season and Code would make the query simpler already, it would become something like:

SELECT top 1 Code

FROM   dbo.SalesOrders SO

INNER JOIN dbo.Representatives R ON SO.SalesOrder_Representative = R.Id

where Season = ‘151’

       and R.Prefix=9

       and Code>=2001

order by Code DESC

Having an index on the Code field and the Season field would improve the performance of this query and make it scalable.

This doesn’t mean that everything must be split in separate fields! For example, there is not much use of splitting a date in Year, Month, Day fields (unless you have some very specific needs for that).

Second normal form

Second Normal Form (2NF): No field values can be derived from another field.

We would fall in this trap if we created a SOCode field, that would contain the full code (‘SO.@Season.@Code’), so doing the reverse of what happened in our test database. In this case when one of the 2 fields is modified the SOCode field must be modified as well. Of course this can be done in a couple of ways in SQL Server, but it is usually better to calculate this in the client. Here are some ways that we can indeed solve this, but I will not explain them further in this post:

  • Create insert / update triggers that will automatically update the SOCode field.
  • Revoke insert / update permissions on the table and only allow insert / update operations via stored procedures, in which you calculate the SOCode field.
  • Create a view / table function over the table with the SOCode field as an extra (calculated) field.
  • Create a Computed Column.

As you can see there are some ways to help you out, but they all require processing at the database level. And often the database is already the bottleneck for performance. So it is better to perform these (easy) calculations on the client side, if possible. Another side effect is that there is redundant data in the table, which can be good for reporting, but not for an OLTP database.

Another example of this would be calculated fields like Total = price * quantity that are stored in the database.

Third normal form

Third Normal Form (3FN): No duplicate information is permitted.

In the modified table the Season field is stored directly in the SalesOrders table. When more information about seasons would be required (maybe a time period); an additional table needs to be created to accommodate for this.  This will enforce referential integrity in the database.

When should we NOT normalize?

When the database is in 3NF it will be optimized for OLTP use. OLTP means that a lot of updates are done in the database. So the full range of CRUD operations is executed. If you want to run reports over your database then having many separate tables can be a problem. You’ll typically want to denormalize your database to simplify queries for reporting. And often a separate database is created for this, so you have a solution with an OLTP database for entering / updating data, and a denormalized database for querying. If you want to perform more advanced queries you’ll end up at the other end, being OLAP databases.

Conclusion

Most experienced developers will probably perform the normalization steps automatically. And I suppose that most of you (or I) don’t know by heart which is 1NF, 2NF or 3NF, but we are capable of building good databases.

Usually a database starts easy and normalized, and when it grows; a moment will come that shortcuts are taken. Eventually you’ll need to normalize the database anyway, be it for space requirements, or (probably) for performance requirements. So it is best to do this right away and think about your database changes beforehand. Don’t forget that in line of business applications the database plays the most important role.

References

Edgar F.Codd

Database Normalization

Normalization of Database

Posted in Codeproject, Databases, Development | Tagged , | Leave a comment

Unit Testing your Repositories–the code

In the previous post I started to write about how to set up your unit tests in the repository code. The title was (maybe a bit misleading) “Unit testing your Repositories”. So I had to promise to write an article about the side of the tests as well.

The Problem

As explained in the other post, we only want to test the non-trivial functions in our repositories. We also don’t want to depend on the current state of the database, because this is never sure. So we want to mock parts of our database. This is not the solution for everything, but in many cases it will save us. Look at my previous post for possible problems with this approach.

The Example

I have a real life example of a database containing sales orders. The database is not completely normalized and the sales order codes are actually a concatenation of a couple of fields. We want to write a function that will calculate the next code for a certain sales representative for a certain season. As you can imagine already, this will involve some string manipulation, conversions, etc.

Currently the code is written as a user function in the database, so we have to convert this to C# using Entity Framework 6 (or better). The following approach won’t work with older versions.

The T-SQL User Function

ALTER FUNCTION [dbo].[GetNextSalesOrderCode]

(

       @Season nvarchar(3),

       @Prefix nvarchar(3),

       @RepPrefix nvarchar(2)  — RepresentativePrefix

)

RETURNS nvarchar(50)

AS

BEGIN

       DECLARE @Code as nvarchar(50)

       DECLARE @PrevCode as nvarchar(50)

       declare @MinSoCode as int


       SELECT top 1 @MinSoCode = C.MinSoCode

       FROM   Computers C

       INNER JOIN Representatives R ON C.Representative = R.Id

       WHERE  (R.Prefix = @RepPrefix) AND (C.ComputerName = N’ERP’)


       SELECT top 1 @PrevCode = Right(SO.Code,5)

       FROM   SalesOrders SO

       INNER JOIN Representatives R ON SO.Representative = R.Id

       where SUBSTRING(SO.Code,4,3)= @Season

         and R.Prefix=@RepPrefix

         and cast(Right(SO.Code,5) as int)>=@MinSoCode 

       order by Right(SO.Code,5) DESC


       if @PrevCode is null

             set @MinSoCode = 0

       ELSE

             set @MinSoCode = CONVERT(int, @PrevCode)+1


       set @Code=  @Prefix+‘.’+ @Season + ‘-‘ + @RepPrefix + FORMAT(@MinSoCode,‘00000’)

       RETURN @Code

END


This function will in some way return the next sales order code, using non-trivial logic. The main problem is actually that the database isn’t completely normalized, which explains why we need in this case some more logic in our repository.

The repository code

    public class SalesordersRepository : Repository, ISalesordersRepository

    {

        public async Task<string> GetNextSalesOrderCode(string season, string prefix, string representativePrefix)

        {

            Representative repr = await _db.Representatives.SingleAsync(r => r.Prefix == representativePrefix);

            int rPrefix = repr.Id;

            RepresentativeComputer comp = await _db.RepresentativeComputers.SingleAsync(c => c.RepresentativeComputer_Representative == rPrefix && c.ComputerName == “ERP”);

            int minSoCode = comp.MinSoCode;


            int prevCode = await GetPrevCode(season, rPrefix, minSoCode);


            return $”{prefix}.{season}{representativePrefix}{prevCode.ToString(“00000”)};

        }


        // Other methods

    }


Because C# as a language is more powerful than SQL, we can write this function a bit more concise (and clear). It still contains enough logic to justify writing a test for it. We also use the function GetPrevCode but to keep things simple we keep this function out of scope. Of course testing it would be done in exactly the same way!

Testing

We follow all the known steps to create a test project, hook it up with the assembly under test, and write a test for the method. As a first attempt we just use the database in its current state. Of course this is bad for several reasons, but it’s a start anyway:

[TestMethod()]

public void GetNextSalesOrderCodeTest()

{

    ISalesordersRepository repo = new SalesordersRepository();

    string next = repo.GetNextSalesOrderCode(“151”, “S0”, “09”).Result;

    System.Diagnostics.Debug.WriteLine(“next: “ + next);

    Assert.AreEqual(next, “S0.151-0902001”);

}

We are lucky with one thing: the method doesn’t change the state of the database, so running this test will not have any side effects. But we do depend on the current state of the database, which can (will) be different when we run the test again later, and of course our unit test is not fast, fast, fast! The test code also depends on the connection string, which for DEV may be correct, but in the TEST environment probably not.

Mocking the Database

We want to mock our database, preferably not with too much code. Mocking the database means in this case mocking some known state in the concerned database tables, and then inject this “in-memory” database (SalesOrderEntities) in the repository. I have created a base class Repository that provides the means to inject a SalesOrderEntities implementation. By default it will use the database using EF, when testing we can inject the mocked database using the second constructor (if you want more info on this, see the other articles in my blog). I just give the class here without more explanation:

public class Repository : IDisposable

{

    protected SalesOrdersEntities _db;


    public Repository()

    {

        _db = new SalesOrdersEntities();

    }

    /// <summary>

    /// Make DI possible for testing

    /// </summary>

    /// <param name=”db“></param>

    public Repository(SalesOrdersEntities db)

    {

        _db = db;

    }


    public void Dispose()

    {

        if (_db != null)

            _db.Dispose();

        _db = null;


        GC.SuppressFinalize(this);

    }


    ~Repository()

    {

        Dispose();

    }

}

All my repositories derive from this class, giving me always the possibility to inject a mocked database for testing.

Setting up for mocking

I like to use Moq as a mocking framework. There are many other mocking frameworks out there that are equally good, but I’m used to this one. So in my test project I install the Moq package:

image

Don’t forget to set the default project to your test project.

As all the repositories derive from the Repository class, it seems like a good idea to implement a RepositoryTests class that will set up all the common stuff. Like that we don’t repeat ourselves all the time. In this class we will set up the mock for the SalesOrderEntities, and some of the tables that it contains.

    [TestClass]

    public class RepositoryTests

    {

        protected static Mock<SalesOrdersEntities> _dbMock;

        protected static Mock<DbSet<Representative>> _representativesMock;

        protected static Mock<DbSet<RepresentativeComputer>> _representativeComputersMock;

        protected static Mock<DbSet<SalesOrder>> _salesOrdersMock;


        public static void Init()

        {

            SetupRepresentatives();

            SetupSalesOrders();

            _dbMock = new Mock<SalesOrdersEntities>();

            _dbMock.Setup(db => db.Representatives).Returns(_representativesMock.Object);

            _dbMock.Setup(db => db.RepresentativeComputers).Returns(_representativeComputersMock.Object);

            _dbMock.Setup(db => db.SalesOrders).Returns(_salesOrdersMock.Object);

        }


        private static void SetupRepresentatives()

        {

            _representativesMock = new Mock<DbSet<Representative>>();

            _representativesMock.Object.AddRange(new Representative[]

                {

                    new Representative { Id = 1, Prefix=“1”},

                    new Representative { Id = 2, Prefix=“2”},

                    // other entities, left out for brevity

                    new Representative { Id = 105, Prefix=“15”},

                });


            _representativeComputersMock = new Mock<DbSet<RepresentativeComputer>>();

            _representativeComputersMock.Object.AddRange(new RepresentativeComputer[]

                {

                    new RepresentativeComputer { Id = 1, ComputerName=“ThnkPad”, MinSoCode=1, MaxSoCode=2000, RepresentativeComputer_Representative=9},

                    // other entities, left out for brevity

                    new RepresentativeComputer { Id = 19, ComputerName=“ERP”, MinSoCode=2001, MaxSoCode=4000, RepresentativeComputer_Representative=5},

                });

        }


        private static void SetupSalesOrders()

        {

            _salesOrdersMock = new Mock<DbSet<SalesOrder>>();

            _salesOrdersMock.Object.AddRange(new SalesOrder[]

                {

new SalesOrder { Id=21910342, Code = “SO.151-0402009”, SalesOrder_Representative=4 },

// other entities, left out for brevity

new SalesOrder { Id=26183, Code = “SO.151-0402001”, SalesOrder_Representative=4 },

                });

        }

    }


In the test base class I first declare 4 Mock objects. One to mock the SalesOrdersEntities and 3 other to mock the DbSets (the collections with entities). Then I create 2 methods to set up the Representatives (and their computers) and the sales orders. As you can see I’m adding the records hard-coded in these functions. This would involve a lot of typing without the help of our friend Excel.

Intermezzo: Using Excel to generate the code

I used SQL Server Management Studio to obtain some records for each table. I then copied these records in an Excel spreadsheet and used a formula to generate the code to instantiate the entities. I only fill the fields that will be necessary now (YAGNI), but having it all in Excel would allow me to easily add more fields when needed. In the screenshots that you see here I removed all the data that could make this recognizable (privacy).

image

The column [New Object] contains the following formula:

=”new Representative { Id = ” & [@Id] & “, Prefix=”””&[@Prefix]&”””},”

As you can see I can easily add more rows if I want to, to execute more test scenarios. You may want to keep this spreadsheet in your source code control system and treat is like your other source code.

This isn’t rocket science, but it has helped me on several occasions Glimlach.

The modified test

    [TestClass()]

    public class SalesordersRepositoryTests : RepositoryTests

    {

        [ClassInitialize]

        public static void Init(TestContext context)

        {

            RepositoryTests.Init();

        }


        [TestMethod()]

        public void GetNextSalesOrderCodeTest()

        {

            ISalesordersRepository repo = new SalesordersRepository(_dbMock.Object);

            string next = repo.GetNextSalesOrderCode(“151”, “S0”, “09”).Result;

            System.Diagnostics.Debug.WriteLine(“next: “ + next);

            Assert.AreEqual(next, “S0.151-0902001”);

        }

    }


2 Things have changed in this test class:

  • I call the base class’ Init( ) method to initialize _dbMock.
  • I pass _dbMock.Object in the repository constructor (DI).

So let’s run our test and see what happens. This should be good…

Bummer

Running the test gives an unexpected exception:

image

The problem is that the DbSet mocks don’t implement the IDbAsyncQueryProvider interface, which makes sense because we are not using a database here. So we need to find a workaround for this. In the repository we use the async / await pattern a lot, which depends on this interface.

Following the indicated link brought me to this great article: IQueryable doesn’t implement IDbAsyncEnumerable. I copied the code with the TestDbAsync classes into my project and referenced this in my mocks (as described in the article), so I won’t copy them in this post. I did change my test base class in the following ways:

Creating the InitializeMock<T> method

For each dataset to be mocked the following code must be executed:

var mockSet = new Mock<DbSet<Blog>>();

mockSet.As<IDbAsyncEnumerable<Blog>>()

    .Setup(m => m.GetAsyncEnumerator())

    .Returns(new TestDbAsyncEnumerator<Blog>(data.GetEnumerator()));

mockSet.As<IQueryable<Blog>>()

    .Setup(m => m.Provider)

    .Returns(new TestDbAsyncQueryProvider<Blog>(data.Provider));

mockSet.As<IQueryable<Blog>>().Setup(m => m.Expression).Returns(data.Expression);

mockSet.As<IQueryable<Blog>>().Setup(m => m.ElementType).Returns(data.ElementType);

mockSet.As<IQueryable<Blog>>().Setup(m => m.GetEnumerator()).Returns(data.GetEnumerator());


I created a generic method to prevent to copy / paste this code everywhere:

private static Mock<DbSet<T>> InitializeMock<T>(IQueryable<T> data) where T: class

{

    var mockSet = new Mock<DbSet<T>>();

    mockSet.As<IDbAsyncEnumerable<T>>()

            .Setup(m => m.GetAsyncEnumerator())

            .Returns(new TestDbAsyncEnumerator<T>(data.GetEnumerator()));

    mockSet.As<IQueryable<T>>()

           .Setup(m => m.Provider)

           .Returns(new TestDbAsyncQueryProvider<T>(data.Provider));

    mockSet.As<IQueryable<T>>().Setup(m => m.Expression).Returns(data.Expression);

    mockSet.As<IQueryable<T>>().Setup(m => m.ElementType).Returns(data.ElementType);

    mockSet.As<IQueryable<T>>().Setup(m => m.GetEnumerator()).Returns(data.GetEnumerator());


    return mockSet;

}

This allows me to write the SetupXXX methods like this:

private static void SetupSalesOrders()

{

  var data = new List<SalesOrder>

  {

    new SalesOrder { Id=21910342, Code = “SO.151-0402009”, SalesOrder_Representative=4 },

    // other entities, left out for brevity

    new SalesOrder { Id=26183, Code = “SO.151-0402001”, SalesOrder_Representative=4 },

  }.AsQueryable<SalesOrder>();


  _salesOrdersMock = InitializeMock<SalesOrder>(data);

}


The actual SalesOrdersRepositoryTests class remains unchanged. And in case you wondered: yes, my test turns green now.

image

Conclusion

Writing unit tests for repositories can be done. It requires some work but not as much as one would expect. With the help of Excel (or some other tool) you can generate the data in an easy way. I hope that I have given you a framework for your EF unit testing with this post.

I want to warn again that not everything can be tested using mocks, so you will need to run integration tests eventually. But if you can already fix a lot of bugs (and prevent them from coming back later) using some clever unit tests, then this is a quick win.

References

Testing with a mocking framework (EF6 onwards)

IQueryable doesn’t implement IDbAsyncEnumerable

Posted in .Net, Codeproject, Debugging, Development, Entity Framework, Testing | Tagged | 1 Comment

Unit testing your Repositories

The problem

We have created our data layer, and of course we want to test it.

It is very hard to use a (physical) database to test your code. There are some problems with this (commonly used) approach:

  • Unit tests must be fast, fast, fast. If you include database access in the tests then the execution time of your unit tests will be much slower, hence your tests won’t be run regularly anymore and they become less useful.
  • You don’t know the state of your test database. Maybe somebody has run some tests before you, and the database is not in the expected state for your tests. Or maybe the order that your tests are executed in is not always the same. Adding or removing tests can mess this order up easily. So your tests are not deterministic and again pretty much useless now.
  • You don’t want to change the state of your database during the testing. Maybe someone in your team is using the same database at the time that you are running your tests, and they may not be pleased with it.

Of course there are solutions for these problems:

  • From time to time you may want to run some integration tests. For this you can set up a dedicated database to work with. Before running your tests you can then restore the database in a known state so at least that part will be deterministic. You can then run your tests in a specific order (or cleanup after each test, which requires more code, but is more foolproof). There are (again) some problems with this approach:
    • Your databases will evolve. You will probably add tables, procedures and other objects to your database. The database that you have backed up will not have these changes yet, so some maintenance is required.
    • It can be slow to run all your tests. Typically integration tests are executed before going live with your project, and often this is done automatically at night, giving you a detailed report in the morning. If possible, it is a good idea to execute the integrations tests every night. You can then discuss the problems during your daily standups.
    • You do need integration tests anyway, because sometimes your database will act different from your mocked objects and you can’t afford to find this out in production.
  • From EF7 on an in-memory database will be provided that will allow you to test your database code fast and deterministic. This article will not cover that (because otherwise I don’t have anything left to write about anymore 😉
  • You can mock your data tables to unit test your repositories. That will be the subject of my next post.

What (not) to test?

In this post I will assume that you use Entity Framework (EF) to implement your repositories. Some of the code in your repository will be very straightforward, and only involve some basic EF functionality (like LINQ queries, …). EF is a third party (Microsoft) library that has been tested by Microsoft, so you don’t have to test EF functionality. I’m usually using a very simple rule: do I get it a method working correctly from the first (or second 😉 time? Then it probably doesn’t require a test.

So we want test the more complex methods in the repository that will perform calculations, update multiple tables, …

Setting up your repository

Design for testing (SoC)

Let’s say that you want to perform some wild calculations over a table. You get the rows from that table and then with the entities you perform your calculation.

But your calculation has nothing to do with the database, all it needs is a collection of objects (entities) to perform its work. So it may be a good idea to add a (private) function that will perform the calculations on an IEnumerable<T>. Testing the calculation is now easy (you just create some lists in your tests and perform the calculations). Testing the whole function may have become unnecessary now.

Separation of concerns, grasshopper 😉

Design for testing (Dependency Injection – DI)

Initially we will write the repository like:

    public class EventsRepository : IEventsRepository

    {

        private readonly PlanningEntities db = new PlanningEntities();

      // …

   }

This will tie the EF context hard to the repository. The code is simple and clean, but very hard to test. So a better way would be to inject the EF context, and provide a default when you don’t. Example:

    public class EventsRepository : IEventsRepository

    {

        private readonly PlanningEntities db = new PlanningEntities();

        public EventsRepository()

        {

            _db = new PlanningEntities();

        }


        public EventsRepository(PlanningEntities db)

        {

            _db = db;

        }

      // …

   }

In this example there are 2 constructors. The default constructor will be used in your controller and will instantiate the repository using the EF context. The second constructor can be used in your test code to pass the mocked context into the repository. In the repository nothing further needs to be modified, unless you use more exotic functionalities (like stored procedures etc). In the functions using the repository nothing needs to be modified either (thanks to the default constructor).

Of course using a dependency injection container like Unity can help a lot with setting up your DI. It will depend on your needs if you need this or not. Usually when your project grows, you will need it at some point.

Caveats

You can’t mock stored procedures, user functions, triggers, … By nature these are written in some form of SQL (T-SQL, PL-SQL, …) and they usually contains multiple statements that will be executed directly against the database engine. If you use them, you’ll need to integration test your code. This doesn’t mean that stored procedures are bad and should not be used, just that you need to be aware of this limitation.

You can’t mock default values for fields, calculated fields, … Identity fields (sequences in Oracle, Autonumber in MS Acces) are a good example of this. They self increment with each newly created record. The same goes for unique identifiers (GUIDs) of course. There are also the typical fields like [CreationDate] that will get the current date and time by default when a record is created. You’ll need to write some extra code in your mocks to cope with these.

Sometimes fields are calculated when a record is updated. Typically there will be a [LastUpdated] field that will be set by an update trigger when the record is updated. For performance reasons some tables may be denormalized, and maintained by triggers. This will also require extra work in your mocks.

Foreign keys may be a problem as well. If you don’t have all the tables in your model, and a table has a foreign key to one of these not-included tables, your mocks can’t catch this either.

Conclusion

Writing testable code requires some architecture. You must think about how your code will be tested, and how this can be done as efficient as possible. You must also accept that you can’t mock everything, so integration tests will be necessary.

I actually started this post with the idea to introduce Effort to you, an nice library to mock your EF classes. But while writing I decided to postpone this to next week’s post.

References

https://en.wikipedia.org/wiki/Separation_of_concerns

Introduction to Unity

Posted in .Net, Architecture, Codeproject, Development, Entity Framework, Testing | Tagged | 1 Comment

Creating an OData V4 service

I’m writing an agenda application, where the data can be delivered to the calendar control using either REST or OData V4. I choose the latter because this will allow for much more flexibility afterwards.

I already have an MVC 5 project containing the calendar control, so now I want to create the OData services.

NuGet is your friend

I first need to add the OData NuGet package in the project. I suppose that you know how to use NuGet, but just to be sure:  Tools > NuGet Package Manager > Package Manager Console.

In the console type

Install-Package Microsoft.AspNet.Odata

This will do all the work for you:

PM> Install-Package Microsoft.AspNet.Odata
Attempting to gather dependencies information for package ‘Microsoft.AspNet.Odata.5.9.0’ with respect to project ‘SyncfusionMvcApplication1’, targeting ‘.NETFramework,Version=v4.6.1’
// Removed a lot of NuGet output here

Added package ‘Microsoft.AspNet.OData.5.9.0’ to ‘packages.config’
Successfully installed ‘Microsoft.AspNet.OData 5.9.0’ to SyncfusionMvcApplication1

As you can see the OData package has some dependencies, which are nicely solved by NuGet. The net result is that 2 assemblies have been added to the project: Microsoft.OData.Core and Microsoft.OData.Edm.

Creating the Entity Framework classes

I already have an existing database so I will create my EDM from that database (call me lazy…) Right click on the Models folder and select “ADO.NET Entity Data Model”. Pick the first choice (EF Designer from database).

image

Then choose your data connection. In my case it is a SQL Server database, running on my development machine:

image

In the next dialog I choose the necessary tables. For this example I’ll only need 1 table:

image

Clicking “Finish” takes me to the EventsContext.edmx diagram. Under de Models folder some new classes have been generated to make it easy to work with the data.

Of course it is also possible to work “code first”, in the end all we need is a way to retrieve and update data. For the OData example this could even be a static list of events, but there is no fun in that!

Create the OData endpoint

If you created your project with the WebAPI option, you should be fine. You’ll have a WebApiConfig.cs file under the App_Start folder which contains the method Register( ) that will be called from within the Application_Start( ) method in Global.Asax.

If this is not the case then you have some manual work to do:

Create the WebApiConfig class under the App_Start folder

Right click on the App_Start folder, and then add a class (add > class). Name the class WebApiConfig and open the generated WebApiConfig.cs file. Mind that when you create a class under a folder, the namespace of this class will contain the folder name. So remove “.App_Start” from the namespace name.

The name of the class (and its namespace) are not important, but to remain compatible it is a good idea to use the standard naming conventions.

In our case the class looks like

using System.Web.OData.Builder;

using System.Web.OData.Extensions;

using System.Web.Http;

using SyncfusionMvcApplication1.Models;


namespace SyncfusionMvcApplication1     //.App_Start => removed

{

    public static class WebApiConfig

    {

        public static void Register(HttpConfiguration config)

        {

            ODataModelBuilder builder = new ODataConventionModelBuilder();

            builder.EntitySet<Events>(“Events”);

            config.MapODataServiceRoute(

                routeName: “ODataRoute”,

                routePrefix: “OData”,

                model: builder.GetEdmModel());

        }

    }

}

We first create a builder that will contain the model to be represented by the OData services. This is done by creating an ODataConventionModelBuilder object, that derives from ODataModelBuilder. This class will generate an EDM using the same entity- and property names as in the model classes. This is done in the next line:

            builder.EntitySet<Events>(“Events”);

The documentation says that the method EntitySet(…) registers an entity set as a part of the model. So the model now contains an Events entityset that can be returned to our client. In the next line:

            config.MapODataServiceRoute(

                routeName: “ODataRoute”,

                routePrefix: “OData”,

                model: builder.GetEdmModel());


I set up a route that will be prefixed with OData. So the URL for the OData services will be something like http://myservice/OData/Events. OData URLs are case-sensitive. Notice that the builder that we just set up is passed here as the last parameter.

You may need to verify that this method is called from Global.asax.cs. Check the Register() function for the following line:

            WebApiConfig.Register(config);

If the line isn’t there you’ll need to add it. Make sure that you add this line at the end of the Register function, otherwise you’ll get a very confusion exception saying: “valuefactory attempted to access the value property of this instance.

So now we have set up the project to use OData, next thing we need to do is to create an OData controller. It turns out that this is the easy part.

Adding the OData Controller

Given that a good developer is lazy (but a lazy developer is not necessarily a good one) I searched a bit for OData V4 Scaffolding. We’re lucky, because this exists:

Right-click on the OData folder that you just created and select Add > Controller. In VS 2015 you’ll find a list of controller types that you can add, including some OData V3 Controllers.

Click on the “Click here to go online and find more scaffolding extensions” link below the dialog.

image

In the “Extensions and Updates” dialog type “OData V4” in the “Search Visual Studio Gallery” text box. In the list you’ll find “OData v4 Web API Scaffolding”, which is the one you want to download. Allow the installer to make changes to your system. Unfortunately you’ll need to restart Visual Studio, so let’s do that now and have some coffee Glimlach

After the restart of Visual Studio open your project and go back to the (still empty) OData folder. Go through the same motions as before: right-click > Add > Controller. Two more choices are presented now:

Microsoft OData v4 Web API Controller. This creates an OData controller with all the CRUD actions. This clearly indicates that we don’t need Entity Framework (EF) to create OData controllers. So it is possible (and often preferable) to implement the Repository pattern and then use the repositories to obtain or modify the data. If you plan to do this, then beware of the caveats that we’ll encounter later in this blog (see the part on IQueryable).

Microsoft OData v4 Web API Controller Using EF. This does the same, but from an EF data context. Given that we’re using EF in this example, let’s try this one. A dialog box pop up, fill the fields like this:

image


and click “Add” to generate your controller.

Running your application will take you to your homepage, add /OData/Events to the URL and you’ll get the list of all the events in the database.

Reminder: OData is case sensitive, so for example /OData/events will NOT work. This is by design.

Show me the code

It is nice to have all the code scaffolded, but when you want to modify something you must know where to do it. So let’s go over the generated code in EventsController.cs.

Class declaration

public class EventsController : ODataController

{

    private Planning365Entities db = new Planning365Entities();

The first thing to notice is that the EventsController class derives from ODataController. The ODataController class derives from ApiController, which makes this service a REST service with a bit more functionality (ODataController adds the protected methods Created and Updated to return action results for the respective operations).

Get the Events

A xxxEntities object db is created to access the database using Entity Framework.

// GET: odata/Events

[EnableQuery]

public IQueryable<Events> GetEvents()

{

     return db.Events;

}

The actual code is simple: return db.Events;

This returns an IQueryable, which is important because there is also the [EnableQuery] attribute. The combination of these 2 makes that we can create lots of queries from this method. You can try the following http GET requests:

We could have written this function like this:

[EnableQuery]

public List<Events> GetEvents()

{

    return db.Events.ToList();

}

The results are the same, but…

  • db.Events is materialized by the ToList() function. This means that I also had to adapt the signature to become a List<Events>.
  • So when we would query a table with 100.000 rows, and the use the $filter clause in the http request to only return 10 records, ToList() will first retrieve all 100.000 records, and then the LINQ Where clause will be applied to this (in-memory) list.
  • In the first (correct) version, we returned an IQueryable, which means that LINQ will now let the database do its work (that means: a SQL where clause will be added to the request and only the 10 relevant records are retrieved from the database. Needless to say that this is a lot more efficient!

I’m raising this issue because often when a repository is implemented, this will return a collection instead of an IQueryable, which would cause this (subtle) bug. This also shows that it is a good idea to test your code with large datasets, so you may catch this kind of errors before you go to production!

Get an event by its key

// GET: odata/Events(5)

[EnableQuery]

public SingleResult<Events> GetEvents([FromODataUri] long key)

{

    return SingleResult.Create(db.Events.Where(events => events.Id == key));

}

Again the actual code is simple: db.Events.Where(events => events.Id == key)

db.Events.Find(key) would be more efficient, but we are returning a SingleResult class. This is actually an IQueryable with zero or one records in it. So we need to pass it an IQueryable object, which the Where method does.

The EnableQuery attribute is used again here, so allow for more than just the simplest queries. We can try:

Updating an event

For Updates we typically use the PUT verb. This will then replace the current event with the new event.

It is also possible to update entities using the PATCH or MERGE verbs. Both verbs mean the same and are allowed. The difference with PUT is that they don’t replace the entity, but only do a partial update: only the fields that have been changed will be modified in the data store.

// PUT: odata/Events(5)

public async Task<IHttpActionResult> Put([FromODataUri] long key, Delta<Events> patch)

{

    Validate(patch.GetEntity());


    if (!ModelState.IsValid)

    {

        return BadRequest(ModelState);

    }


    Events events = await db.Events.FindAsync(key);

    if (events == null)

    {

        return NotFound();

    }


    patch.Put(events);


    try

    {

        await db.SaveChangesAsync();

    }

    catch (DbUpdateConcurrencyException)

    {

        if (!EventsExists(key))

        {

            return NotFound();

        }

        else

        {

            throw;

        }

    }


    return Updated(events);

}

As a first remark: the class Events indicates a single event. I did not put it in singular when the Entity Framework data model was created, hence this name. So don’t let that put you on the wrong foot.

In the function signature we see that the patch parameter is of type Delta<Events> instead of just Events. This type tracks the changes for the Events class, allowing the line patch.Put(events) to do its work: overwrite the fields of the found event with the fields of the patch object.

The rest of the function is straightforward.

If you look at the Patch() method, you’ll see exactly the same code except for the line

patch.Patch(events);

The Patch method will only update the changed fields.

The Post( ) and Delete( ) methods should be clear by now.

Conclusion

Using the OData V4 templates it is easy to create OData services. There are some things that are good to know, but most can be inferred from the code.

Some references

http://www.asp.net/web-api/overview/odata-support-in-aspnet-web-api/odata-v4/create-an-odata-v4-endpoint

https://blogs.msdn.microsoft.com/davidhardin/2014/12/17/web-api-odata-v4-lessons-learned/

Posted in .Net, Codeproject, Development, MVC, MVC5, Web API | Tagged | 8 Comments