Introduction
I am preparing a course for 5 persons. They will all need a virtual machine (VM) with Visual Studio 2017 and some files on to perform exercises. I could create each machine, one by one and perform the same installation everywhere but this would not be very productive, and error-prone. Instead I want to create the virtual machines by creating a “master” image, from which I can easily create the other VMs.
Prerequisites
 If you don’t have an Azure account yet, there are some ways to get a free test account. You can surf to https://portal.azure.com, where your credentials will be asked. If you don’t have an account yet, you click on “Create One!” and Microsoft Azure will gladly guide you to create a new account. This account will be free for the first 3 months and will provide you with a free (limited) budget to allow you to test Microsoft Azure.
Creation of the first VM
I want to create a Windows VM image that will contain Visual Studio 2017, and all the necessary course files. I already took these steps to organize my Azure resources:
- Created a new resource group called “courses”.
- In that resource group created a new VM called “vs2017-2”.
- Once the VM was running, installed all the needed software and downloaded the needed files.
This is not the scope of this article, so I won’t describe this here. It would make a boring blog post…
Preparing the VM to be used as a template image
Now that the VM is installed the way we like it, let’s destroy it …
We are going to prepare the image in a way that it can be deployed on multiple computers (or VMs in our case). These don’t necessarily have the same configuration, so we need a tool to prepare for this cloning process. Enter sysprep.exe.
Sysprep can strip the image to the minimum, allowing it to be used to create other VMs. Each VM that we will create using this image will have the same software installed, with the same data files, settings, …
You can find sysprep in this folder: %windir% \System32\Sysprep. On https://blogs.technet.microsoft.com/danstolts/2014/05/how-to-sysprep-sysprep-is-a-great-and-powerful-tool-and-easy-too-if-you-know-how-step-by-step/ you can find the use of Sysprep described in a very good way.
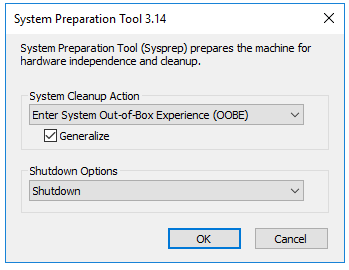 Sysprep can be used with parameters (when you know what you are doing), or just without parameters, which will pop up a little form. In the screenshot, you can see the form with the right values filled in:
Out of Box Experience.
Generalize. This checkbox will change your image so that it can be run on a different computer. All the hardware-specific settings will be removed.
Shutdown. With the previous 2 settings you’re going to make a clean image of your computer which will only be useful to create other images from. So you don’t want to try to reboot this image.
Click OK, when you’re certain that all the security data can be wiped from this VM. Sysprep will clean up your VM, and then execute the generalize step. This can take several minutes to run. When it is ready, we can go back to the Azure portal to capture the image.
Capturing the VM in Azure
As said before, the next step is now to capture the VM, so that we can clone it later. This is done on the blade for the VM itself. To go there: open the “courses” resource group, then open the VM that you just created and generalized. On the top menu you’ll find the “Capture” button.

Clicking this button takes us into the “Create image” page, with will show some warnings to start with. Here you’ll give your new image a name, assign it to a resource group and you get the possibility to delete the VM that you are capturing. This makes sense because that VM will not be useful anymore. Below, I have created an image called “vs2017-image”, in the resource group “courses” and decided to clean up (Automatically delete):

Clicking on the “Create button” …
- Stops the VM. When you have shut down the VM, it still is available in Azure (and still costs money). If you’re not going to use a VM for a while, don’t forget to also Stop it in the Azure portal. Warning: when you restart the VM in the portal, it will have another IP address. If you downloaded the RDP file to access this machine, you’ll need to adapt the IP address in the RDP file, or download it again. For the course I will only use the 5 VMS for 4 days, and only between 8:00 and 17:00. Therefor I also create a policy on each VM that will make the VM stop at 18:00.
- Generalizes the VM further.
- Creates the image.
- Deletes the VM, as requested.
Even though the VM is deleted, other elements are not automatically deleted, so this needs to be done manually. These items don’t cost a lot in MS Azure, but it is a good practice to remove what you don’t need anymore.
- Public IP address. Click on the Public IP address to open its blade. Click on the “Dissociate” button to remove it from its network interface (and confirm). Now you can click the “Delete” button to make the final kill!
- Network interface. Open the blade by clicking on the name, then click “Delete” (and confirm).
- Network security group. Open the blade by clicking on the name, then click “Delete” (and confirm).
- The Disk. Open the blade by clicking on the name, then click “Delete” (and confirm).
The order of deletion is important, because some resources depend on others.
Creating a new virtual machine from the image

Now comes the time to profit from the work before. In the Azure portal, click on the image that you created (in this example “vs2017-image”). In the blade that appears, click on “Create VM”. This will take you through a wizard-like series of pages to enter all the necessary parameters. The important parameters are:
- Resource group. You can select an existing resource group; or create a new one for the VM.
- VM name. This must be a unique name for your VM.
- Image. This will be pre-filled with the image name that you just created.
- Size. The size for your new VM. This can be modified afterwards if needed.
- Username / password.
- Inbound port rules. If you want to access the VM over RDP, you need to add this here:
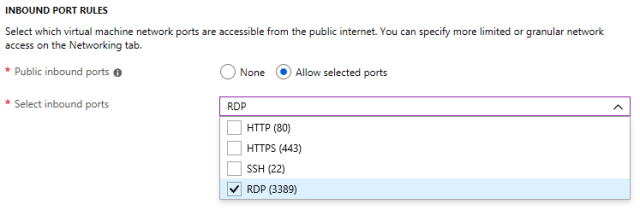
You can specify these rules on the first page of the wizard, or on the network tab. - Most of the other fields will depend on your specific needs.
When you’re done, click on the “Create” button. The VM is now created from the image. You can test the VM by starting it; and connecting to verify if everything works correctly. When the VM is created, it is already started so you can connect immediately to it.
To create additional VMs, you don’t have to wait for the first VM to finish creation.
Conclusion
When you need one or two VMs it may not be worth setting up an image to clone the VMs from. But when you need more than that, you’ll save a lot of time using the sysprep / capture combo. In the end the steps to create an image are quite simple:
- Create a VM that will serve as the master template. Install all the necessary software on it, together with all the data files that you may need. When everything works remove temporary files that you left during the testing of the VM. If needed, also remove MRU lists (ex in Visual studio: recently used files and projects) and other user state.
- Run the sysprep tool on this VM.
- Once sysprep is done, and the VM is shut down, capture the VM in the Azure portal. It is not necessary to remove all the left-overs from the master VM, but it is good practice.
- When the capture is done, you can create new VMs from the created image.
