Setting up unit testing

Introduction

In the previous posts I talked about unit testing. I gave some background, and I explained the flow of Test-driven Development (TDD). So now is the time to set things up. In this article I will use the calculation of the Greatest Common Divisor or 2 integers as an example. I’m using Visual Studio 2015 to run my examples, but you can do the same in other development environments of course. I’m supposing some basic knowledge about VS2015 (but not much).

Setting up the application

In VS create a new Console Application, name it “GCD”.

image

This will create a solution called “GCD”, with a console application project called “GCD” as well. No surprises there!

Here is the Main( ) function, and the function under test CalcGCD( ). I will number the functions CalcGCD1, CalcGCD2 etc to indicate the workflow.

class Program
{
    static void Main(string[] args)
    {
        int x;
        int y;

        Console.Write(“x: “);
        x = int.Parse(Console.ReadLine());
        Console.Write(“y: “);
        y = int.Parse(Console.ReadLine());

        Calc c = new Calc();

        int z = c.CalcGCD1(x, y);

        Console.WriteLine($”GGD({x}, {y}) = {z}”);
    }
}

public class Calc
{
    public int CalcGCD1(int x, int y)
    {
        throw new NotImplementedException();
    }
}

Running this first version of the program will terminate it with an exception, which gives us a perfect baseline for our tests.

Adding a test project

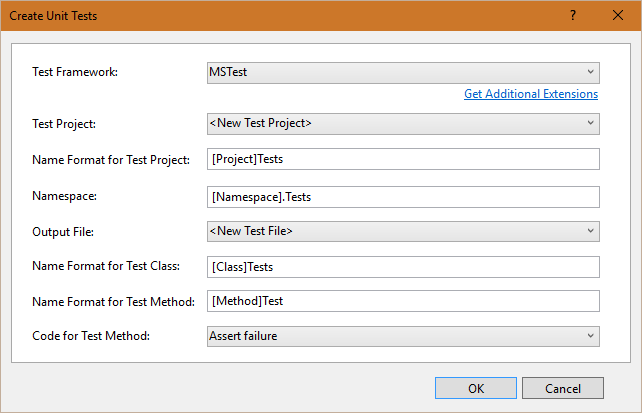
The easiest way to do this is to right click on the method that you want to test (CalcGCD1) and then choose “Create Unit Tests”. This will show the following dialog box:
image

The default values are perfect in this case, so I won’t change them. To go over the fields:

  • Test Project: A new test project will be created. If you have already a test project in your solution you can use this one instead. Often you’ll find yourself with more than one test project: you may want to test your data services, your business services, your UI, … and for each of these projects you’ll create a separate Unit Test project. When a solution becomes a bit bigger, I usually create a “Test” folder to group all my test project in.
  • Name Format for Test Project: This will become GCDTests, which is OK.
  • Namespace: In our case: GCD.Tests.
  • Output file: If you have already some tests for this function (or class, as you’ll usually put all the tests for one class together) then you can pick the corresponding test file. As we’re creating out first test here, I select “New Test File”.
  • Name Format for Test Class: should be obvious now.
  • Name Format for Test Method: should be obvious now.
  • Code for Test Method: The 3 options are self-explanatory, we’ll use the default.

Clicking OK gives the following result:

image

A new test project is created, named GCDTests.

In the references we can see that the GCD project is automatically referenced, which gives us access to the methods in the Calc class.

A first class called CalcTests is generated, which contains 1 method already: CalcGCD1Test. In the “Code for Test Method” drop down we selected “Assert Failure”, which is what you see here indeed:


[TestMethod()]
public void CalcGCD1Test()
{
    Assert.Fail();
}

The only line is “Assert.Fail( );”, which will make our test red in the test runner. Assertions are the heart of unit testing, so I’ll give some more examples later.

One more thing to be noticed: the method is preceded by the [TestMethod] attribute. And the test class is preceded by the [TestClass] attribute. These attributes tell the test runner that CalcTests may contain some test methods, and that CalcGCD1Test is one of those.

We may as well make the test more useful. I also renamed the test function to indicate its purpose:

[TestMethod()]
public void CalcGCD1BasicTest()
{
    // arrange
    int a = 10;
    int b = 5;
    int expected = 5;
    Calc c = new Calc();

    // act
    int actual = c.CalcGCD1(a, b);

    // assert
    Assert.AreEqual(expected, actual);
}

Running this test will fail, because we haven’t implemented the CalcGCD1 yet. But this is an actual test that will stay in the code base. When we change our function later, and even this basic test fails, we’ll know that something went pretty wrong!

Running the tests

This requires a test runner. In VS we find this under the “Test” menu. In here you can run or debug your tests directly, but even handier is the Test Explorer (Test > Windows > Test Explorer). This will open the Test Explorer Window, which will probably be empty. This is because you haven’t built your test project yet. So press Ctrl+Alt+B to fix this.
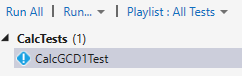
image


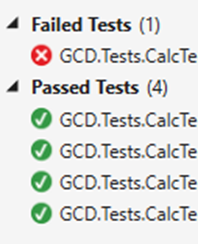
As you can see by the blue icon, the test hasn’t been executed yet. So click on “Run All” and see what happens: The icon turns red because your test has failed. If you don’t know why your test has failed you can now put a breakpoint after the // act comment and right click the test. In the menu you choose “Debug” and you’ll be debugging your code directly, without having to enter the numbers in the console etc. So this will make your debugging cycle shorter.

Fixing the CalcGCD Function

So TDD says that now we have to fix the function in such a way that all the tests will pass. We only have one test, so that’s easy enough:

public int CalcGCD2(int x, int y)
{
    return 5;
}

Build and run the test again, and yes, we have a green test. The GCD of 10 and 5 is indeed 5. So our function handles our basic test well.

Assertions

We verify the necessary conditions for out tests by using the Assert class. This class is your communication with the test runner. When an assertion fails, the test runner will stop running your code. Here are some of its methods:

Assert.Fail( )  This will fail immediately and turn our test red. No conditions are checked. There is an overload that takes a string as its parameter. This is usually a good idea, so at least you know why something failed when you see the red icon in the test explorer.

Assert.Inconclusive( )   You can put this at the end of your test method, when you have reached a point where you are not sure if the test is OK or not. It will give an orange icon in the test explorer. Again, it is a good idea to pass a description to the function.

Assert.AreEqual( )  This has a lot of overloads to test equality between expected values and actual values. If they re not equal the test fails.

You can find the full list of assertion methods at https://msdn.microsoft.com/en-us/library/ms245302(v=vs.140).aspx.

Parameterized Unit Tests

Some testing frameworks (like NUnit) have the possibility to easily add different test cases using the same function. A test function can look like

[Theory]
[InlineData(10, 5, 5)]
[InlineData(5, 10, 5)]
[InlineData(7, 5, 1)]
[InlineData(5, 7, 1)]
public void TestGCDNormalCases(int a, int b, int expected)
{

// …

}

Unfortunately VS doesn’t provide an easy way to do this. If you want to work with different sets of data for testing the same function, you have to set up an external data source and then reference this in your tests.

This is out of scope for this article, but I’ll get back to it, and to some other possibilities to fix this problem.

Microsoft, if you read this, we’re waiting for this feature already a long time!

Conclusion

So now we have set up some basic unit testing for our project. We can add more tests and refine our function further, proving that all the previous tests still pass. And then we can move on to the next function to be implemented. When you have finished some more functions you’ll probably start to refactor your code. While refactoring the code you can run all the tests to verify that everything remains green. And if it doesn’t, you have the tests to help you find out why not.
Posted in .Net, Codeproject, Development, Methodology, Testing | Tagged | 4 Comments

Test Driven Development

I talked about the necessity of testing in my previous post. I’ll talk about how we can implement TDD in our project in this post.

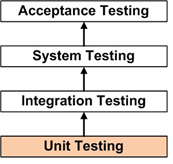
When we talk about testing, there are a lot of tests that we can perform. A non-exhaustive list:

  • Unit testing
  • Integration testing
  • System testing
  • Regression testing
  • Acceptance testing (done by our customer)
  • Load testing
  • Performance testing
  • Stress testing
  • Installation testing

Each of these tests is important, but in this section we’ll only talk about unit testing.

What is unit testing?

imageAs the name implies, unit testing will test a small part of the code (a unit) in isolation. This unit is usually a function. In this post we’ll use a function as a unit. So we take the smallest piece of testable software in the application (the function) and try to isolate it from the rest of the code. This implies that we have to create clean functions that do only one thing well. We need to know what will be the input for each function (which follows from its signature), and what will be the output. We then write one or more tests that will verify if the function behaves correctly.

A unit test should test 1 thing. It can be tempting to write one test and add more test cases into that test. But when an assertion in your test fails, why is that? Is it because of a defect in unit 1, unit 2 or in both? So each unit tests must only involve one function to test. On the other hand, one function can be tested by multiple unit tests. You may write a test for a happy path in the function, some tests for edge cases and some tests for expected exceptions.

Your set of unit tests will grow over time. You try to cover as much of the functionality of your functions in your initial unit tests, but there will be things that you forgot. So indeed, you’ll need to add more tests then, to cover those bugs.

Don’t treat unit tests as an afterthought, because then they will only be additional code that you need to write, taking up your time. This takes us to TDD.

Test Driven Development

Instead of writing your tests after you have implemented the code, you can also reverse this. When you’re about to write a function

  • Write the function signature, and do something like
    throw new NotImplementedException();
  • Write one or more tests for the most trivial cases for your function (usually the positive paths).
  • Run these tests. They will fail, but this gives you a baseline for your testing. From now on things can only get better!
  • Implement the function, with the tests in mind
  • Run the tests again, and correct the function if necessary

imageBy writing the tests in advance you are forced to think about the function ahead. Probably you’ll write the code more structured from the first time, which enhances the code quality.

The cycle of developing – testing is very short. You just create the function, run the tests, repeat until everything works as supposed. And then you run all the tests in your project / solution and hope that everything is green now. This can also be seen as a regression test: we changed some code, and we have a whole test suite to prove that everything still works. So when our code is moved to production, we don’t have to pray for a quite evening.

Red / Green

The previous example show how TDD works:

  1. Understand the requirements.
  2. Red: create a test and make it fail. This can easily be done by throwing some exception in your function.
  3. Green: Write the code that makes the test pass. Keep this code as simple as possible. All you want to do is make it pass the test(s) you have already written. Think of the YAGNI principle. If new functionality is needed, you just add another test. You then add the new functionality and run all your tests again. If all is well the previous tests will still be green.
  4. Refactor. The code is now complete, and all requirements are fulfilled. If necessary optimize your code by refactoring it. Of course, after each change you can run the tests again.
  5. Repeat this for all your other units.

So what is a good unit test?

Runs fast

Unit tests will be run often. In the previous section we saw that a set of unit tests is run each time we want to test our function. If we need to wait 10 minutes for the tests to terminate they don’t serve their purpose anymore!

Removes external dependencies

One of the things that may take a lot of time is calling external services. Database calls can take quite some time, calling web services can be slow as well. So we need to remove these dependencies from the tests.

In a unit test we don’t want to test if the web service that we call is correct. Normally that service is tested and should be correct already. The same goes for the database. Of course, later in the process we’ll perform integration tests, and they will perform the whole flow.

Dependencies can be removed in several ways. I take the example where we want to access data for a certain user. So in the function we first obtain the current username, and we pass that in the query to the database.

Testing this code manually may work, because we’re authenticated with our Windows account, and that account may be retrieved in the function (Windows authentication). But the test runner may run under another account, causing problems already. If another developer runs your test code results may be different as well. And it will be difficult to test for other user accounts, because you would have to log on with their credentials.

A simple solution may be to pass the username as a string into the function. Now your function can be tested without depending on the currently logged on user.

Other solutions involve dependency injection, which I will talk about in a later post.

Tests should be automatically run before you move your code into DEV. This prevents moving code into your source control system that doesn’t work properly. This is a good reason to remove external dependencies. It will also reduce the “works on my box” syndrome!

Tests should not depend on the state of external systems. The example with the user name already illustrates this, but this becomes even worse when a database is involved. You cannot rely on a certain status of the database. If you are going to modify data during your tests then you face some problems:

  1. You can’t be sure about the state of your database when you start your tests. You don’t know if other users have changed something, or if a previous test has modified the database already. Unit tests are not run in a certain order, so you never know which of your tests already ran. And there there is parallelism as well: tests can be run simultaneously.
  2. You don’t want to mess up your database if your tests fail. One of the reasons for testing is that things may fail, so you should expect his!
  3. As said before, databases are slow.
  4. Maybe your database is not accessible in DEV.

I will talk about stubbing and faking in later posts, and one of the specific cases will be how  to handle the dependency on databases.

Very limited in scope / AAA pattern

Test functions are simple. They will do 3 things:

Arrange. Set up everything that you need for the test. Here objects are instantiated, variables are declared and initialized.

Act. Invoke the method under test.

Assert. Run several tests on the return values to see of they are what you expected.

If you keep these 3 sections in mind your tests should be easy to implement. As you can see writing a test doesn’t take much time.

Clearly communicate intent

Give your tests a good name. Instead of calling a test “TestGCD”, call it something like “GCDPositiveCase” or “GCDNegativeInputShouldThrowException”. When you see some red tests in the list of executed tests you know immediately what went wrong.

It is also a good idea to comment the test functions as well, if the name doesn’t show the intent of the test enough.

They evolve

When you write new functions, you’ll write new tests. Clear.

When bugs are detected that aren’t covered in your current unit tests, you’ll need to add tests as well.

When requirements change, and the behavior of your function must change, you’ll have to maintain your tests too.

http://pcweenies.com/comic/unit-testing-101/

Conclusion

In this post we saw how we can use TDD to speed up development, and in the same time improve our code quality.

In the next post we’ll see how to set up unit testing in Visual Studio, and we will finally get our hands dirty!

References

Unit Test Basics

Posted in Codeproject, Development, Testing | Tagged | Leave a comment

Is testing a waste of time?

tl;dr:  NO

Let’s elaborate

As developers we all know that we’re supposed to test our code. We should write unit tests and yet usually this is the first action that we skip when we’re running out of time.

As team leads / managers we all know that tests are necessary, but when a deadline nears we tend to put less emphasis on testing, and more on cranking out code.

So there seems to be some tension in the testing field. We all know that testing is good for us, but yet we don’t do it anymore once there is some stress on the project.

 - Dilbert by Scott Adams

http://dilbert.com/strip/2010-08-21

Why should we test?

imageEdsger W Dijkstra : Program testing can be used to show the presence of bugs, but never to show their absence!

This means that testing doesn’t give you a 100% guarantee that your software has no bugs. But is helps a lot. We could turn this around and say that we have an almost 100% guarantee that there will be bugs if we don’t test, unless of course you’re typing over a version of a “hello world!” program. And even this program you will test, because once you have typed in your code you’ll be curious to know if the output will indeed be “hello world!”.

imageAnd with that we’re on the first form of testing, that we all do: manual testing. We wrote the program, and then started it to verify the results. With a simple “hello world” this can be sufficient, but once there is some more complexity involved this will result in a waste of time. This is also something repetitive, with a known set of actions and outcomes. Isn’t this why we invented computers in the first place?

In the case of our “hello world” this isn’t a big problem, but when you create a web application, where you want to test certain conditions that only occur after going through 10 pages, clicking some buttons and entering a lot of fields with (correct) data, you can see that automating this will be a huge time saver. If you can get a test runner to execute directly the function that you want to test instead of having to spend half a minute to get to that function, you’ll be saving hugely!

But that means that we need to code more. And coding more takes more time and effort. So it will take more time and our project will complete slower.

Or maybe not

Let’s create a console application to calculate the greatest common divisor (GCD) of two integers. There are many ways to tackle this problem, but for simplicity we will

  1. enter 2 integers
  2. calculate the GCD, with whatever algorithm you fancy
  3. show the output

Let’s go through the normal development cycle. We typically write a main( ) function that gets the 2 integers, calls a function to calculate the GCD and then shows the result.

Testing. Entering the 2 integers in the console will take some time, and become quite boring if you have to repeat it many times to get your code right. It is also very easy in a console application to enter something wrong, causing the program to crash. This means that you have to restart the program, enter the 2 digits again, and then verify the result again. Mind that we’re talking about a console application that only takes 2 input values, no clicks are necessary (as in a web application), and already we see that this will take some time.

We then probably will want to test some more values, which means restarting the program, entering the 2 digits (correctly), testing, … So we see immediately that this will not be done because it takes too much time. Edge cases will be forgotten, and errors will only be found in production!

Also, when we change something we need to run all the tests again (manually), with a high risk of the the tests being forgotten, or shortcuts being taken.

There will be no trace of our testing effort. No log files are written, unless you add this job to your list of things to do (manually) during testing.

Negative feedback loop

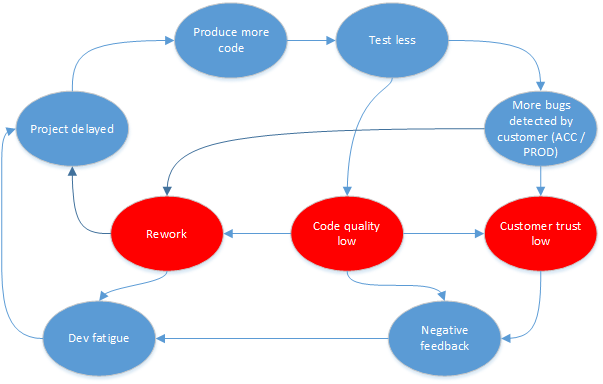
Typically, when projects are delayed (for some reason), they get in a negative feedback loop. Or sometimes we just decide to skip writing tests in the first place. This brings us to the following diagram:

image

The project gets delayed, so we must produce more (code). So instead of wasting our time with testing we just develop, develop, develop. As a result the code quality will be lower which will result (sooner or later) in rework. This rework will usually become urgent at the worst possible time (some people say that Murphy was an optimist !). Because of the rework nothing else can be done, so the project will be even more delayed now. So weird enough, the more we code, the later we’ll finish the project. As a reaction often more developers will be put on the project, only feeding the negative loop.

The lack of testing will inevitably mean that more bugs will be detected by the customer, in acceptance and production environments. So the customer’s trust will quickly drop, which will result in negative feedback. This feedback gets to the (already overworked) developers, who will get into “developer fatigue”. This causes motivation to drop, developers to leave, … So the project will be delayed even more.

Breaking the negative cycle

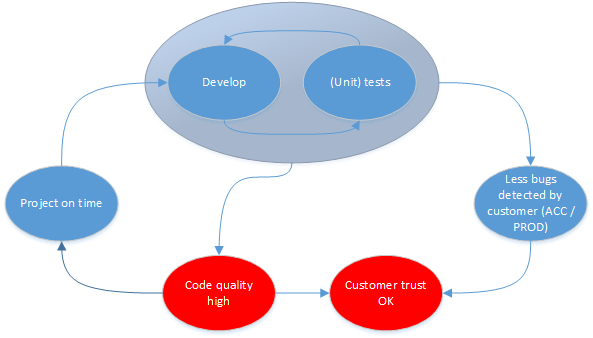
I think that you already have understood that there is a way to solve this. Let’s draw a different diagram:

image

We can start in the “project on time” bubble. We develop our code, and test it immediately. The tests are preferably automated (coded), so that they can be executed easily and efficiently. We have a tight integration between developing and testing, so this loop can be executed quite fast. When the loop is finished we can be certain that the code quality is high enough; because it has passed the tests. Also less bugs will be detected by our customer which will make sure that the customer keeps his trust up. And if they do discover a bug (which still is probable) then we can adjust our test set, so we avoid recurring bugs.

Thanks to this no rework is required and the project can move on.

When our project is already delayed, it will take some time to switch to this methodology. A feature freeze may be necessary. Don’t write new code, but start writing tests for the parts with the most (annoying – visible – expensive) bugs.

In this case it doesn’t make sense to start writing tests for your whole code base. Some parts of it will be OK, so don’t waste your time there. But do write tests for the other parts. When I come in a project at this stage I try to find the worst problems (prioritize), and then write some tests there. Then it becomes easier to “quickly” correct the code, and keep it correct while other areas are tackled. Because automated tests are run often, the risk for recurring bugs is reduced. And so we can start to stabilize the project efficiently.

Often this will also require some refactoring of the code, to make it testable. I’ll get to that in an other post.

Conclusion

In most projects a balance will be sought between writing tests and writing code. But I hope that it is clear that testing is a great accelerator for your project, and not a waste of time.

In the next article I will take you into the world of Test Driven Development, so you can become even more productive!

Happy testing!

Posted in Codeproject, Development, Methodology, Testing | Tagged | 1 Comment

State Chart Diagram Part II

In part I we covered state chart diagrams in a basic way. Usually this is good enough to describe your states. You also want to keep thing simple (KISS). On the other hand it can be convenient to be able to express some more situations, which is what we’re going to do in this post. We will see how we can specify actions when a certain event occurs, we’ll see how we can describe conditions and then we’ll see how to describe concurrent states in a State Chart Diagram.

Actions on Transitions

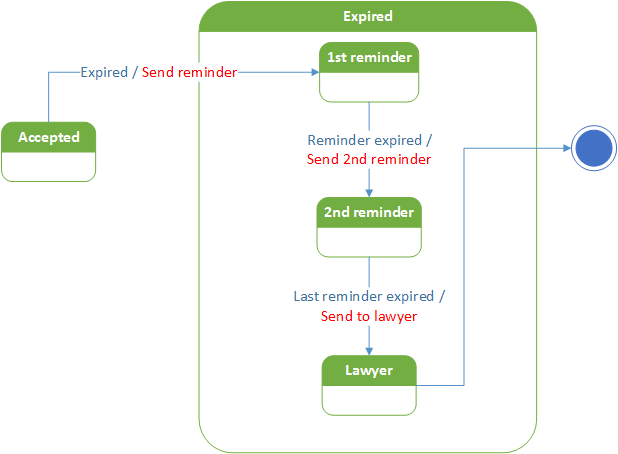
We already talked about actions in the previous post. We put actions in the states themselves as entry actions, exit actions or do actions. This is usually the right place to put them!

image

The syntax for a transition is : eventTrigger [guard condition] / action

The action is what will be executed when the transition occurs.

All three parts (eventTrigger, guard condition, action) are optional. In the diagram above we omitted the guard condition, only putting the actions.

I’d like to put a remark here: let’s take the first expired action. When the state changes from “Accepted” to “1st reminder” the first reminder will be sent. There is only 1 arrow arriving in the “1st reminder” state, so no problem.

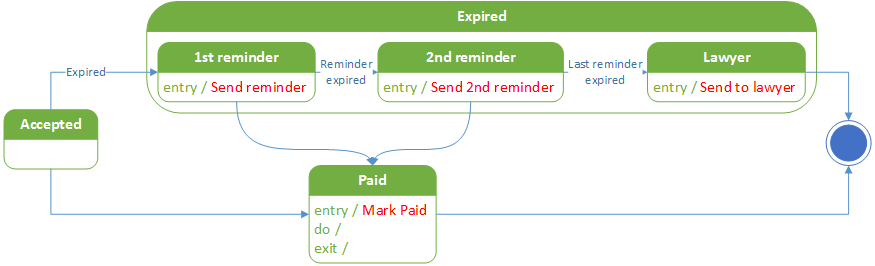
But it is clear that often this action will always need to be performed when we get into the “1st reminder” state. So it would be a better idea to put “Send Reminder” as an entry action for this state. That way, when in the future we find more transitions to “1st Reminder” we’re always certain that a reminder will be sent in any case!

Of course the same goes for the “2nd reminder”.

And in that way we can remove some clutter from the diagram as well. Let’s keep things as simple as possible!

image

Guard Conditions

The syntax for a transition is : eventTrigger [guard condition] / action

This event will be executed when the guard condition is true.

image

When we look at the “Paid” state we see that it can be left in 2 ways:

Either the invoice is completely paid ( [total amount paid] ) and we’re happy, or the invoice was only partially paid ( [invoice not completely paid] ) and we go back to the “Accepted” state.

The conditions can be expressed in whichever way you like. We could have put something like [amount paid = invoice total] instead of [total amount paid]. This may depend on your audience (who is reading this diagram?). If it is a final diagram for your developers, then the more explicit way of putting the guard condition may be better. If you’re still discussing with your end-users then the first (more abstract) form may be better.

Concurrent States

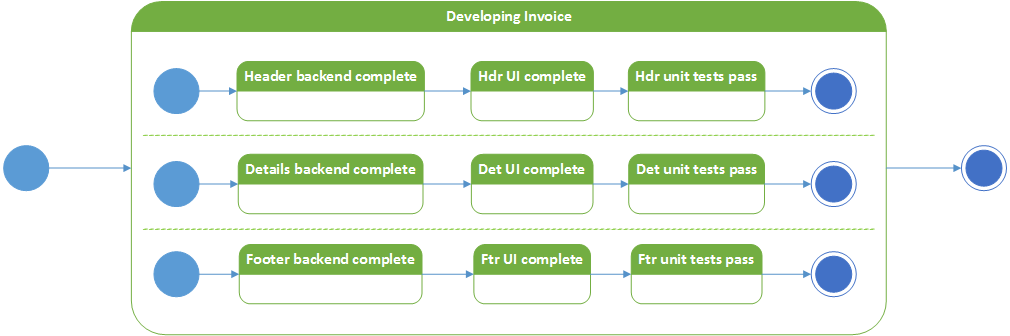
When there are concurrent actions to be executed, each action can have its own state.

image

Let’s say that we’re going to start developing our invoice. We’ll need to develop a header for the invoice, where we’ll enter the client details and some invoice details (invoice number, date, expiration date, …). As you see the expiration date follows from our previous analysis.

Then we need a part where we will enter the invoice details. We need to be able to create the invoice lines, modify them, etc.

And finally we need to create the invoice footer, where we calculate totals, taxes, …

But we don’t necessarily need to do all these 3 tasks one after the other. Maybe we have 3 developers, who can work simultaneously on the software. In that case each developer can run through his states (backend – UI – unit tests), and the invoice software will be complete when all the 3 trajectories are ended.

Of course this is a very naïve example of software development. The 3 lanes are never so straightforward, but for the sake of simplicity we keep it this way in this example. I put a more realistic diagram of TDD at the end of this post.

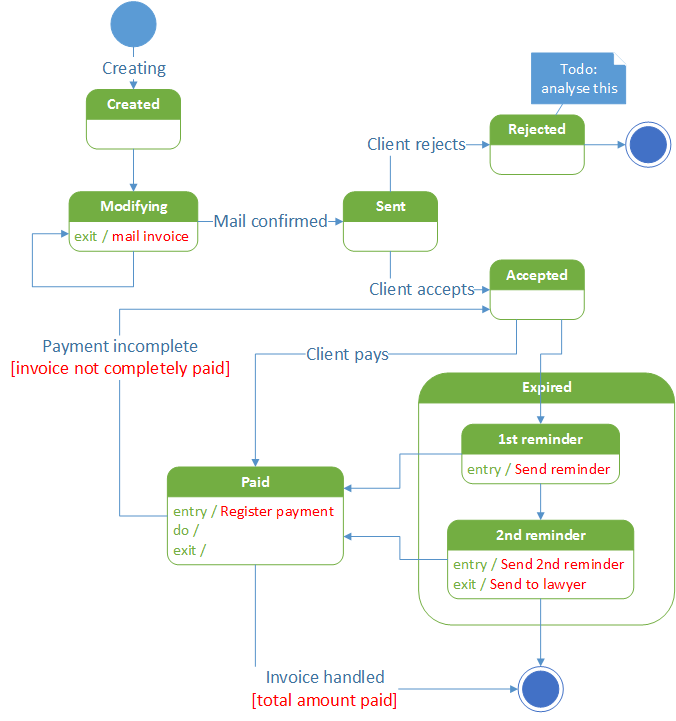
The complete diagram

I have put most of the principles that we have discussed in one fine diagram. While discussing this with an end-user, she immediately noticed that we have some work to do for the “Rejected” state, hence the comment on that state.

I used colors in this diagram to make things clearer. You don’t have to do that in your diagrams, unless you think that it adds clarity.

I also had to rearrange the diagram so that it would fit on the page. In our paperless times, with large screens that should not be a concern in most of the cases. But sometimes these diagrams can become quite big, so it may be a good idea to model composed states on a separate diagram.

In this diagram we see that everything flows towards the end states. Because I had to rearrange the diagram, there are 2 directions: one horizontal direction for the “Rejected” flow, and one vertical direction for the “Accepted” flow. I normally create diagrams in such a way that everything either flows horizontally (and from left to right) or vertically (top down). That makes the diagrams more clear.

image

A Word of Caution

We have seen many ways to express things in a state chart diagram. But it is not because we have all these possibilities that we need to use them. Try to keep things simple!

One More Example

Development of a web page

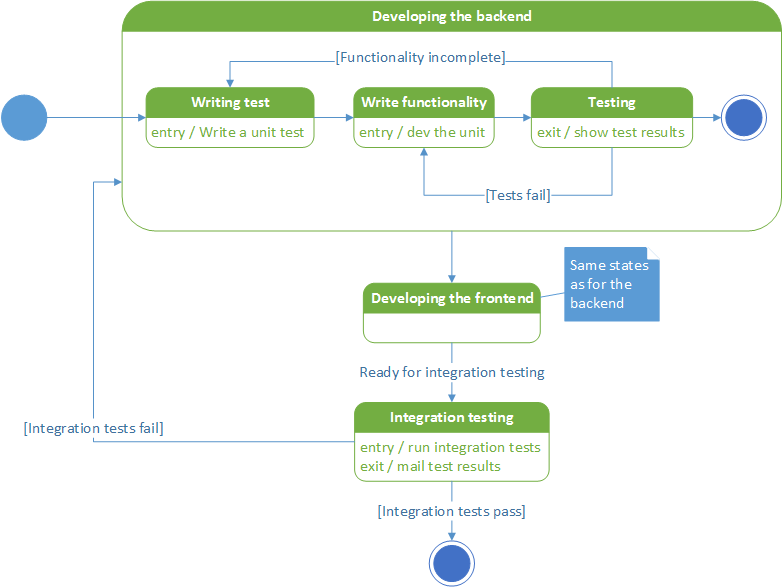
In this example I want to work out the “Invoice development” a bit better. I’m concentrating on only the development of one unit, such as the invoice header.

image

We start by writing the backend, after which we write the front end. We then perform the necessary integration tests and if all goes well the unit is finished. So that is the (sequential) happy path.

For the development we practice TDD (Test-driven development). So we start by writing a test, for which we implement the functionality. We then test what we have written and hope that the test passes. If it doesn’t we continue the development until the test is OK. We then verify if all the cases are covered. If not we add a new unit test (or more than 1) and we repeat the whole cycle until we’re complete with the backend.

For the front end we run through the same process, as indicated by the comment. When we’re happy with the front end we can test the whole. If the integration tests don’t pass we enter the backend development again, starting by writing some more unit tests. We repeat the cycle until all the integration tests pass.

Conclusion

This concludes my explanations about state analysis. I hope that in these 2 articles you have seen that by defining state correctly already during the analysis phase, you’re creating a lot of advantages:

  • It gives you another angle on your models, which is a good way to verify if nothing was missed in the analysis.
  • It’s a good way to discuss with your clients / users
  • Developers and testers usually understand it really well so development will be faster, and more accurate

Do you use state chart diagrams? Let me know in the comments!

Posted in Analysis, Codeproject, Development, OOAD, UML | Tagged | Leave a comment

How to describe object state

Let’s say that we’re developing an application to manage invoices. Invoices will be created, modified, sent, (hopefully) paid or rejected, …

Depending on the stage that an invoice is in, we can perform different actions on it. For example: it will be very rare that an invoice that was rejected will be paid. Or it shouldn’t be allowed to modify an invoice once it has been sent. So how can we model this in such a way that it becomes easy to develop it, and – in extension – to test it?

Let’s first define some things:

What is a State

A state is a condition during which

  • an object satisfies some condition
  • an object performs some activity
  • an object waits for some event

Examples of states in the invoicing example can be:

  • Creating – we are creating the invoice
  • Modifying – after the invoice was created we modify it
  • Sent – The invoice has been sent to the customer, in some way (like e-mail, snail mail)
  • Accepted – the customer has accepted the invoice
  • Rejected
  • Expired – the expiration date of the invoice is passed
  • Paid – this should be the end state of an invoice

An event is a significant occurrence

  • Something that happens at a point in time.
  • Has no duration.This is not always true. When we send an invoice to the customer, this will take some time. But we consider this as an immediate action.
  • One-way transmission of information. Typically nothing is returned from an event.

State Machine Diagram

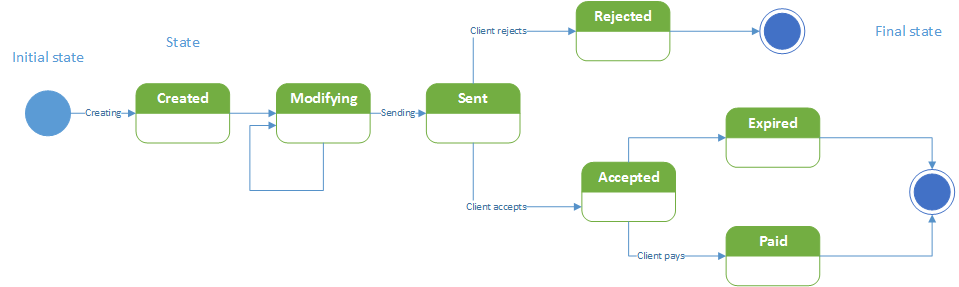
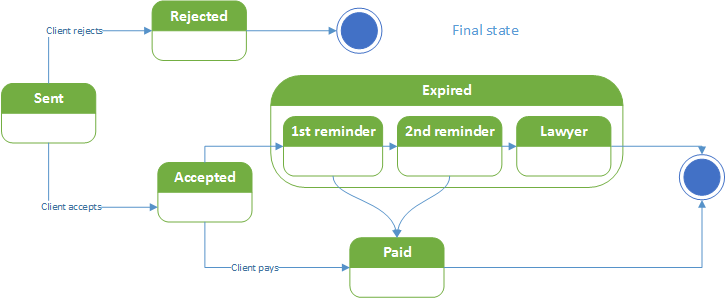
image

This simplest form of this diagram is composed of the following elements:

  • States: initial state, final state, simple state
  • Transitions: are indicated by a labeled arrow.

As you can see, with only these 2 elements we can express a lot already. We see immediately that when an invoice has been sent, it can’t be modified anymore. We also see that there currently are no actions when an invoice is expired or rejected, which may indicate that our analysis is incomplete.

Composite state

image

When an invoice is expired we may want to send a reminder, then maybe a second reminder, and then send the invoice to our lawyer. This can all be part of the expired state. So we can make this a composite state, containing sub states. The diagram shows it all. And of course we can do the same with the rejected state.

Actions

image

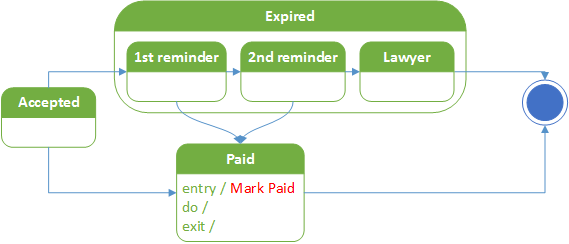
When entering or leaving a state you may want to perform some actions. In the diagram above when we enter the “Paid” state we always mark the invoice as paid. We put this on all 3 the arrows, indicating that this must be done in 3 instances in our code. Not so DRY, is it?

image

So instead we create an entry action on the “Paid” state, that says: “every time we enter this state we will “Mark Paid” the invoice.” This has several advantages:

  • The diagram becomes simpler (KISS), it contains less overhead.
  • We can’t forget the “Mark Paid” on one of the arrows.
  • For the implementation we now know that entering the “Paid” state also means marking the invoice as paid.
    • The implementation just became easier. This code can easily be derived from the diagram.
    • The tests just became more atomic. We just need to test that the method is called when the state is entered, and we’re good.

This makes most sense when there are multiple paths into the “Paid” state.

We can do the same with the exit action, which will be called when we leave the “Paid” state.

The “do” action will be called (repeatedly) while in the “Paid” state.

Conclusion

There is much more to say about State diagrams, but that will be for another post.

Happy drawing!

References

http://www.uml-diagrams.org/state-machine-diagrams.html

https://en.wikipedia.org/wiki/UML_state_machine

Posted in Analysis, Codeproject, Development, OOAD, UML | Tagged , | 1 Comment

Let’s fix Windows Live Writer on Win10

The problem

I installed Windows 10 on my computer, and then to make blogging easy I wanted to install Windows Live Writer. So I went to https://www.microsoft.com/en-us/download/details.aspx?id=8621 to download it and well enough, I received the setup file wlsetup-web.exe in my download folder.

So things are easy from here: double-click the exe and it will install. Not on Window 10 (which is great, by the way). I received an error message (in Dutch, so I won’t put a screen shot here) telling me that something had gone wrong.

The solution

As always Google is your friend. I found an article explaining what to do, I’ll give you the solution immediately instead of letting you wade through all the answers. It turns out that there is a version that will work, but it is hidden at http://windows.microsoft.com/en-us/windows/essentials.

The download at this location will work for Windows 10.

I hope this short post may help someone. If it helped you then please leave a comment.

Posted in Computers and Internet | Tagged , , | 1 Comment

How to obtain the value of the selected radio button

Here is a simple way to get the value for the selected button in an html form, using jquery:

<form>
<input type=”radio” name=”status” value=”1″ /> Free <br />
<input type=”radio” name=”status” value=”2″ selected /> Reserved <br />
<input type=”radio” name=”status” value=”3″ /> Not available <br />
</form>

 var x = $(‘input[name=status]:checked’).val();

x will now contain 2.

Posted in Development | Tagged , , | 4 Comments

Could not load file or assembly ‘System.Web.Http, Version=4.0.0.0, Culture=neutral, PublicKeyToken=31bf3856ad364e35’

When creating a new MVC5 application using VS2013 I got the following error:

Could not load file or assembly ‘System.Web.Http, Version=4.0.0.0, Culture=neutral, PublicKeyToken=31bf3856ad364e35’ or one of its dependencies. The located assembly’s manifest definition does not match the assembly reference. (Exception from HRESULT: 0x80131040)

I tried the following, to no avail:

  • Updated the MVC 5 package (Nuget)
  • Uninstalled / installed MVC5 (Nuget)
  • Reviewed, then removed binding redirects in the web.config
  • Repaired VS2013 installation
  • Installed VS2013.4

What did help was:

Install-Package Microsoft.AspNet.WebApi

After this my MVC5 Application was running flawless.

Posted in .Net, Development, MVC, MVC5, Web API | 2 Comments

“Object reference not set to an instance of an object” when building my cloud project

In my Azure project I have a worker role and a wcf role. When compiling it failed (with no obvious reason) with this message in the output window:

Error: Object reference not set to an instance of an object

There is no other reference as to where this error would originate from. So it has to come from the builder.

The “fishy” solution to this problem (in my case) was to unload the worker role project, rebuild, then load the worker project again and rebuild all again. Now it is working again.

This is a workaround that worked for me in this instance. I didn’t investigate the root cause of this problem. On StackOverflow there are some threads describing the same problem, so I suppose that there will shortly be updates to VS / Azure SDK to solve this problem.

http://stackoverflow.com/questions/19162614/object-reference-not-set-to-an-instance-of-an-object-when-building-my-cloud-pr

Posted in .Net, Azure, Development | Leave a comment

Managing IIS Express settings

Problem statement

For ease of use I had put a web application using IIS Express at port 80. This implies that later on using IIS (the real one) didn’t work anymore because it uses port 80 by default too.

So I started looking in VS2012 for a way to change IIS Express settings. This doesn’t seem to be possible, so here comes the way that I found.

Changing IIS Express settings

This is a bit tricky.

  1. Start an application in IIS Express (in Visual Studio).
  2. The IIS express icon will appear in the Notification Area (by default right of the taskbar)
  3. Right-click the icon > Show all applications
  4. Click on the site that you want to change (not on its URL, as this will open the web application in your browser). Below you find its path, and more importantly the location of its config file (URI).
  5. Click on the config file URI and you see the contents of it. Now you can change the settings. It *may* be a good idea to first take a backup of this file.
Posted in Geen categorie | Tagged , | Leave a comment